
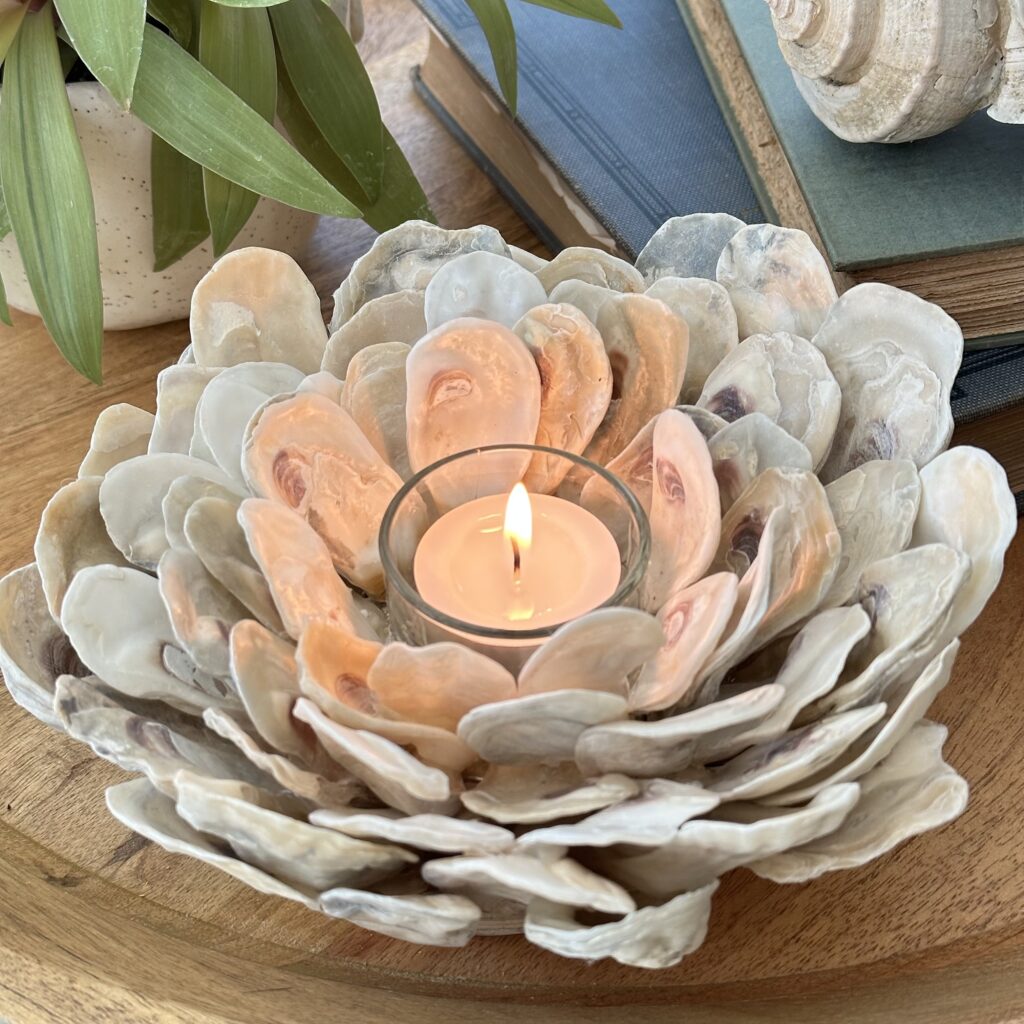
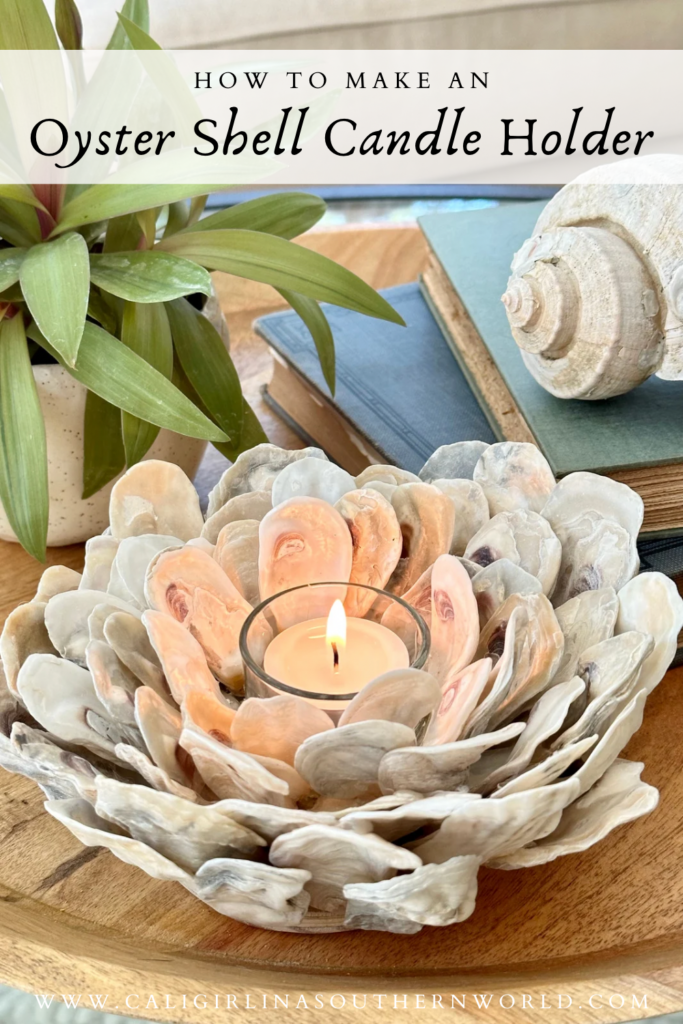
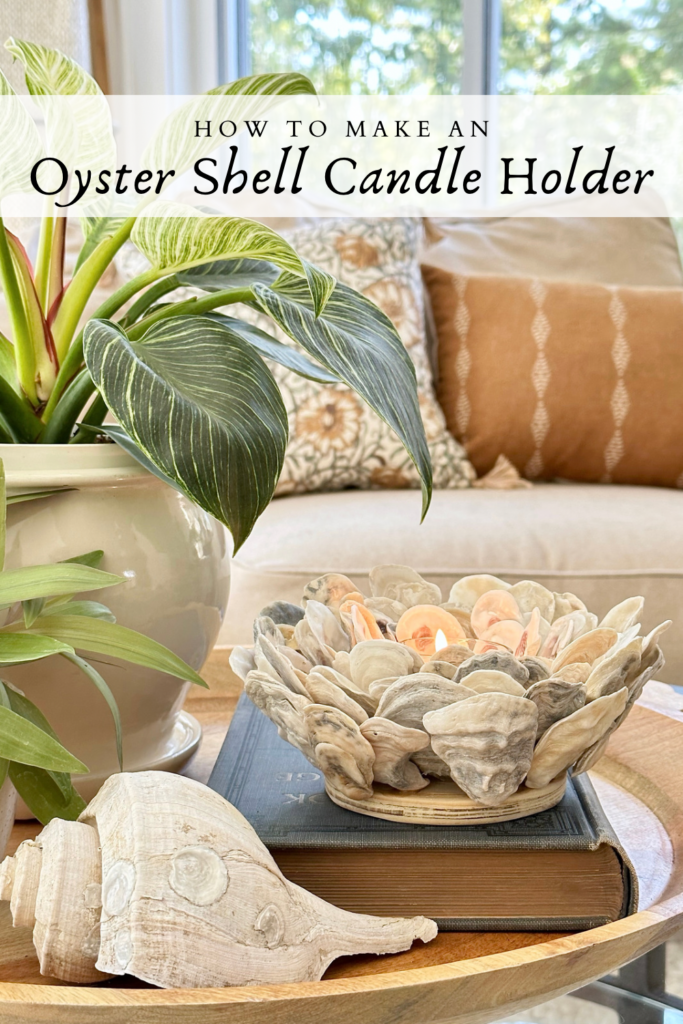
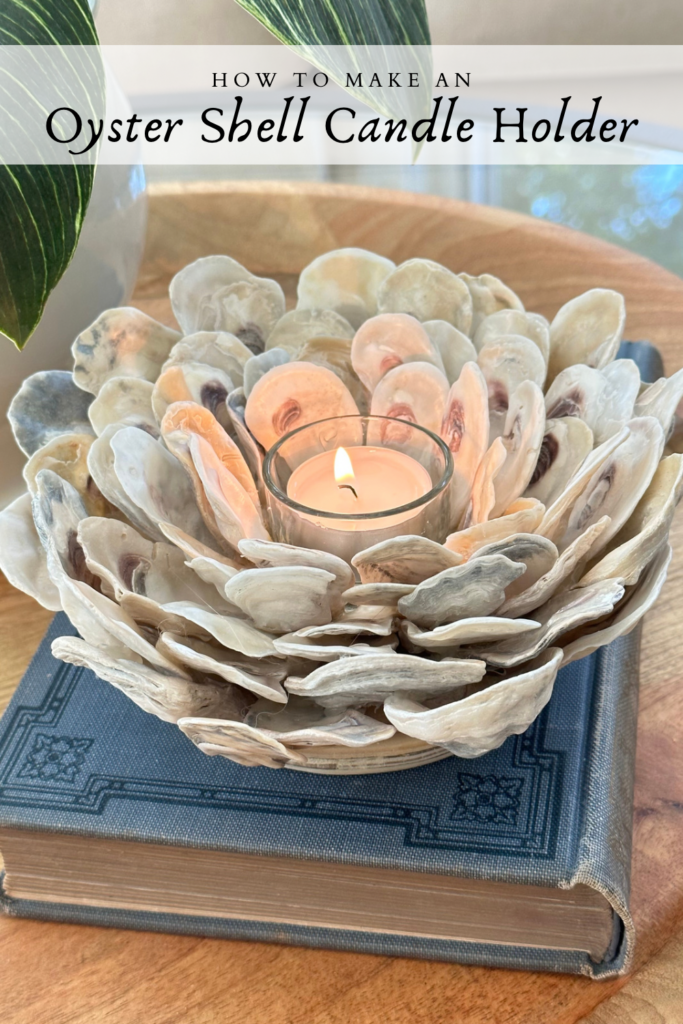
If you love collecting shells and you love DIYs, you’re going to love making an oyster shell candle holder for your home! This is such an easy project and it’s a beautiful way to add texture and a warm glow to any room. Oyster shell candle holders look beautiful on a table, a bookshelf, or displayed on a tray. This unique candle holder also makes an excellent gift for the coastal/beach lover in your life.
For the Love of Oysters
Living in coastal North Carolina, it’s virtually a prerequisite that you love oysters. They are abundant here. Not only do we enjoy eating them, but the shells are used for many things including (but not limited to):
- Gardening- to balance soil pH levels.
- Housing – to pave pathways and driveways and to make cement.
- Farming – to enrich chickens’ diets.
- Ecology – to restore damaged oyster reefs.
- Home decor DIYs and craft projects. (One of my favorite uses!)
Shelling by The Seashore
Every summer we spend a lot of time at the beach. Although I love a good summer read, listening to music, and playing in the waves, one of my favorite beach activities is shelling. I spend hours walking up and down the beach looking for unique and beautiful shells all summer long. The only person who might love shelling more than me is our daughter!
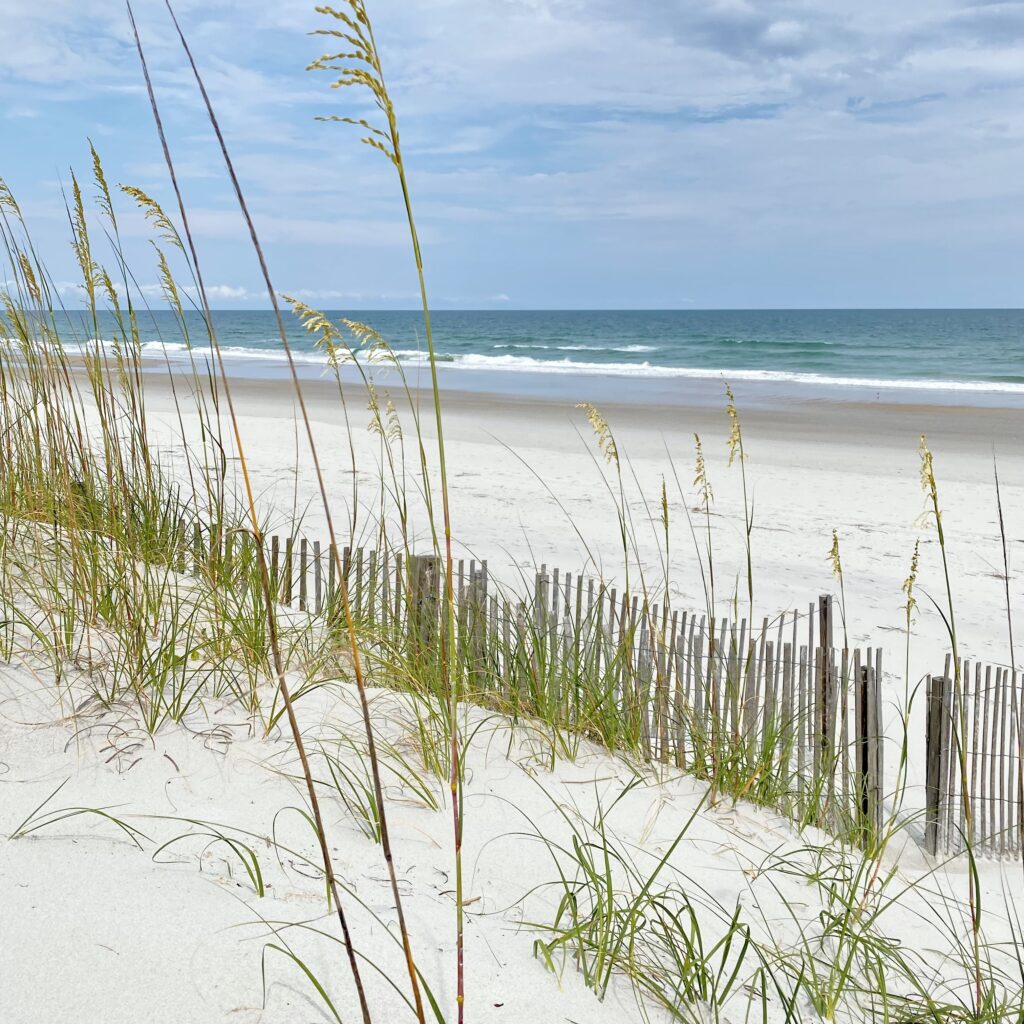
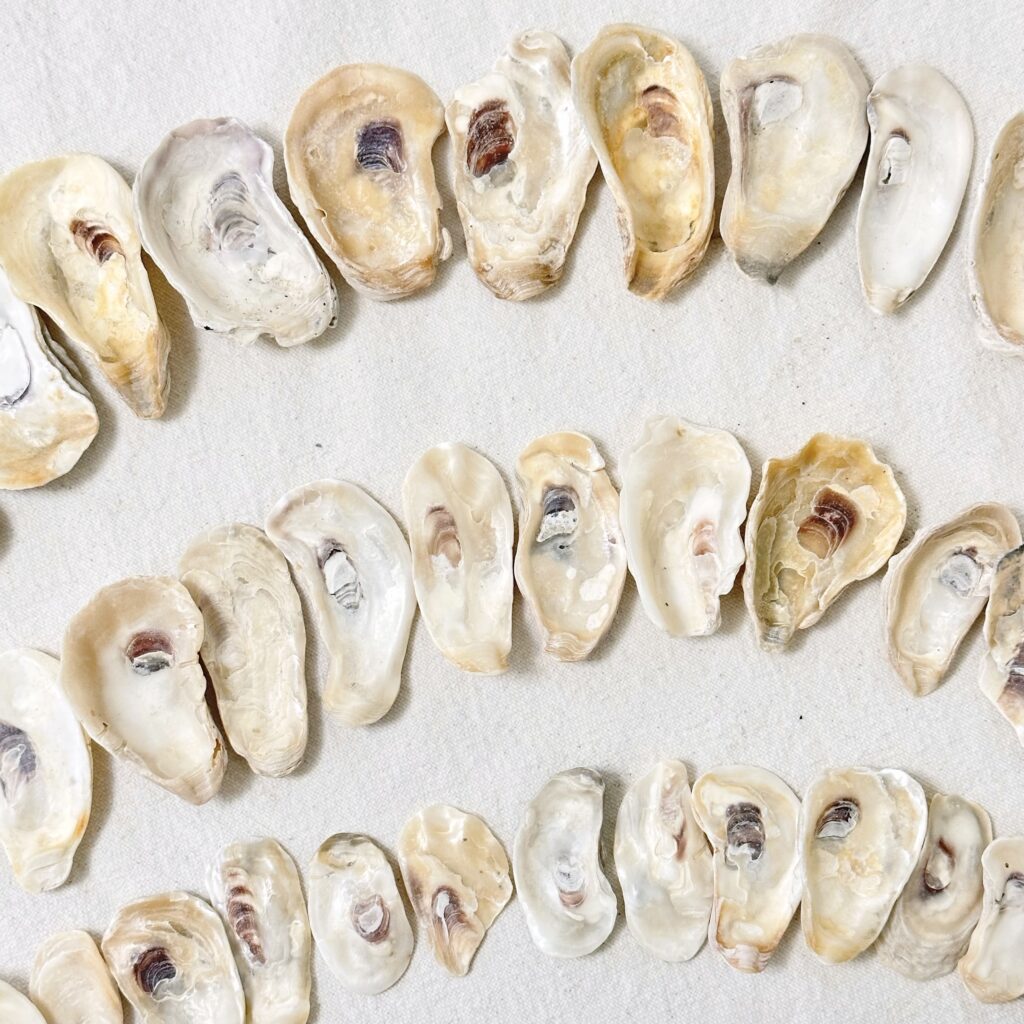
This past summer I was on a beach where oyster shells were abundant one day. What I loved about the oyster shells I was finding was that, unlike typical oyster shells that are sharp and rough (like the ones you find when you eat them), these oyster shells were smooth and soft. They had clearly been tossed around in the sand and waves for quite some time and I loved them.
As I was walking up and down the beach collecting these fabulous oyster shells, I was thinking about how I could use them… Then, I remembered seeing a lovely oyster shell candle holder in a local shop just weeks earlier. It was beautiful and looked almost like a lotus flower! I remember thinking it was a fantastic way to use oyster shells and it made gorgeous home decor.
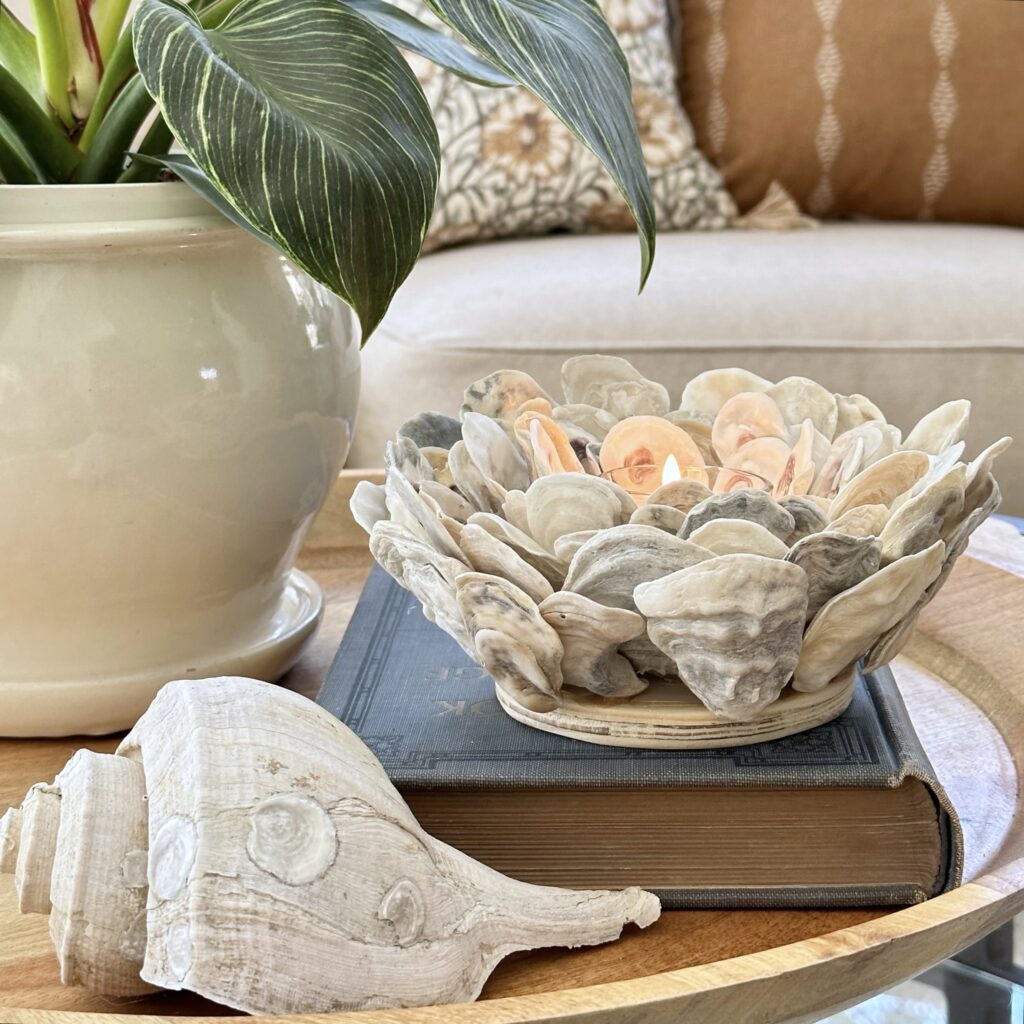
You know me! It was then that I decided I wanted to try to make my own oyster shell candle holder for a special room in the farmhouse. I love how it turned out! It was also very inexpensive and easy to make. I can’t wait to show you how you can make one for your home!
Materials to Make an Oyster Shell Candle Holder
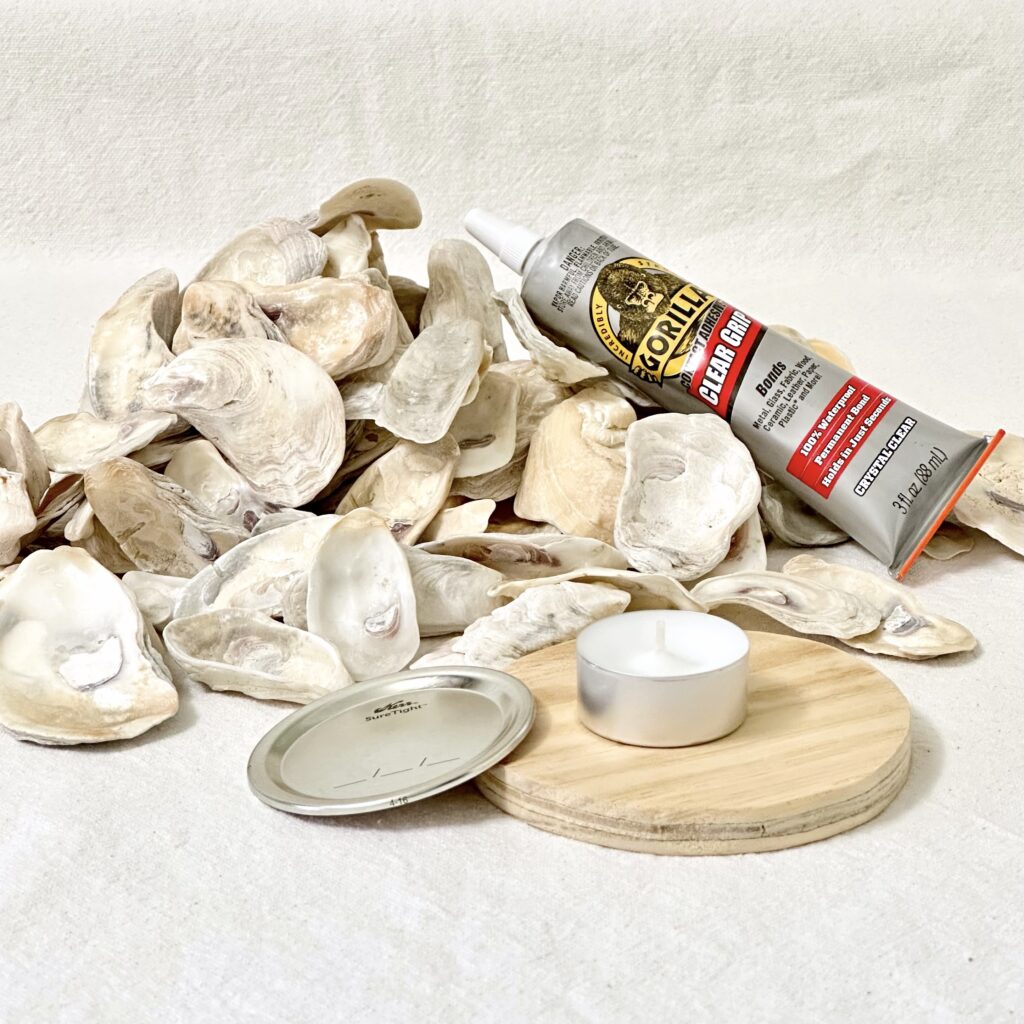
- Oyster shells
- Aluminum can or mason jar lid (I used a mason jar lid.)
- Flat, circular piece of wood, about 4-5 inches in diameter (My husband cut a 4” circle out of scrap plywood we had lying around.)
- Contact adhesive or hot glue
- Spray shellac or clear sealer (optional)
- Tea light
- Glass tea light holder (optional)
- Small shallow bowl (optional)
How to Make an Oyster Shell Candle Holder
Organize Oyster Shells
Separate the oyster shells into three groups: small, medium, and large.
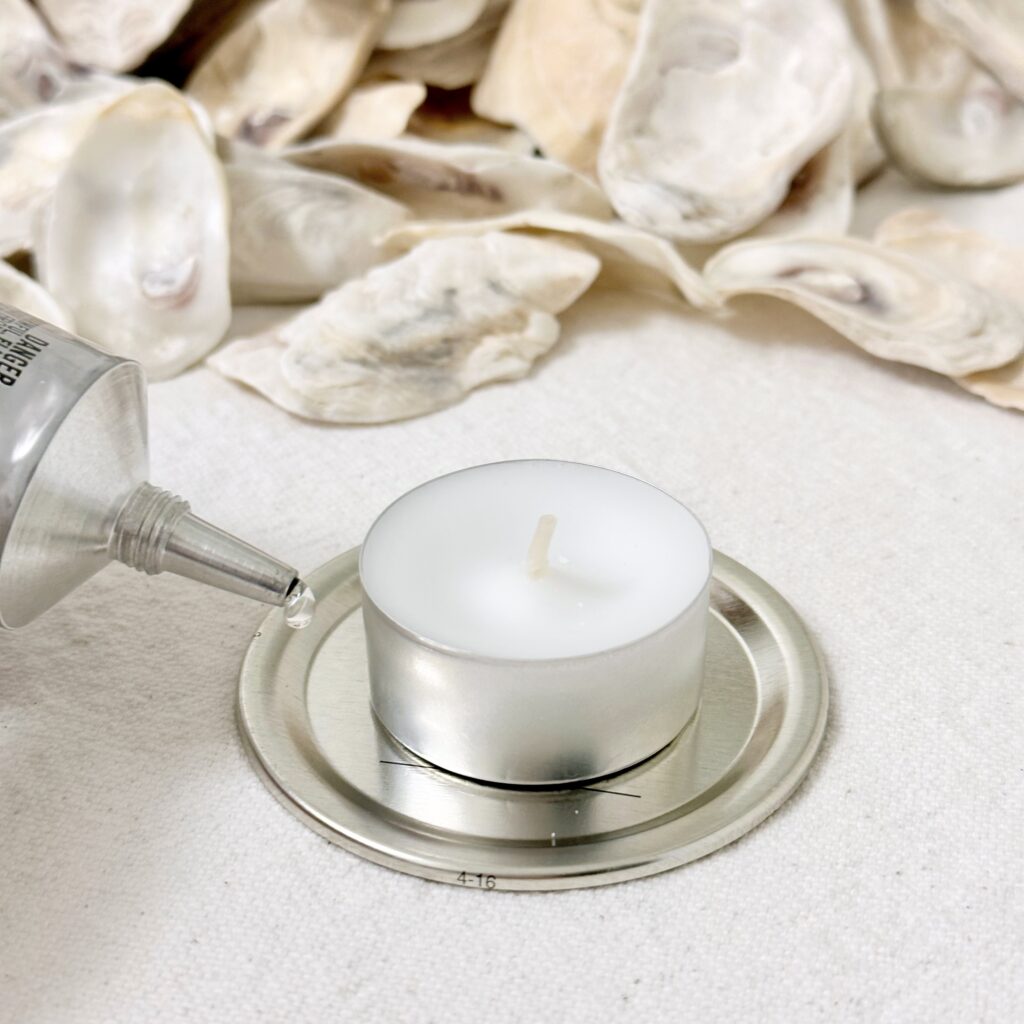
Apply Adhesive
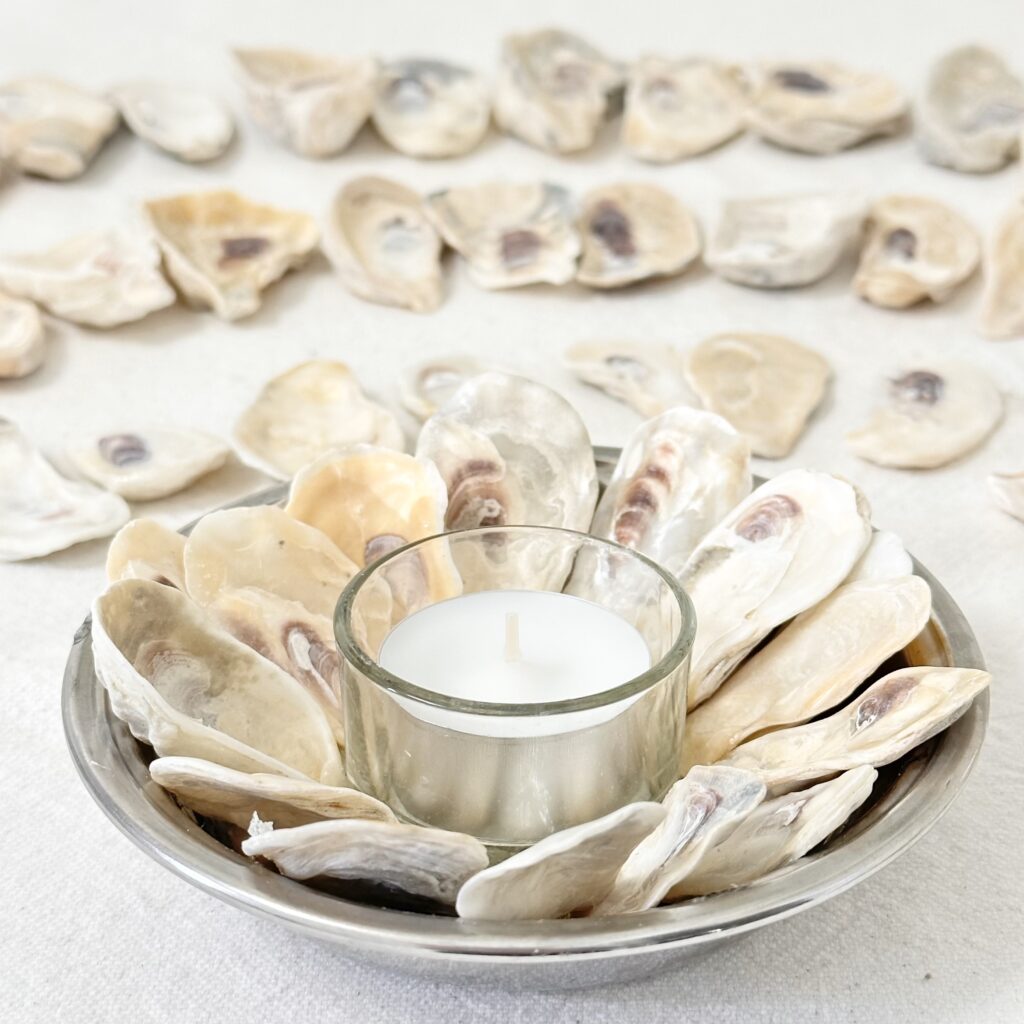
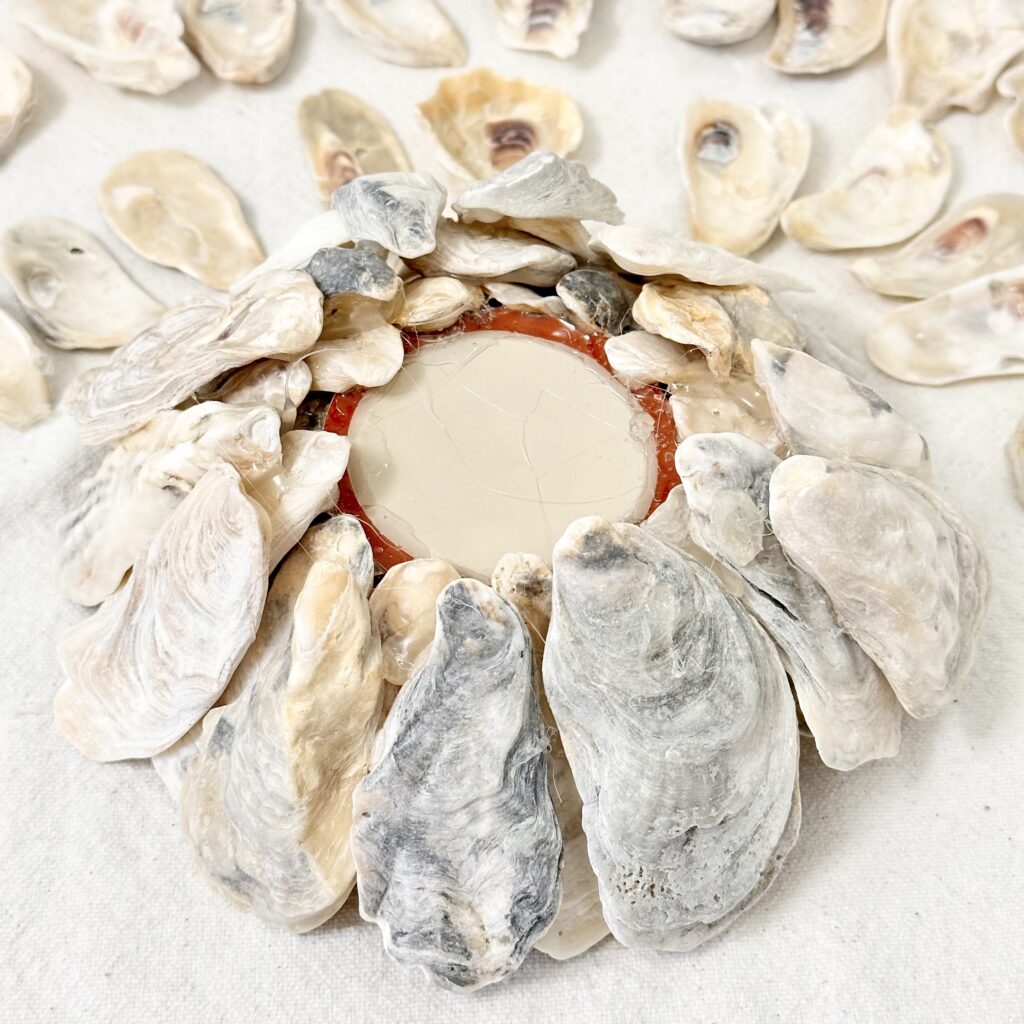
Place the votive candle in the center of the lid to make sure you leave space for it in the middle of the oyster shells. You can also glue an inexpensive glass tea light holder to the middle of the lid for a more elegant and finished look.
Attach Small Oyster Shells
Apply clear contact adhesive around the edge of the lid. Then begin to stick the smaller oyster shells into the glue. Line/layer them around the lid. (Placing the lid small shallow bowl may be helpful to hold the oyster shells in place while the adhesive dries… I used an old metal cat food dish.)
Allow the adhesive to dry completely before starting the next row of oyster shells.
Flip and Apply More Adhesive
Next, flip the lid upside down. The lid with now be resting on the small oyster shells. Begin applying the adhesive around the edge of the lid.

Attach Medium Size Oyster Shells
Place the medium-sized oyster shells in the adhesive all around the edge. Allow the adhesive to dry completely before moving on to the next layer of oyster shells.
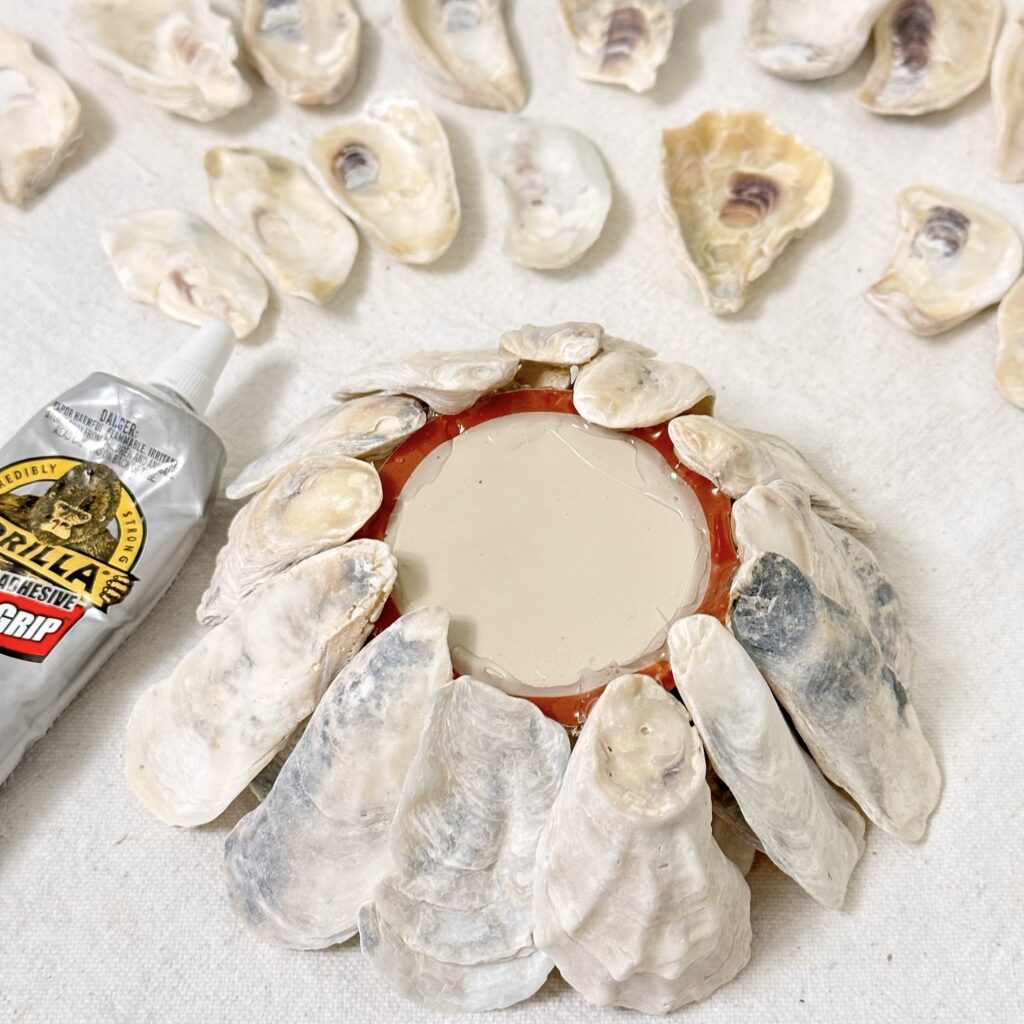
Continue to Attach Large Oyster Shells
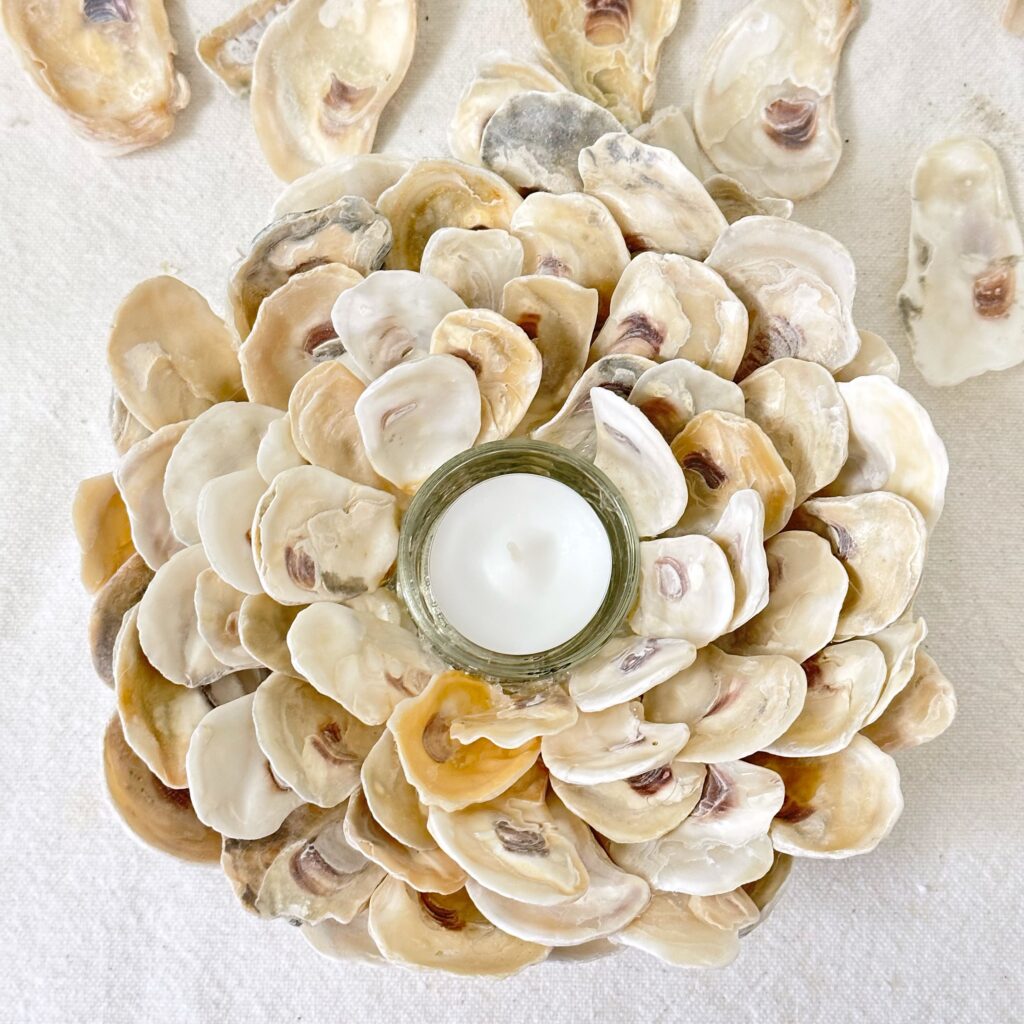
Continue to add adhesive and oyster shells until the desired fullness and layers of shells are reached or until the shells run out. Remember to work in order of size. Attach the shells from small to large. The last layer of oyster shells should be the largest ones.
Helpful hints:
- I found that attaching the multiple layers of larger oyster shells was easier using a hot glue gun. In the end, I probably could have used it from the start.
- Be sure to look at the candle holder at eye level as you near the end of gluing to ensure that the last layer of shells (on the outside) meets the top of your surface. This will ensure an aesthetically pleasing view of it from all sides when it’s displayed.

Flip and Fill Gaps
When all the oyster shells have been attached and the adhesive has completely dried, turn your candle holder over. If you have extra shells, you can look for open spots you may have missed and fill them in using a dab of adhesive.
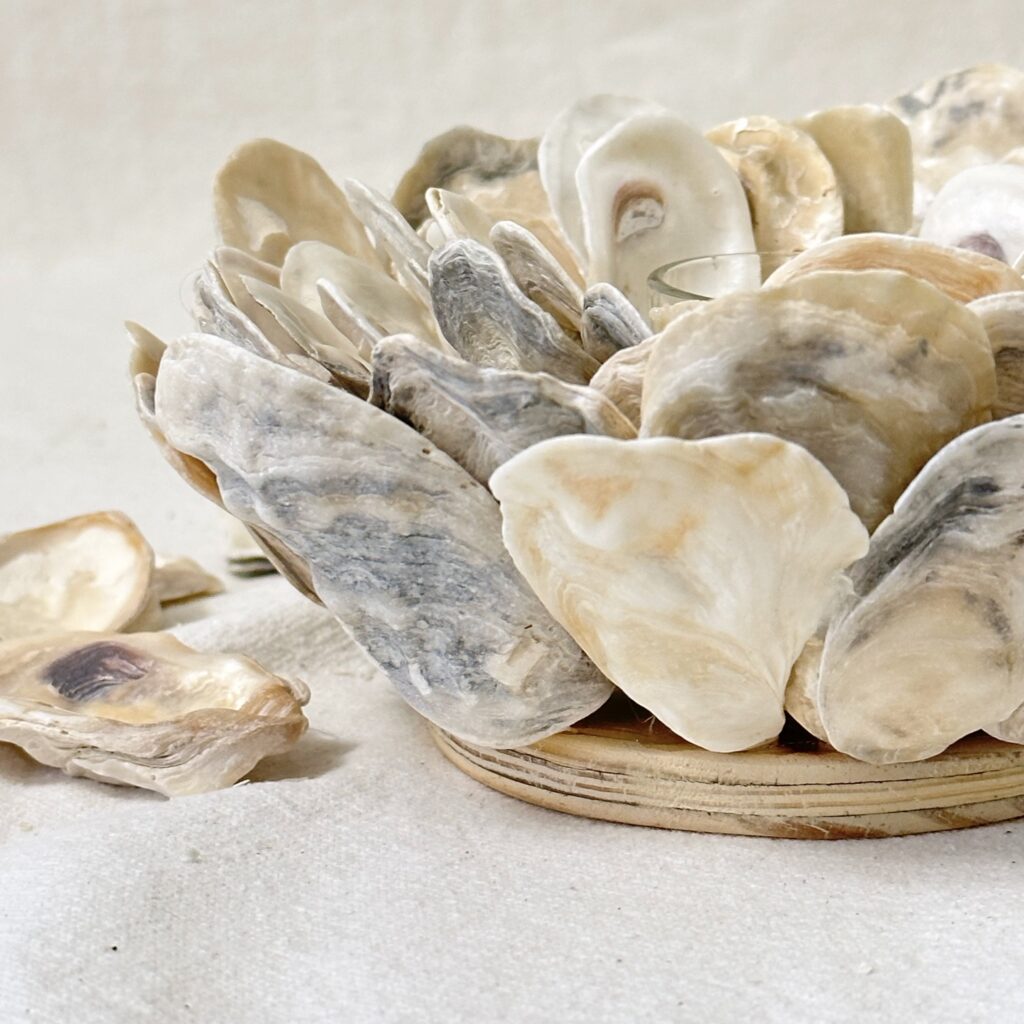
Attach the Wood Base
Once all the oyster shells are attached and the adhesive is completely dry, attach the wood base to the bottom using adhesive. This provides a flat surface for the candle holder allowing it to rest straight on any surface.
Seal the Candle Holder (Optional) and Enjoy
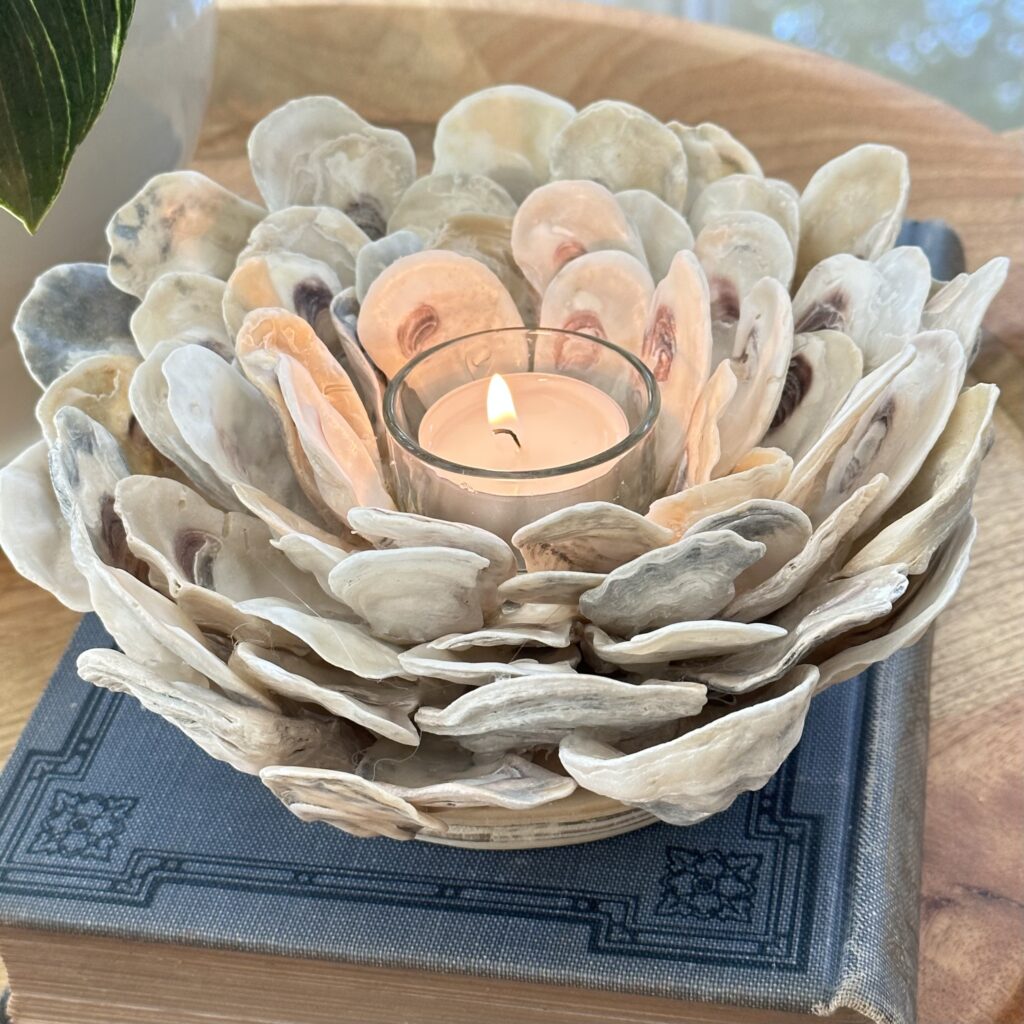
One final (optional) step once the candle holder is complete is to seal the candle holder with spray shellac. Shellac adds a clear coat to the shells for protection and makes them look glossy. It brings out the unique colors in the oyster shells and adds a lovely finishing touch to the oyster shell candle holder. Should you prefer a more natural look, don’t seal the candle holder. Both styles are very pretty! I chose not to shellac mine.
Now it’s time to find a special spot in your home for your beautiful oyster shell candle holder. Add a tea candle, light it, and enjoy!
Preserving Memories
Making an oyster shell candle holder for your home is a beautiful way to remember the wonderful time you spent shelling on the beach. I’ve also seen candle holders made with scallop shells. Whether the shells used are from a special vacation, a unique beach you visited, or just a favorite local beach, this candle holder is a lovely way to preserve the memories that were made.
I hope you enjoy making an oyster shell candle holder as much as I enjoyed making mine. It was a true pleasure to show you how to make this inexpensive and beautiful piece of home decor. Keep yours to display in your home or give to a coastal-loving friend or family member as a gift. They will love it!
If you love candles as much as I do and you love DIYs, you might also enjoy these projects:
Easy DIY Jack O’Lantern Vase and Candle Holders
Frosted Glass Winter Candle Holders
DIY Mercury Glass Candle Holders
For more farmhouse inspiration, easy DIYs and crafts, delicious recipes, and home decor tips and styling ideas follow me on Pinterest and Instagram. I can’t wait to see you there!
Want to stay up to date with me and all my latest projects?! Subscribe here to my blog. I look forward to connecting with you!


Great, simple instructions, and so pretty!
I have a large collection and am definitely
going to try this. Thanks for the info
Thank you for the kind compliments, Jean! I’m happy you like the idea and plan to try it with some of the shells from your collection. Have fun! It is my pleasure to share with you here.
I am in the process of making one of these and I cannot get it level! I added 3 layers of shells, let it dry overnight, and when I flipped it over it was listing. Any tips for me? Thanks!!
Hmmm… It’s hard to say when I’m not sure how unlevel it is. If it’s significant, you could add a smaller oyster shell on the bottom. Or, I might suggest using a small felt pad (like the ones used under coasters) to help it stay level.
I love this idea. The instructions were perfect. Thanks