
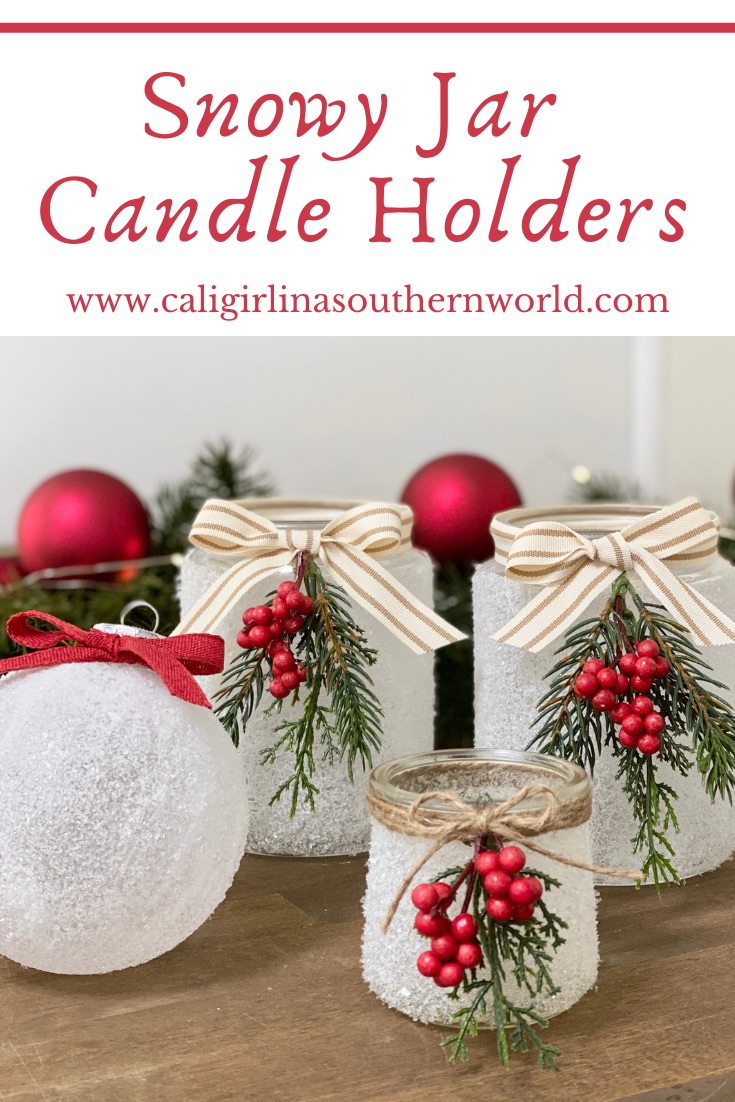
Easy, beautiful, and festive. These snowy jar candle holders are a lovely way to decorate your home for the holidays. They are the perfect DIY this season. If you love learning through video, you might enjoy watching the video Pin I created on Pinterest for this project.
This post contains some affiliate links for your convenience. Click here to read my full disclosure policy. As always, thank you for supporting my blog.
So Much to Love About Snow
Growing up in California, I didn’t see a lot of snow. It was about a two-hour drive to the mountains from where we lived on the coast. Therefore, each winter we made at least one trip to the mountains annually. It was always such a treat.
Back then, I would imagine how wonderful it would be to wake up in your own bed, look out the window, and see gentle snow falling in the yard. When we moved to North Carolina, my dream came true. We’ve had snow three times in six years here on the farm. The beauty of snow here in coastal North Carolina is that it’s just enough to stick around for a couple of days, give the kids days off of school to play in it, and then it’s gone. For this Cali Girl, it’s perfect!
My whole life, I’ve always been in awe of snow’s beauty. It exudes such a sense of stillness and peace. This year, I decided I wanted to bring the beauty of snow from outside into the farmhouse.
Bring the Beauty of Snow From the Outside, In
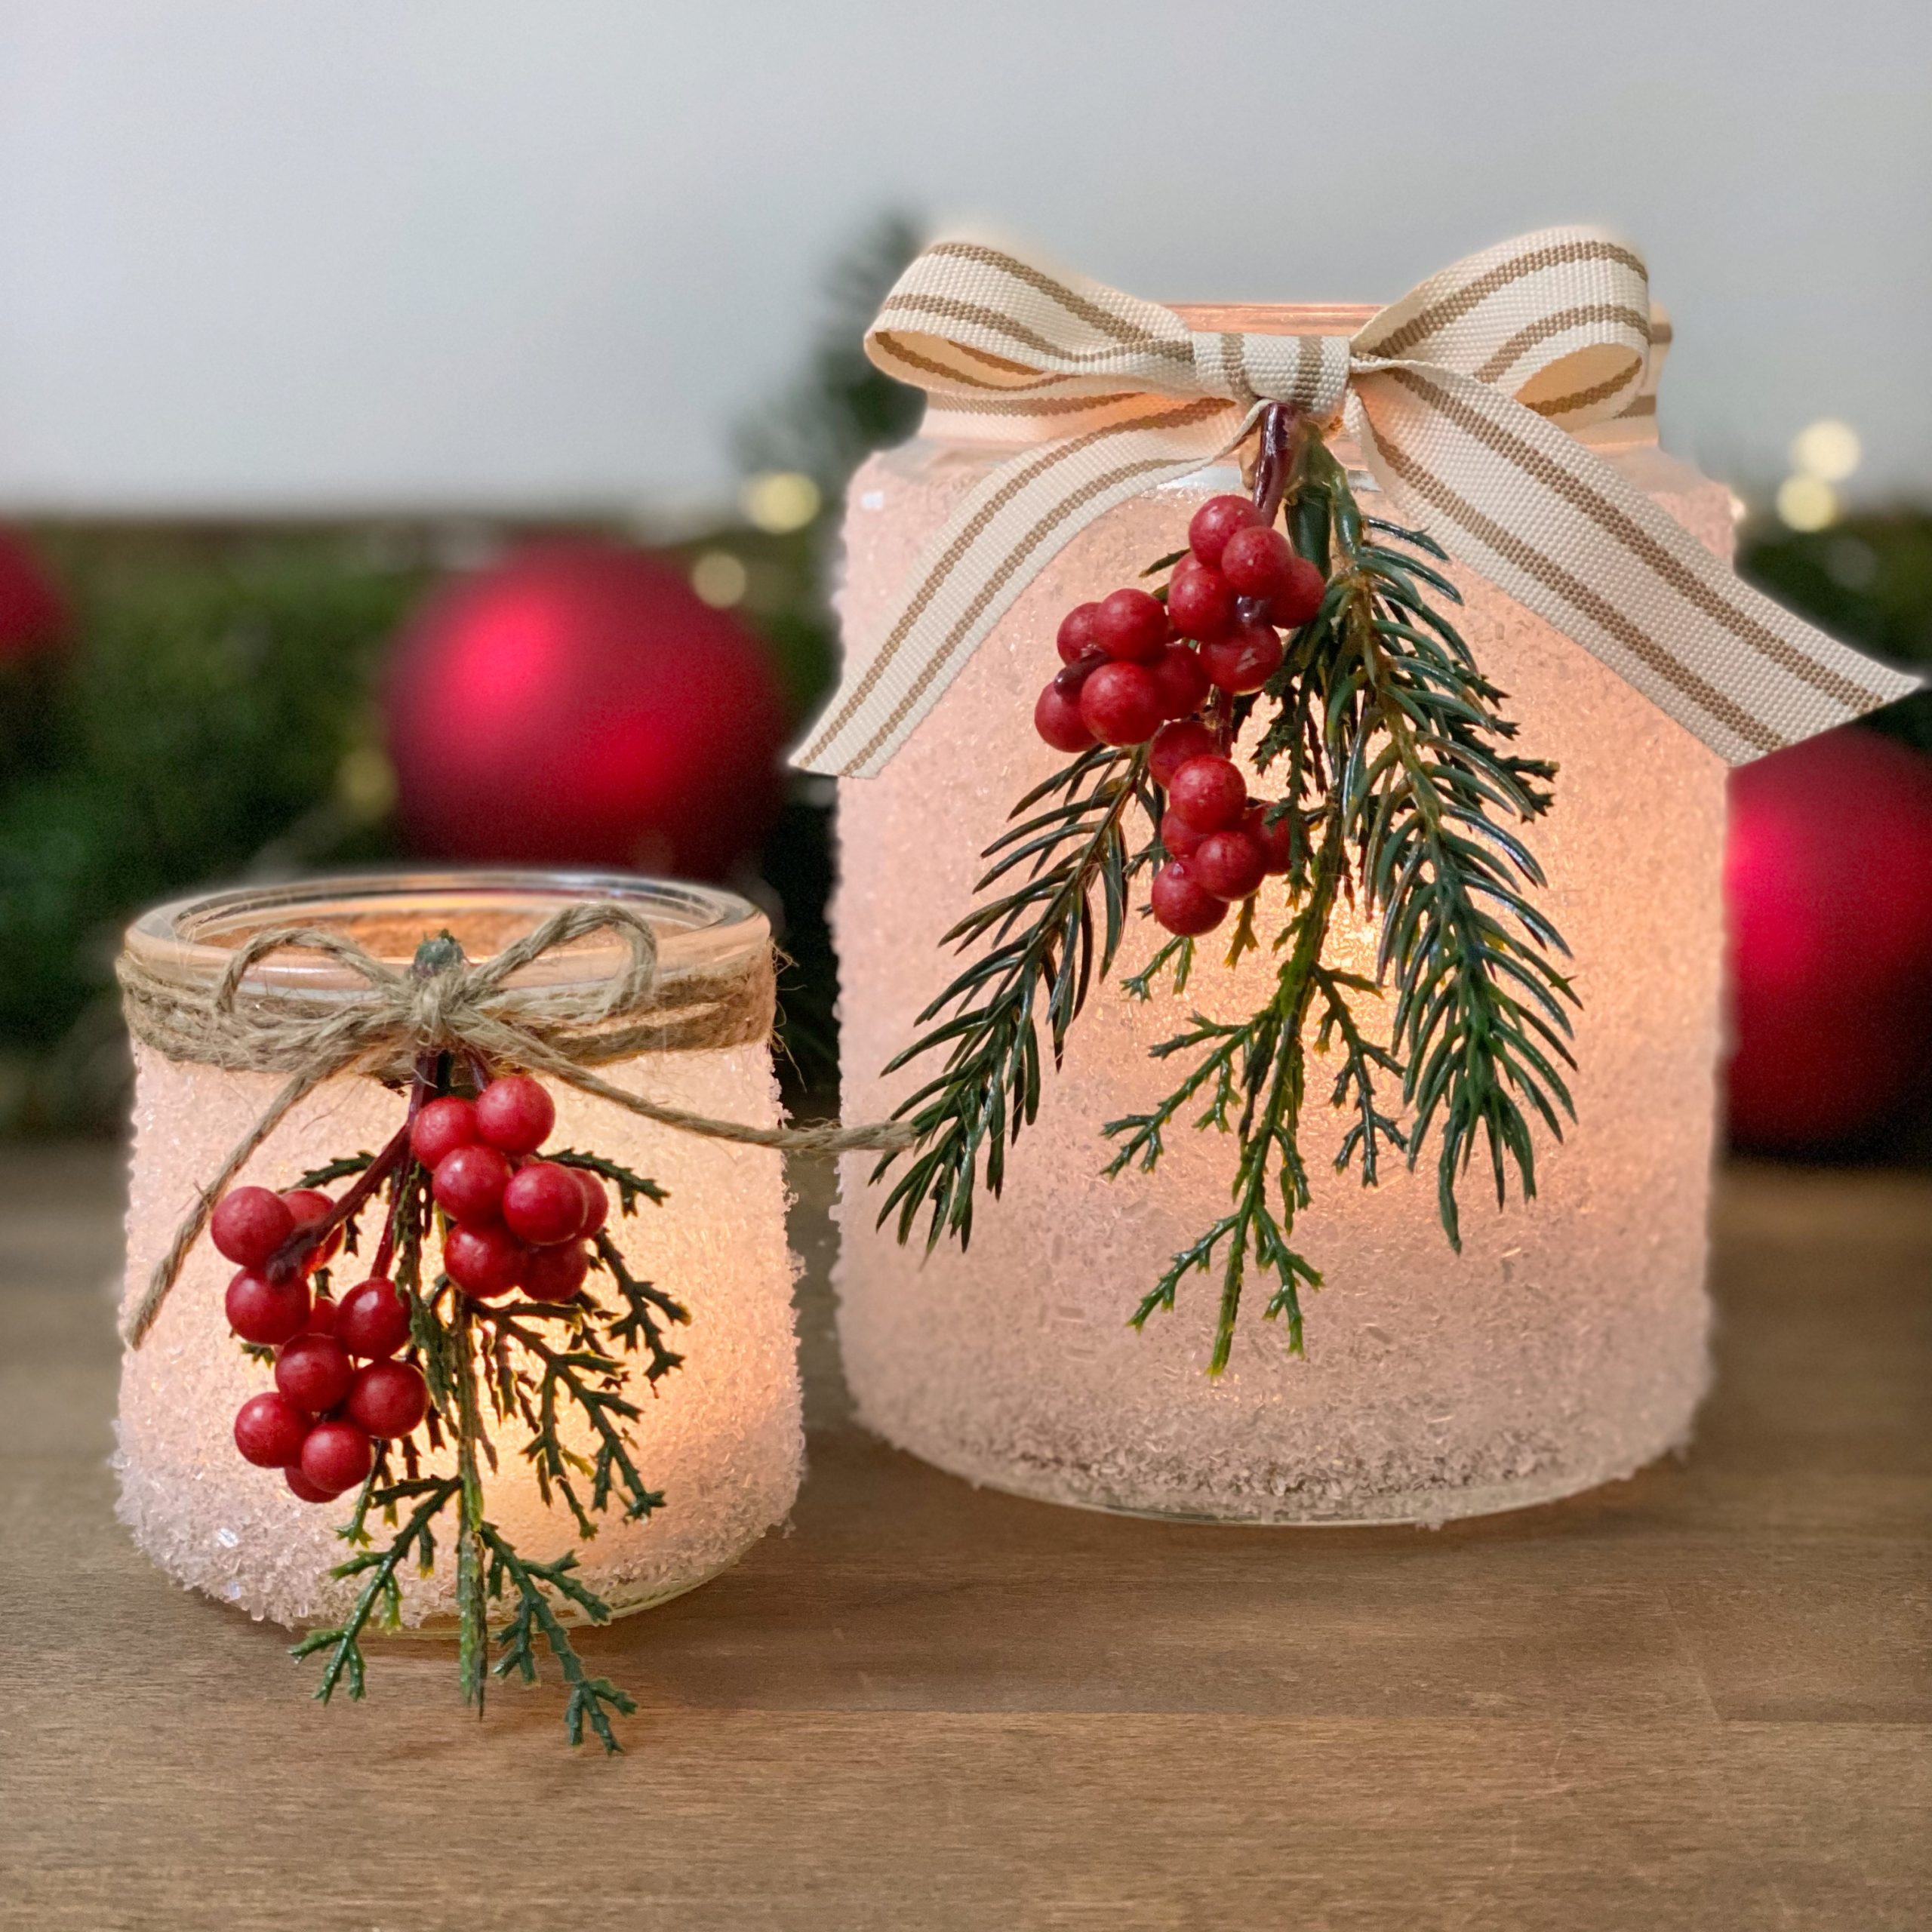
Snow is such a lovely part of the holiday season. When it falls it creates the most majestic sense of peace and quiet. There is nothing more beautiful than the image of snow blanketing the landscape. With snow on the ground there comes an overwhelming sense of wanting to make things cozy inside. Blankets, fires in the fireplace, and candlelight are just a few ways to make the home feel warm and cozy. The beauty of the snow and wanting to create a cozy feeling inside the farmhouse inspired me to upcycle some of the glass jars that I had diligently collected over the years. I decided to make them into snowy jar candle holders.
Snowy Jar Candles Holders: The Perfect Upcycling Project
Upcycling projects are some of my favorite types of DIYs. Last holiday season I created a lampshade Christmas tree. It was such a fun way to use old and/or broken lampshades that had lost their purpose and were just sitting up in the attic. This year that project was featured in Country Sampler Farmhouse Style Christmas magazine. It was such a treat to see my name in print and a true honor to see my DIY lampshade Christmas tree featured in a magazine.
This holiday season I was inspired to do another upcycling project. After spending a day organizing the kitchen cabinets I realized that I may have a problem. Apparently, glass jars come into the farmhouse and it turns out, they never leave. I love to save all jars, jelly jars, pickle jars, honey jars, yogurt jars, and more.

As I was going through the kitchen cabinets and pantry, I started pulling out all the glass jars I found. I put them on the kitchen island. The next thing I knew, the island was almost completely covered in jars. It was then that I realized I needed to find something to do with some of them.
Pinterest to the rescue!
Supplies to Make Snowy Jar Candle Holders
These beautiful snowy jar candle holders can be made with just a few simple and inexpensive items. Here is what you need:
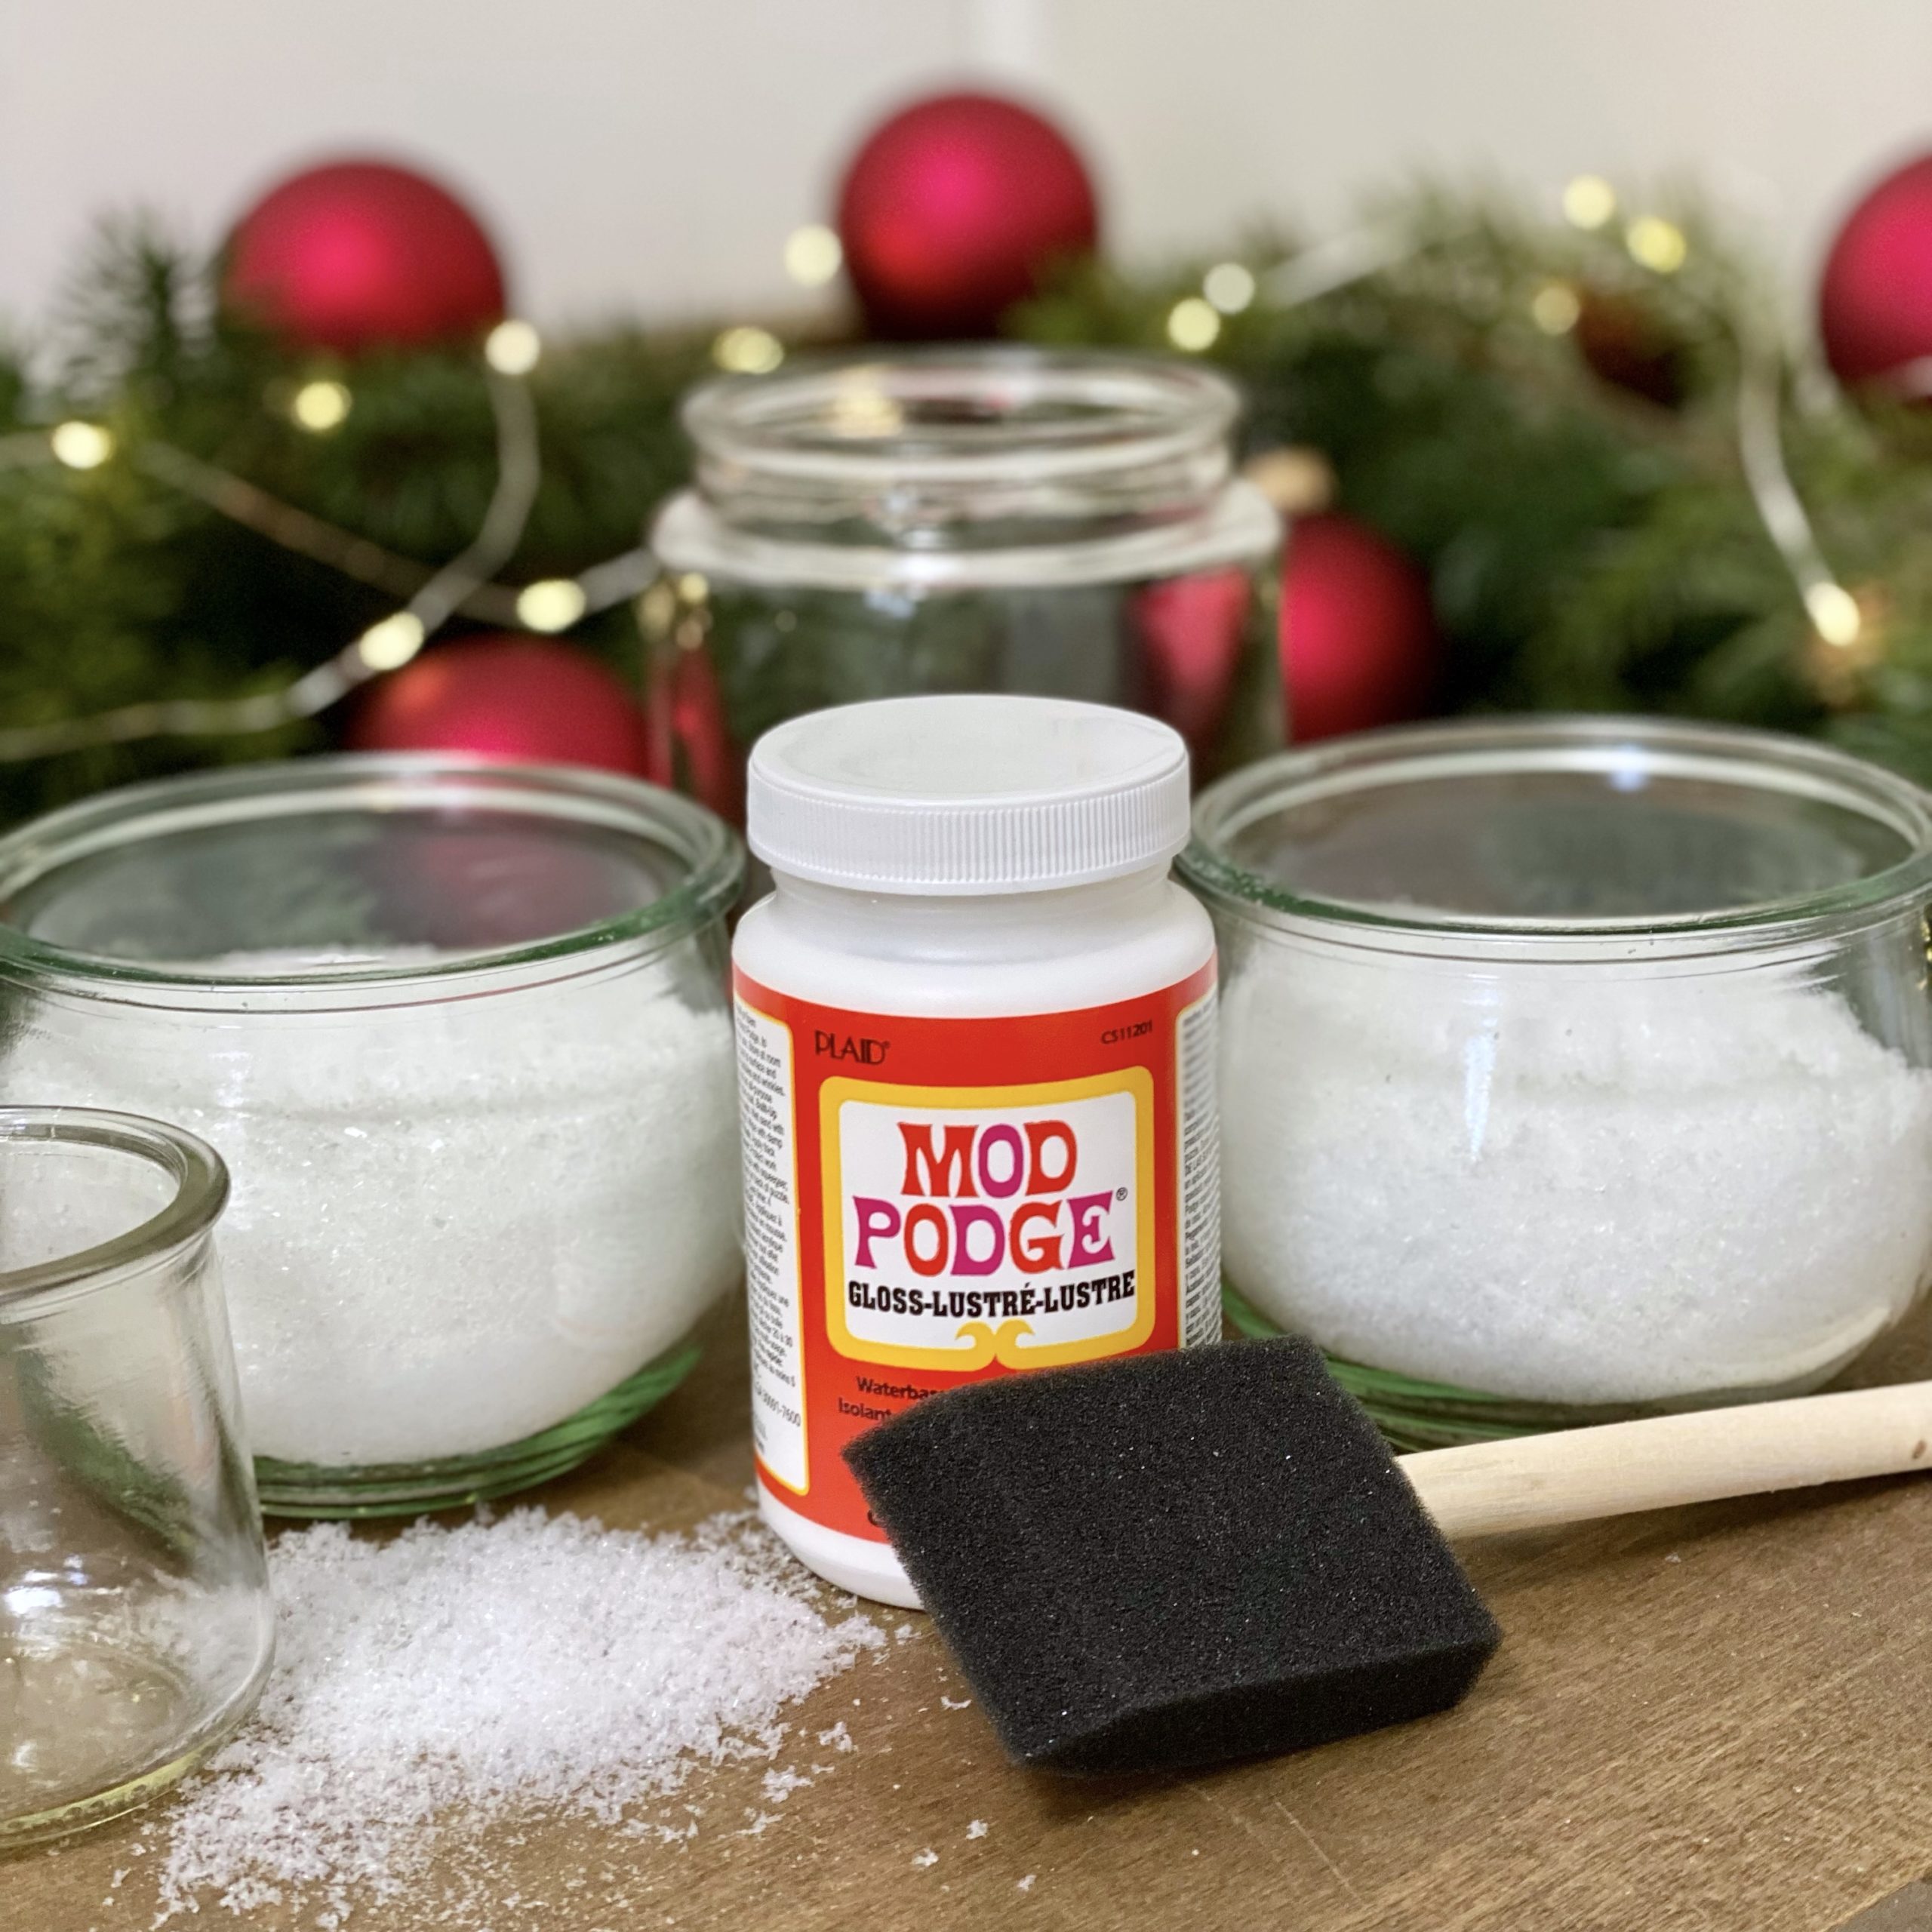
- Glass jars (new or old)
- Mod Podge
- Paintbrush
- Epsom salt
- Faux snow
- Ribbon or twine
- Seasonal faux greens, berries, or florals
- Candles (tea lights, votives, etc.)
- Scissors
- Hot glue
How to Make Snowy Jar Candle Holders
Making snowy jar candle holders is so easy (and fun)! First, gather all the supplies.
Make the snow
In a shallow bowl, combine the faux snow and Epsom salt. You can combine equal parts of each or you can use more of one than the other. Using more faux snow will make the jar look more “frosted.” Using more Epsom salt will make the jar look more sparkly because the light reflects off the salt crystals.
Apply the Mod Podge
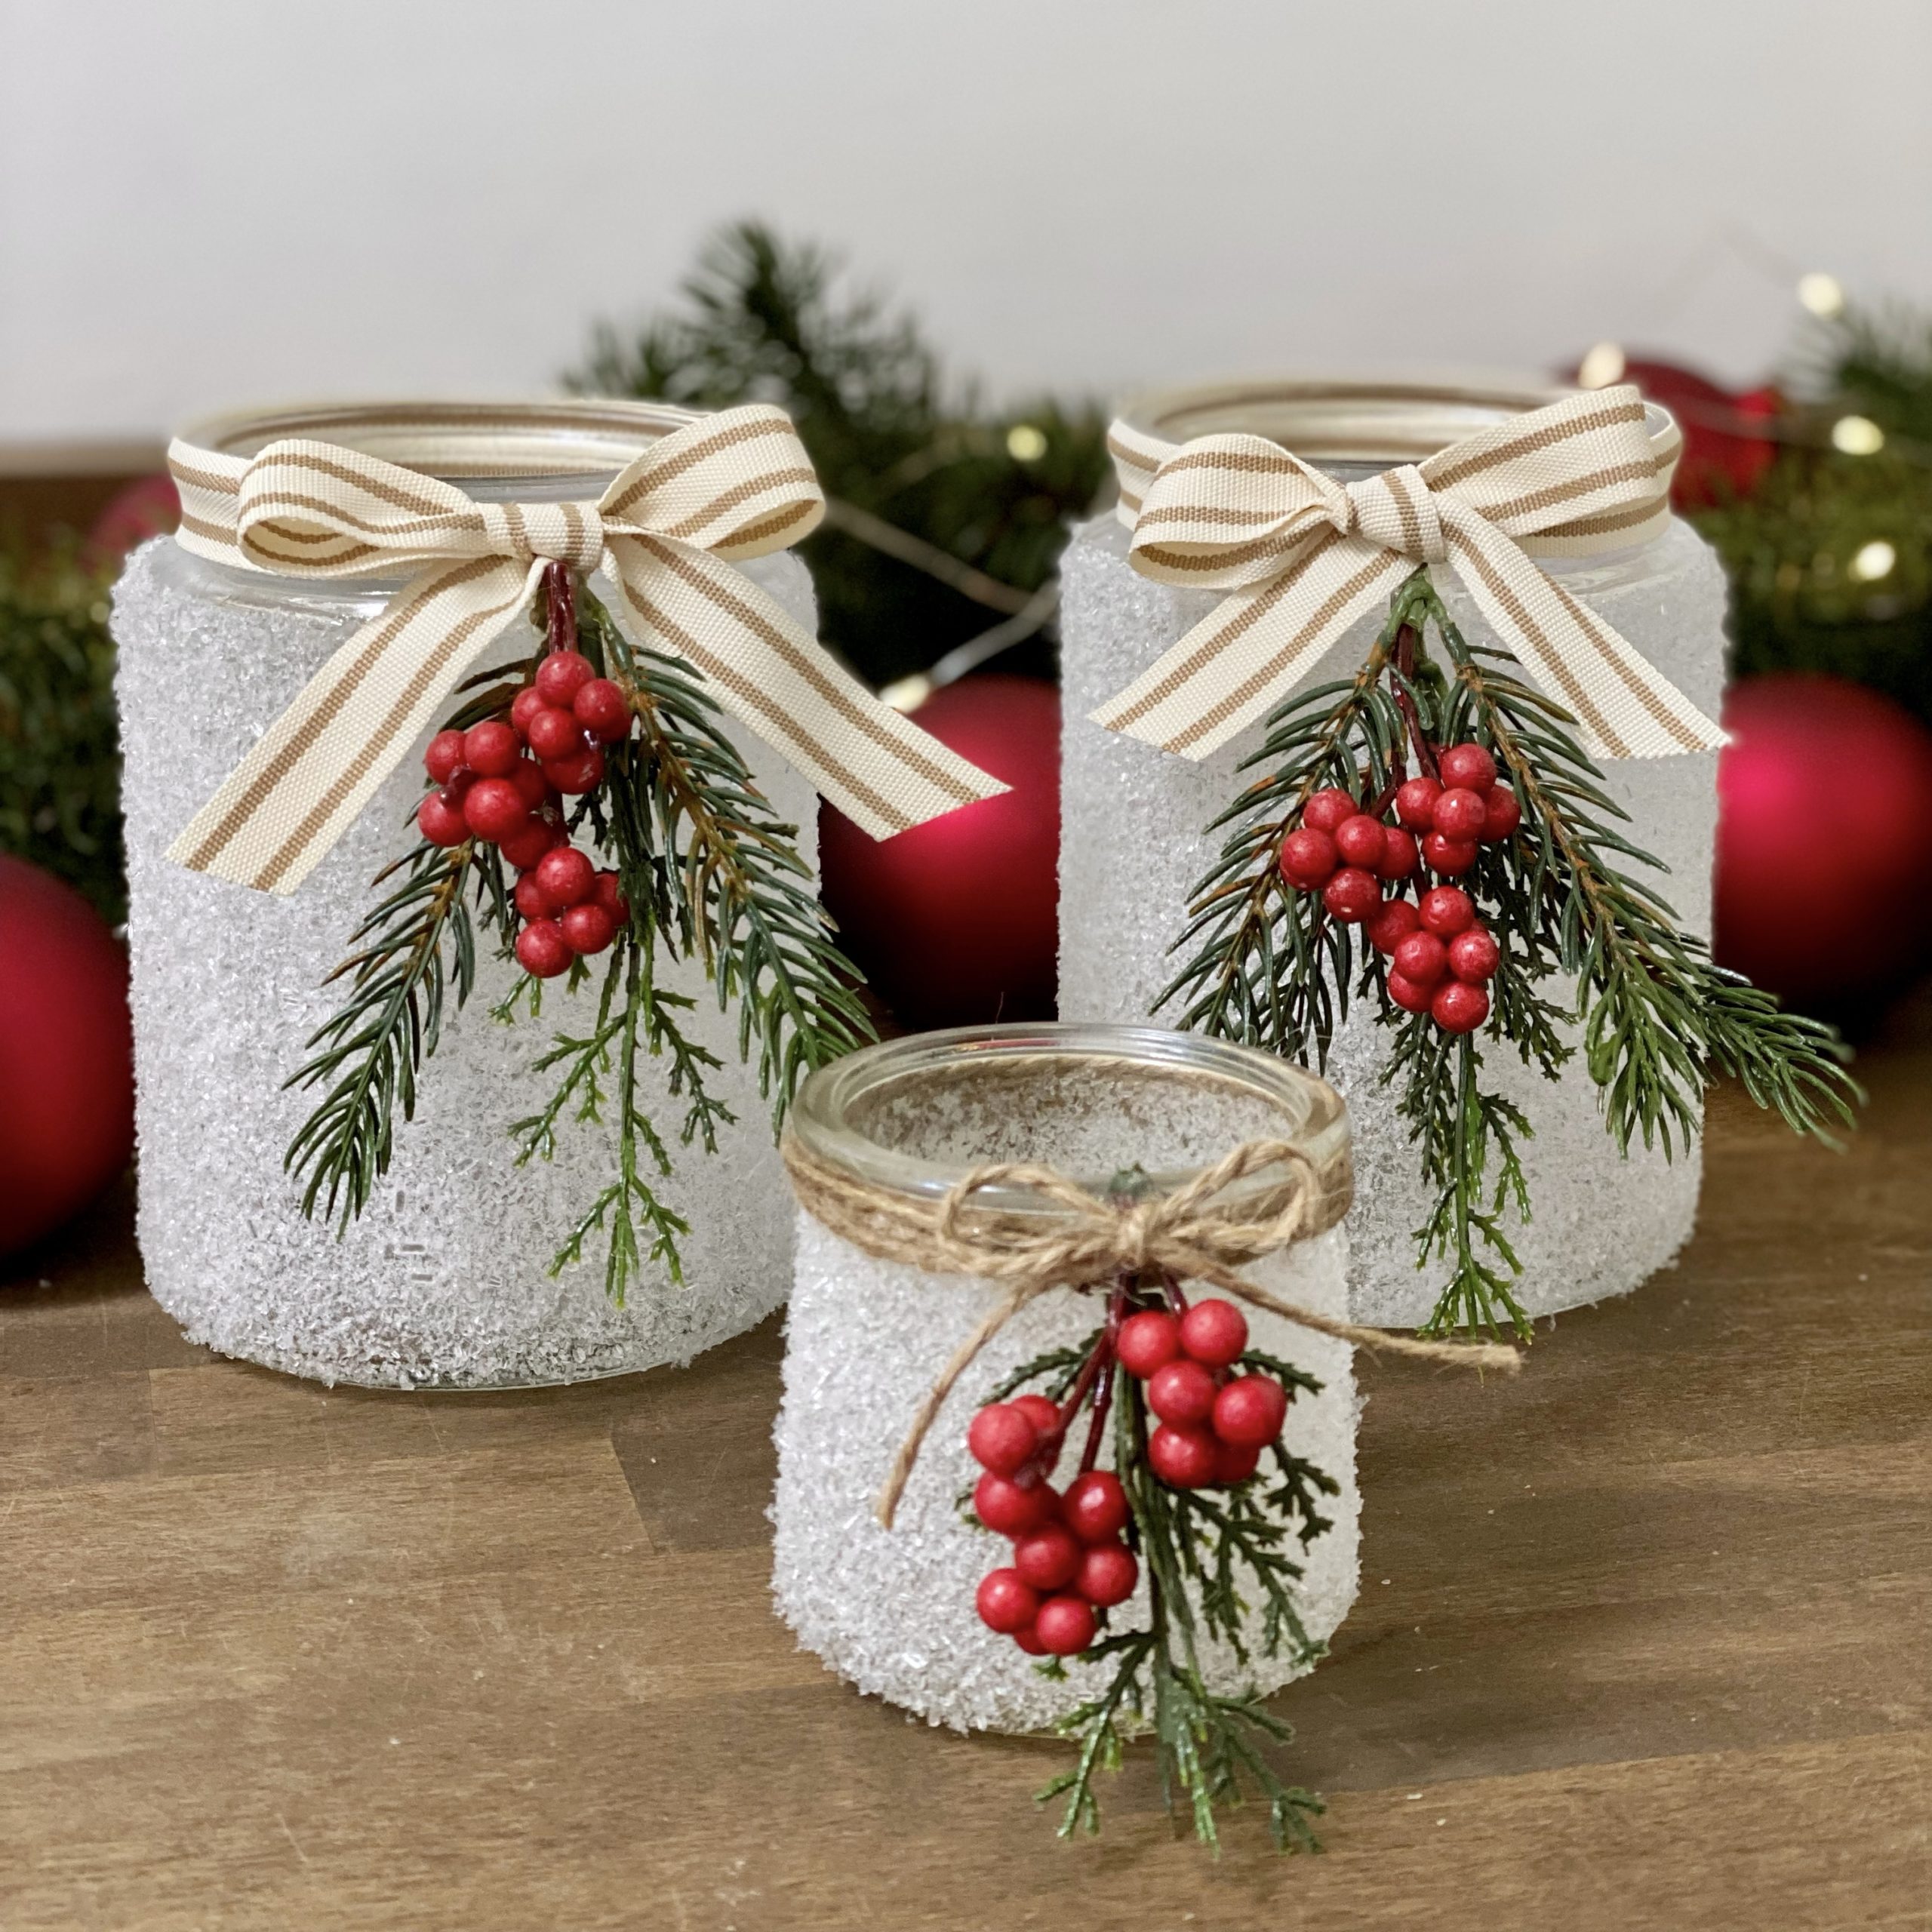
Then, with a paintbrush, apply the Mod Podge onto the outside of the jar. It should be applied in an even layer. There is no need to apply the Mod Podge to the bottom of the jar. If you want the entire jar to be snowy, apply the Mod Podge all the way up to the rim. I left the rim clear, making it easier to decorate with ribbon, greens, and berries.
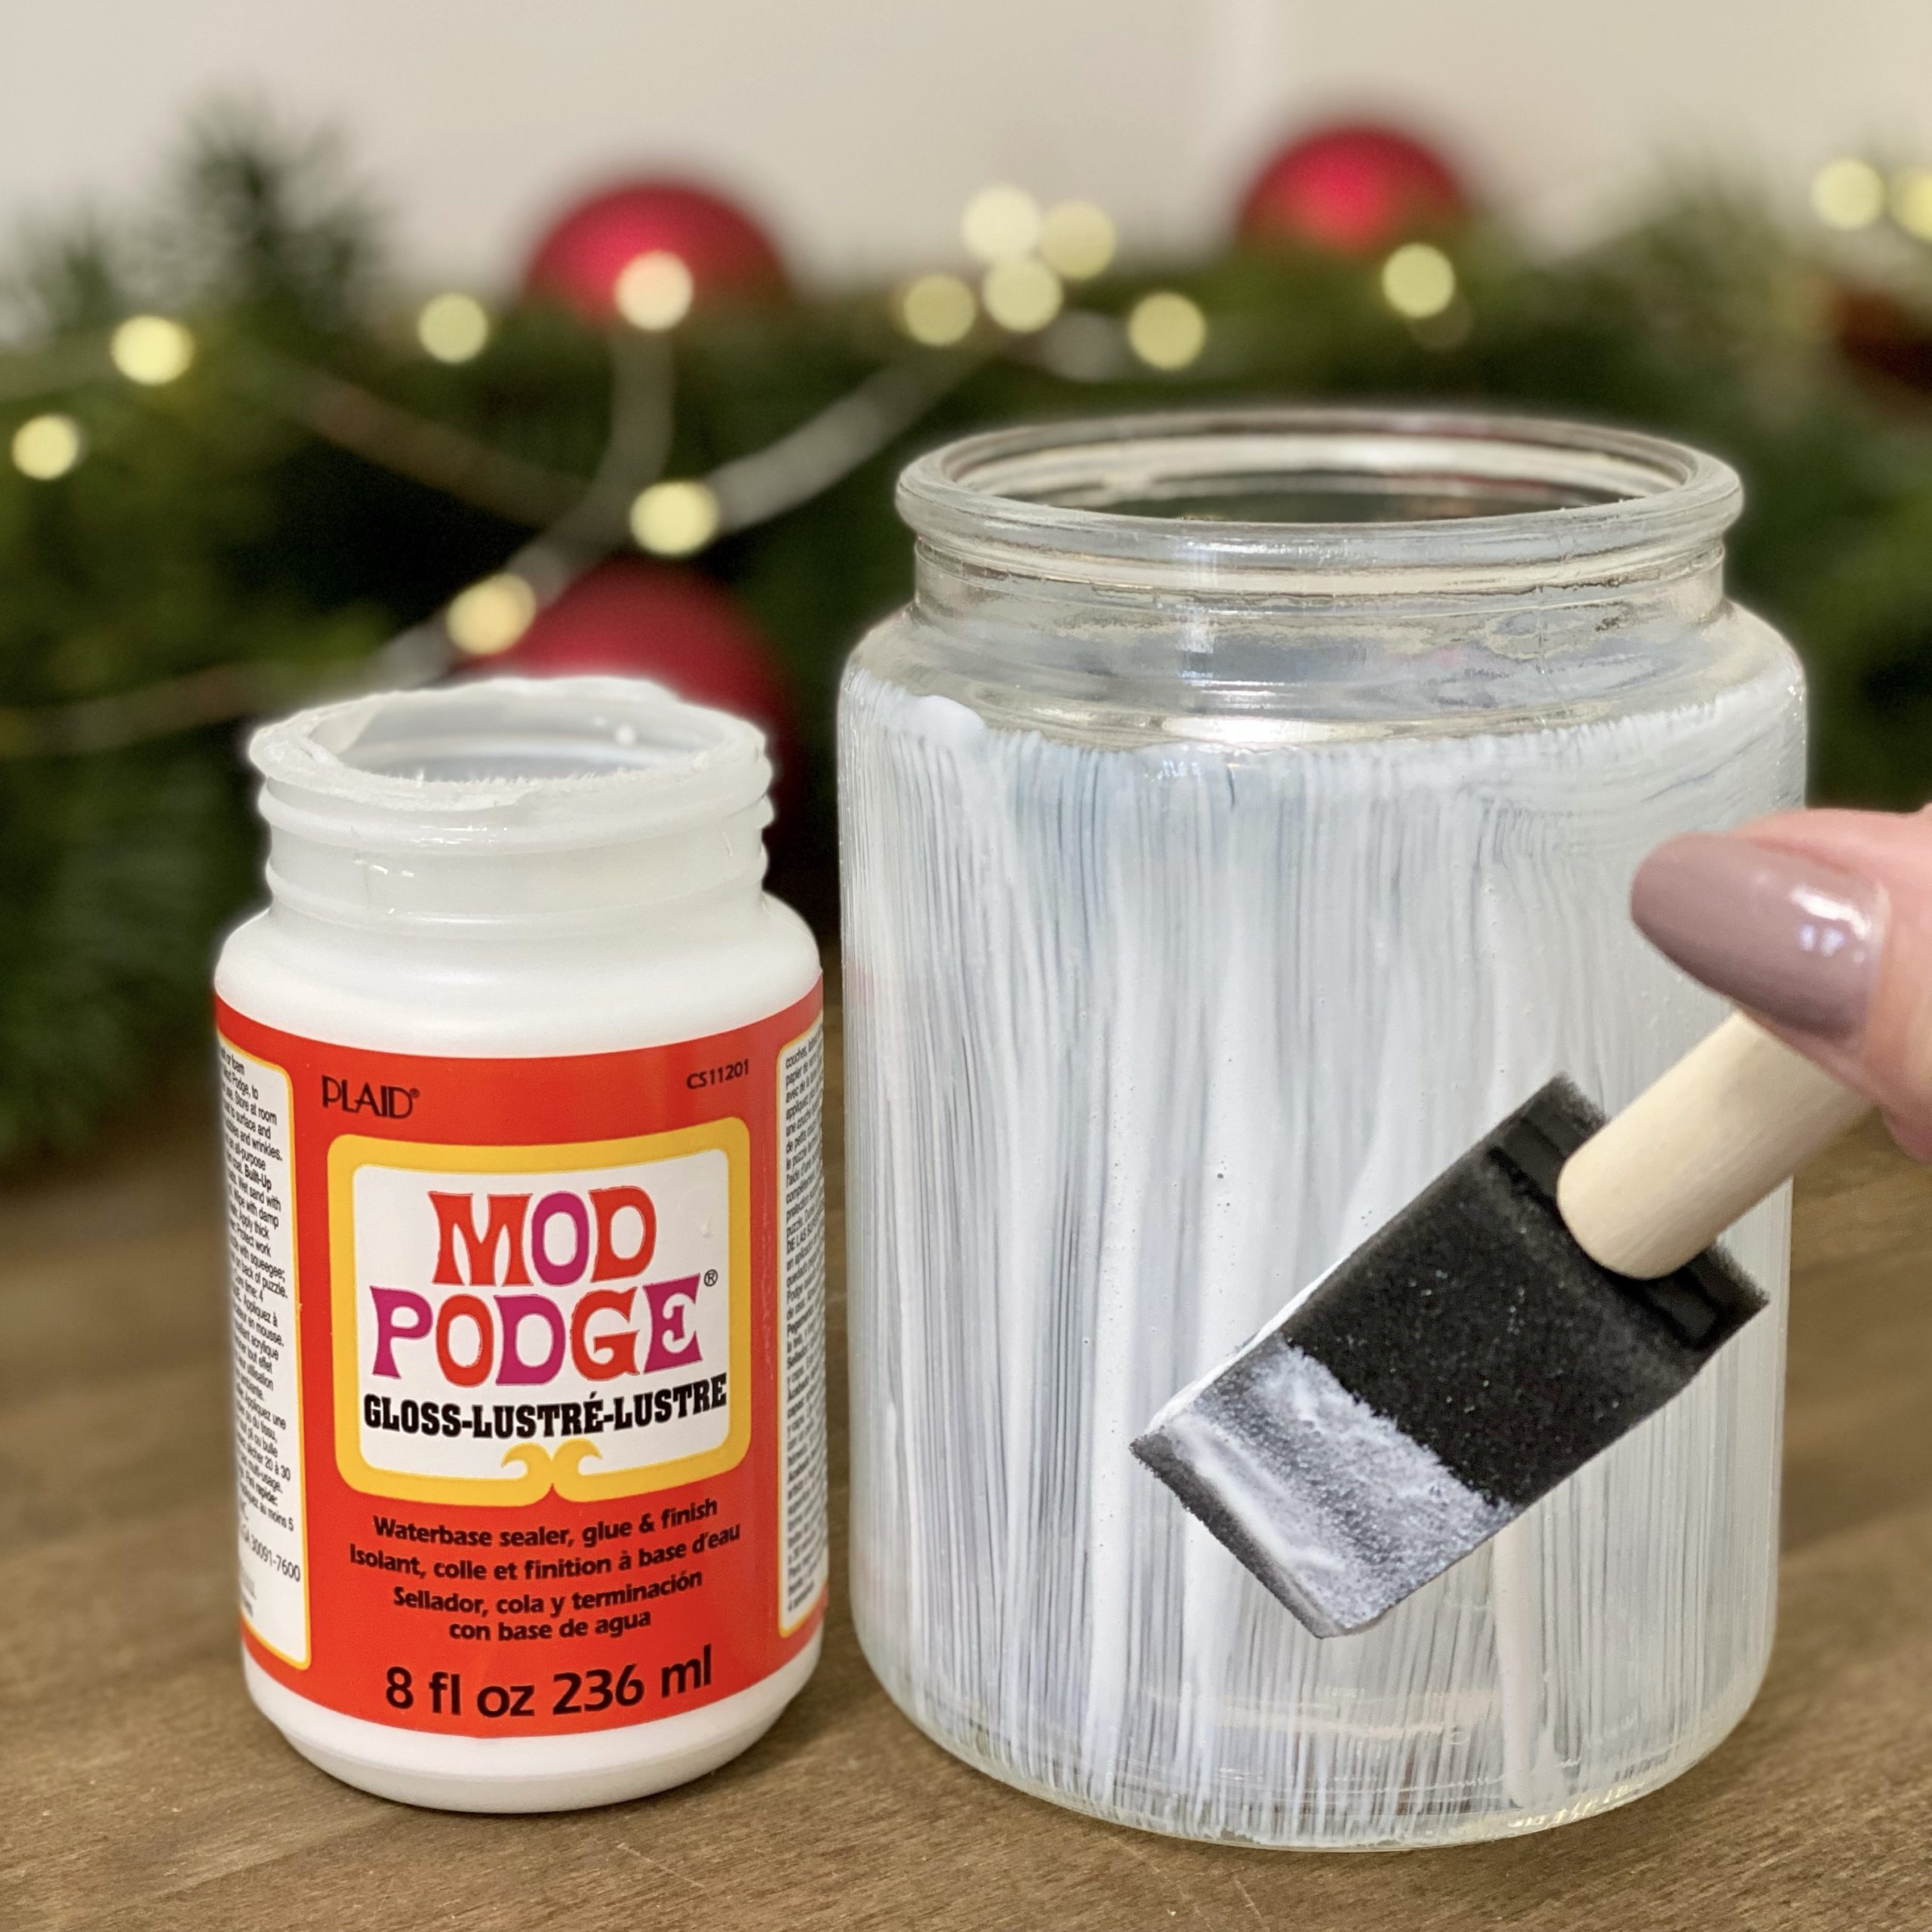
Mod Podge dries quickly, so it’s important to make each candle holder one at a time. Be sure you have the snow ready and waiting so it can be applied immediately after you apply the Mod Podge.
Sprinkle the snow
With the Mod Podge applied, begin to sprinkle on the snow on top right away. It’s easiest to use a spoon or scoop for this. Be sure that the snow is sprinkled evenly over all the Mod Podge. You don’t want to miss a spot, otherwise, you will see voids in the snow when the candles are lit.
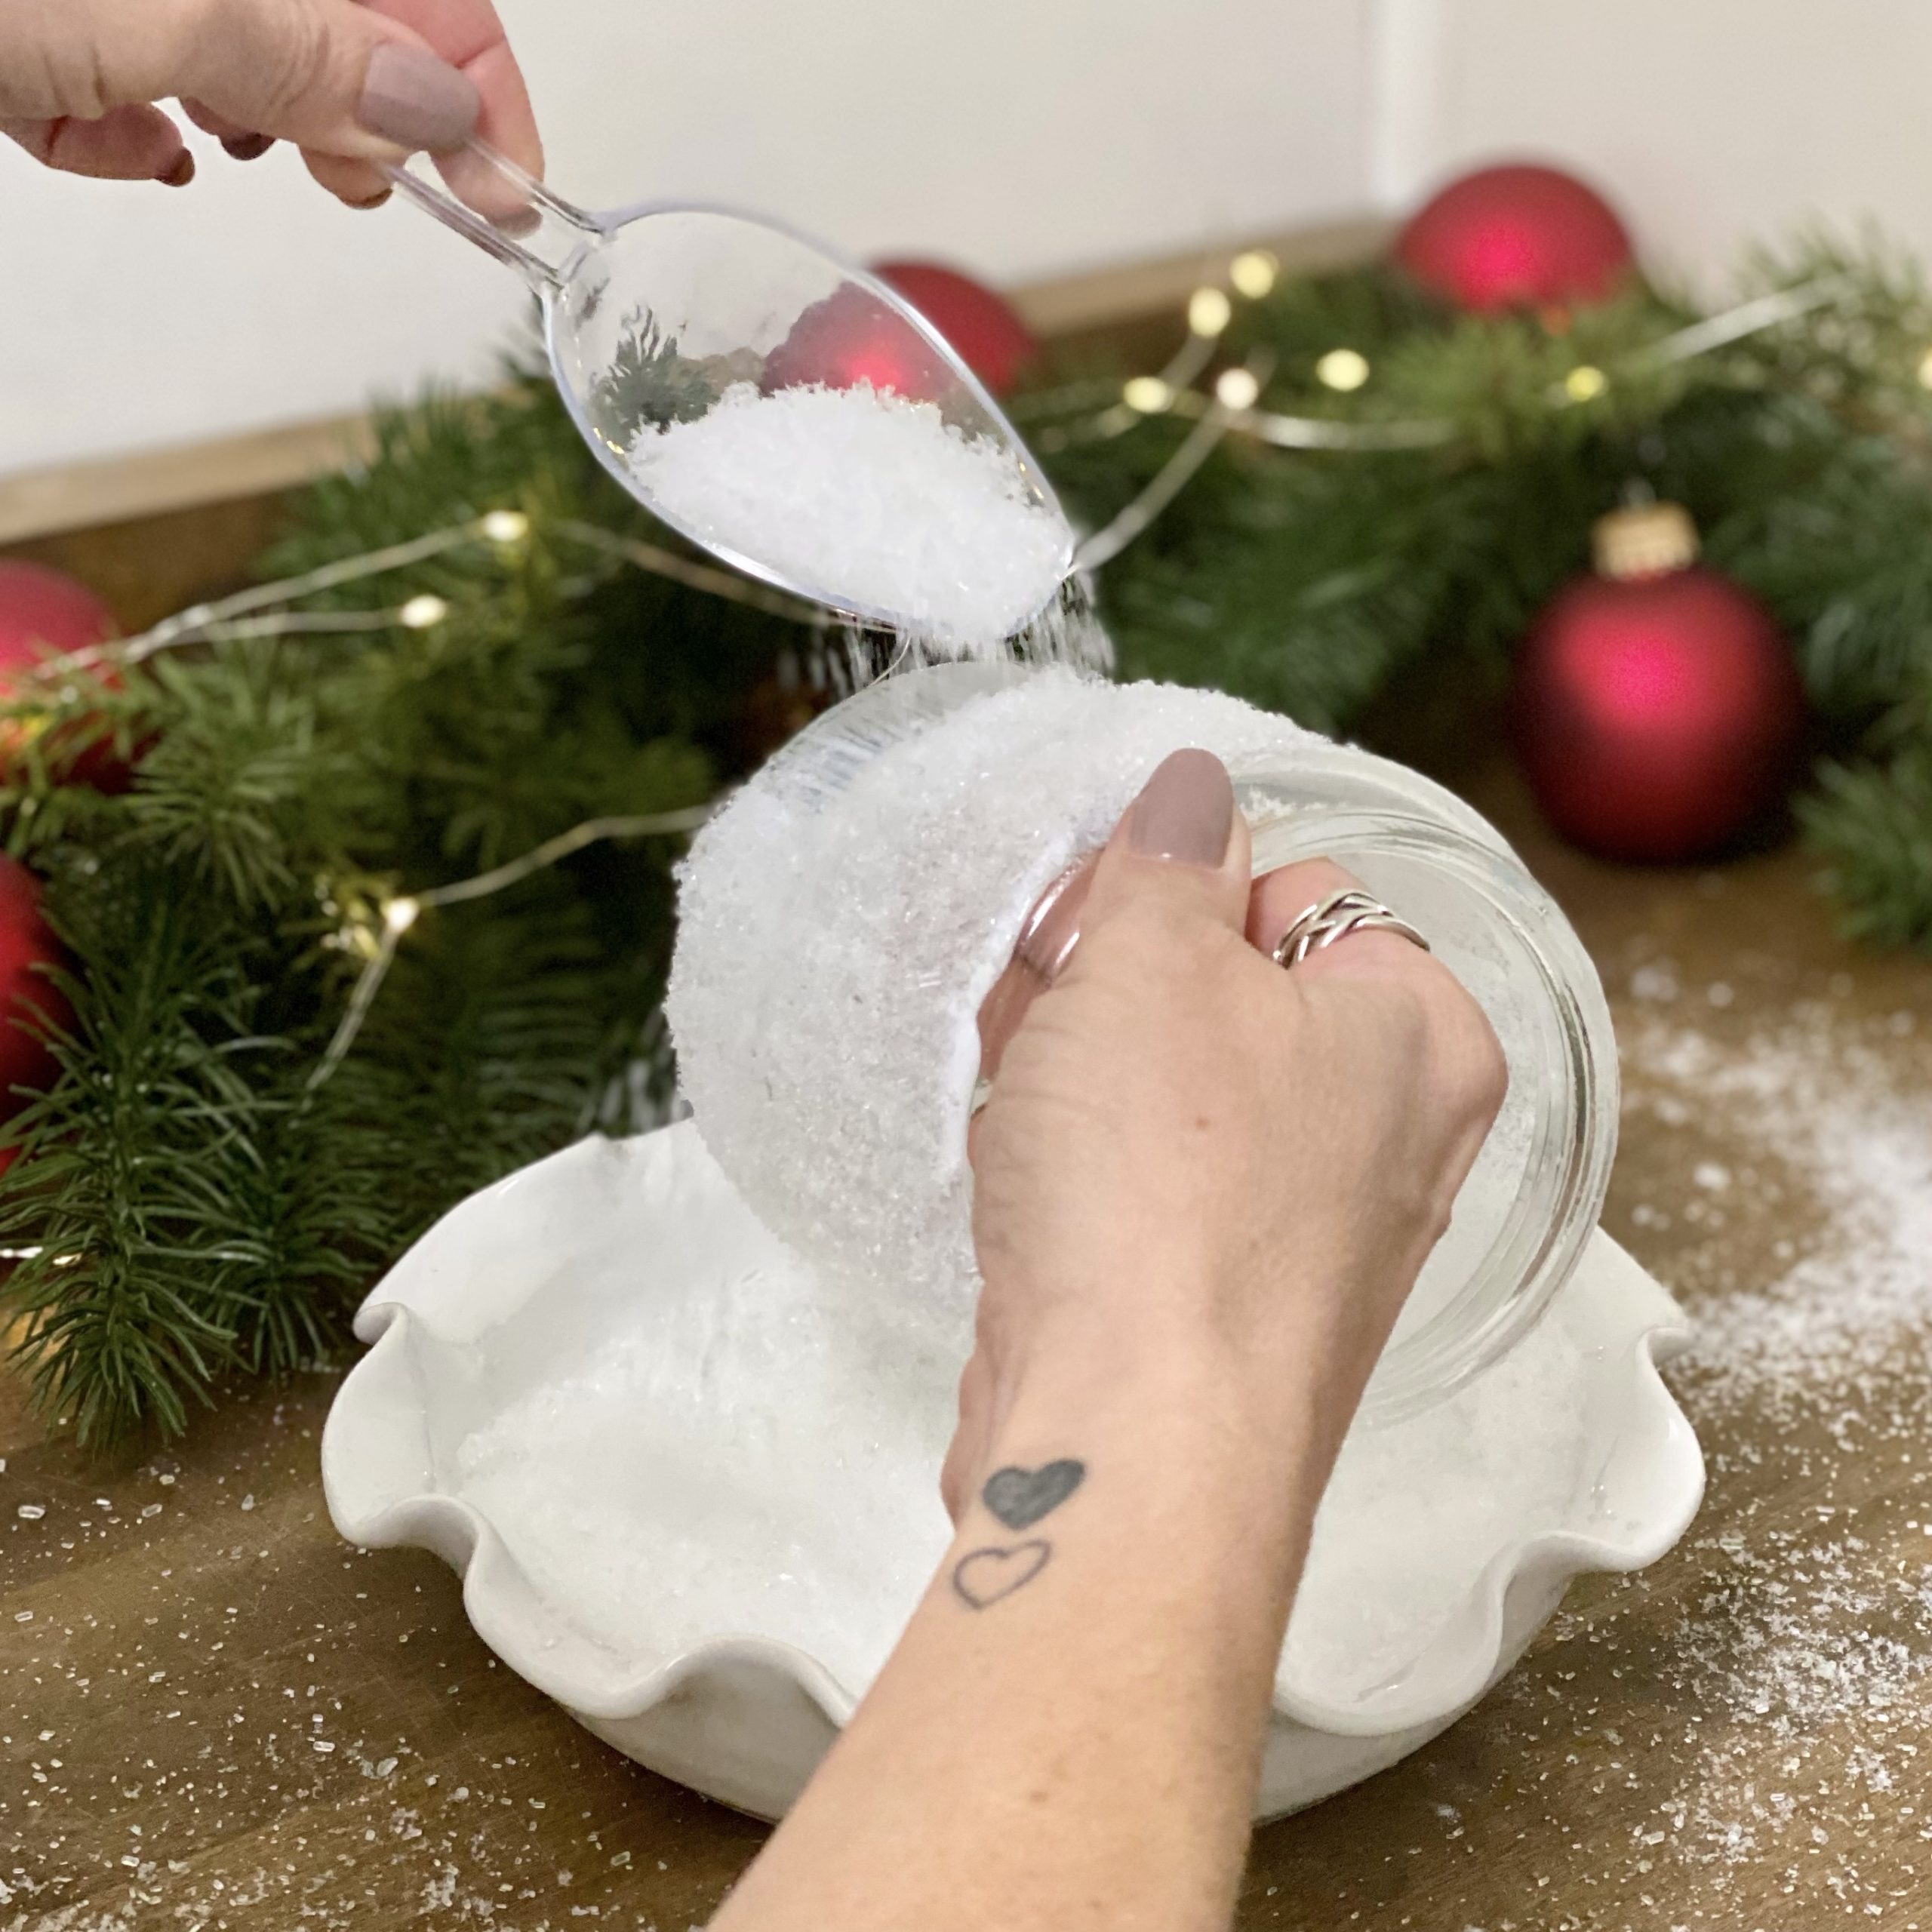
The snow adheres to the Mod Podge quickly. Within about 10-15 minutes the jars will be dry.
Time to Decorate the Snowy Jar Candle Holders
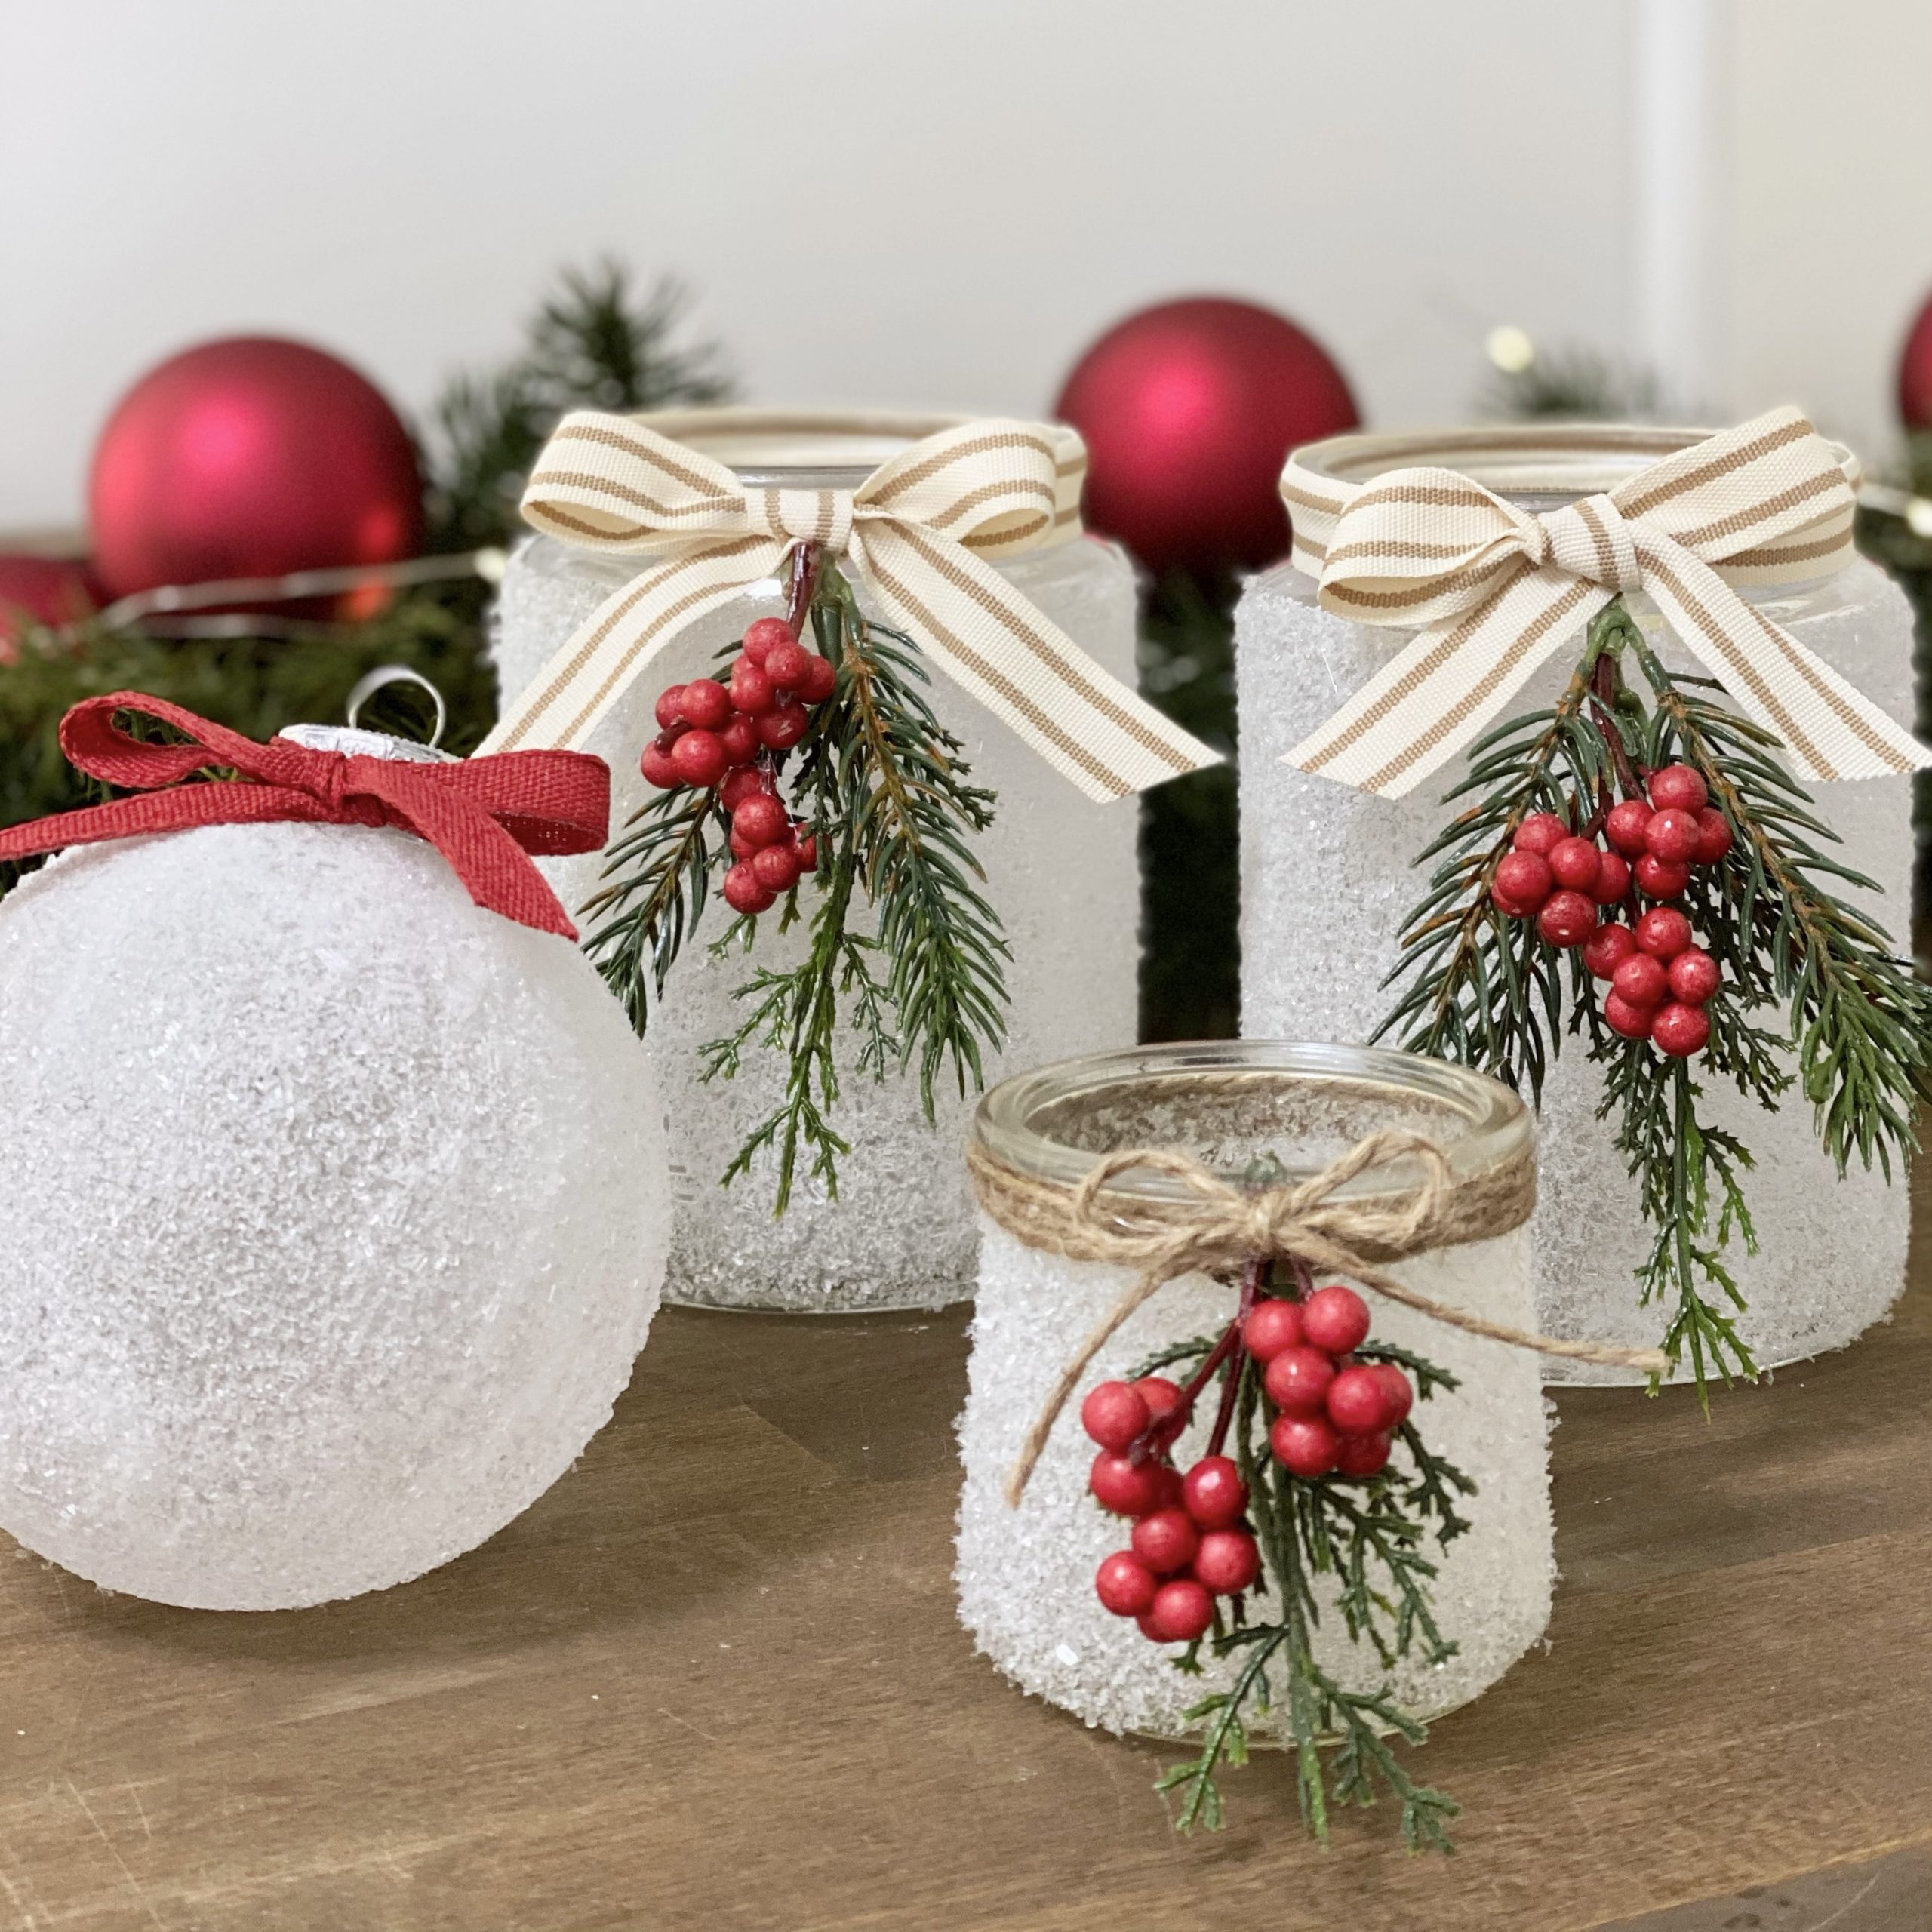
Now, it’s time for the fun part, decorating your snowy jar candle holders. Let your creative juices run wild! Depending on your holiday decor, you can add ribbon to match, holiday greens, berries, or florals. You can also use twine instead of ribbon.
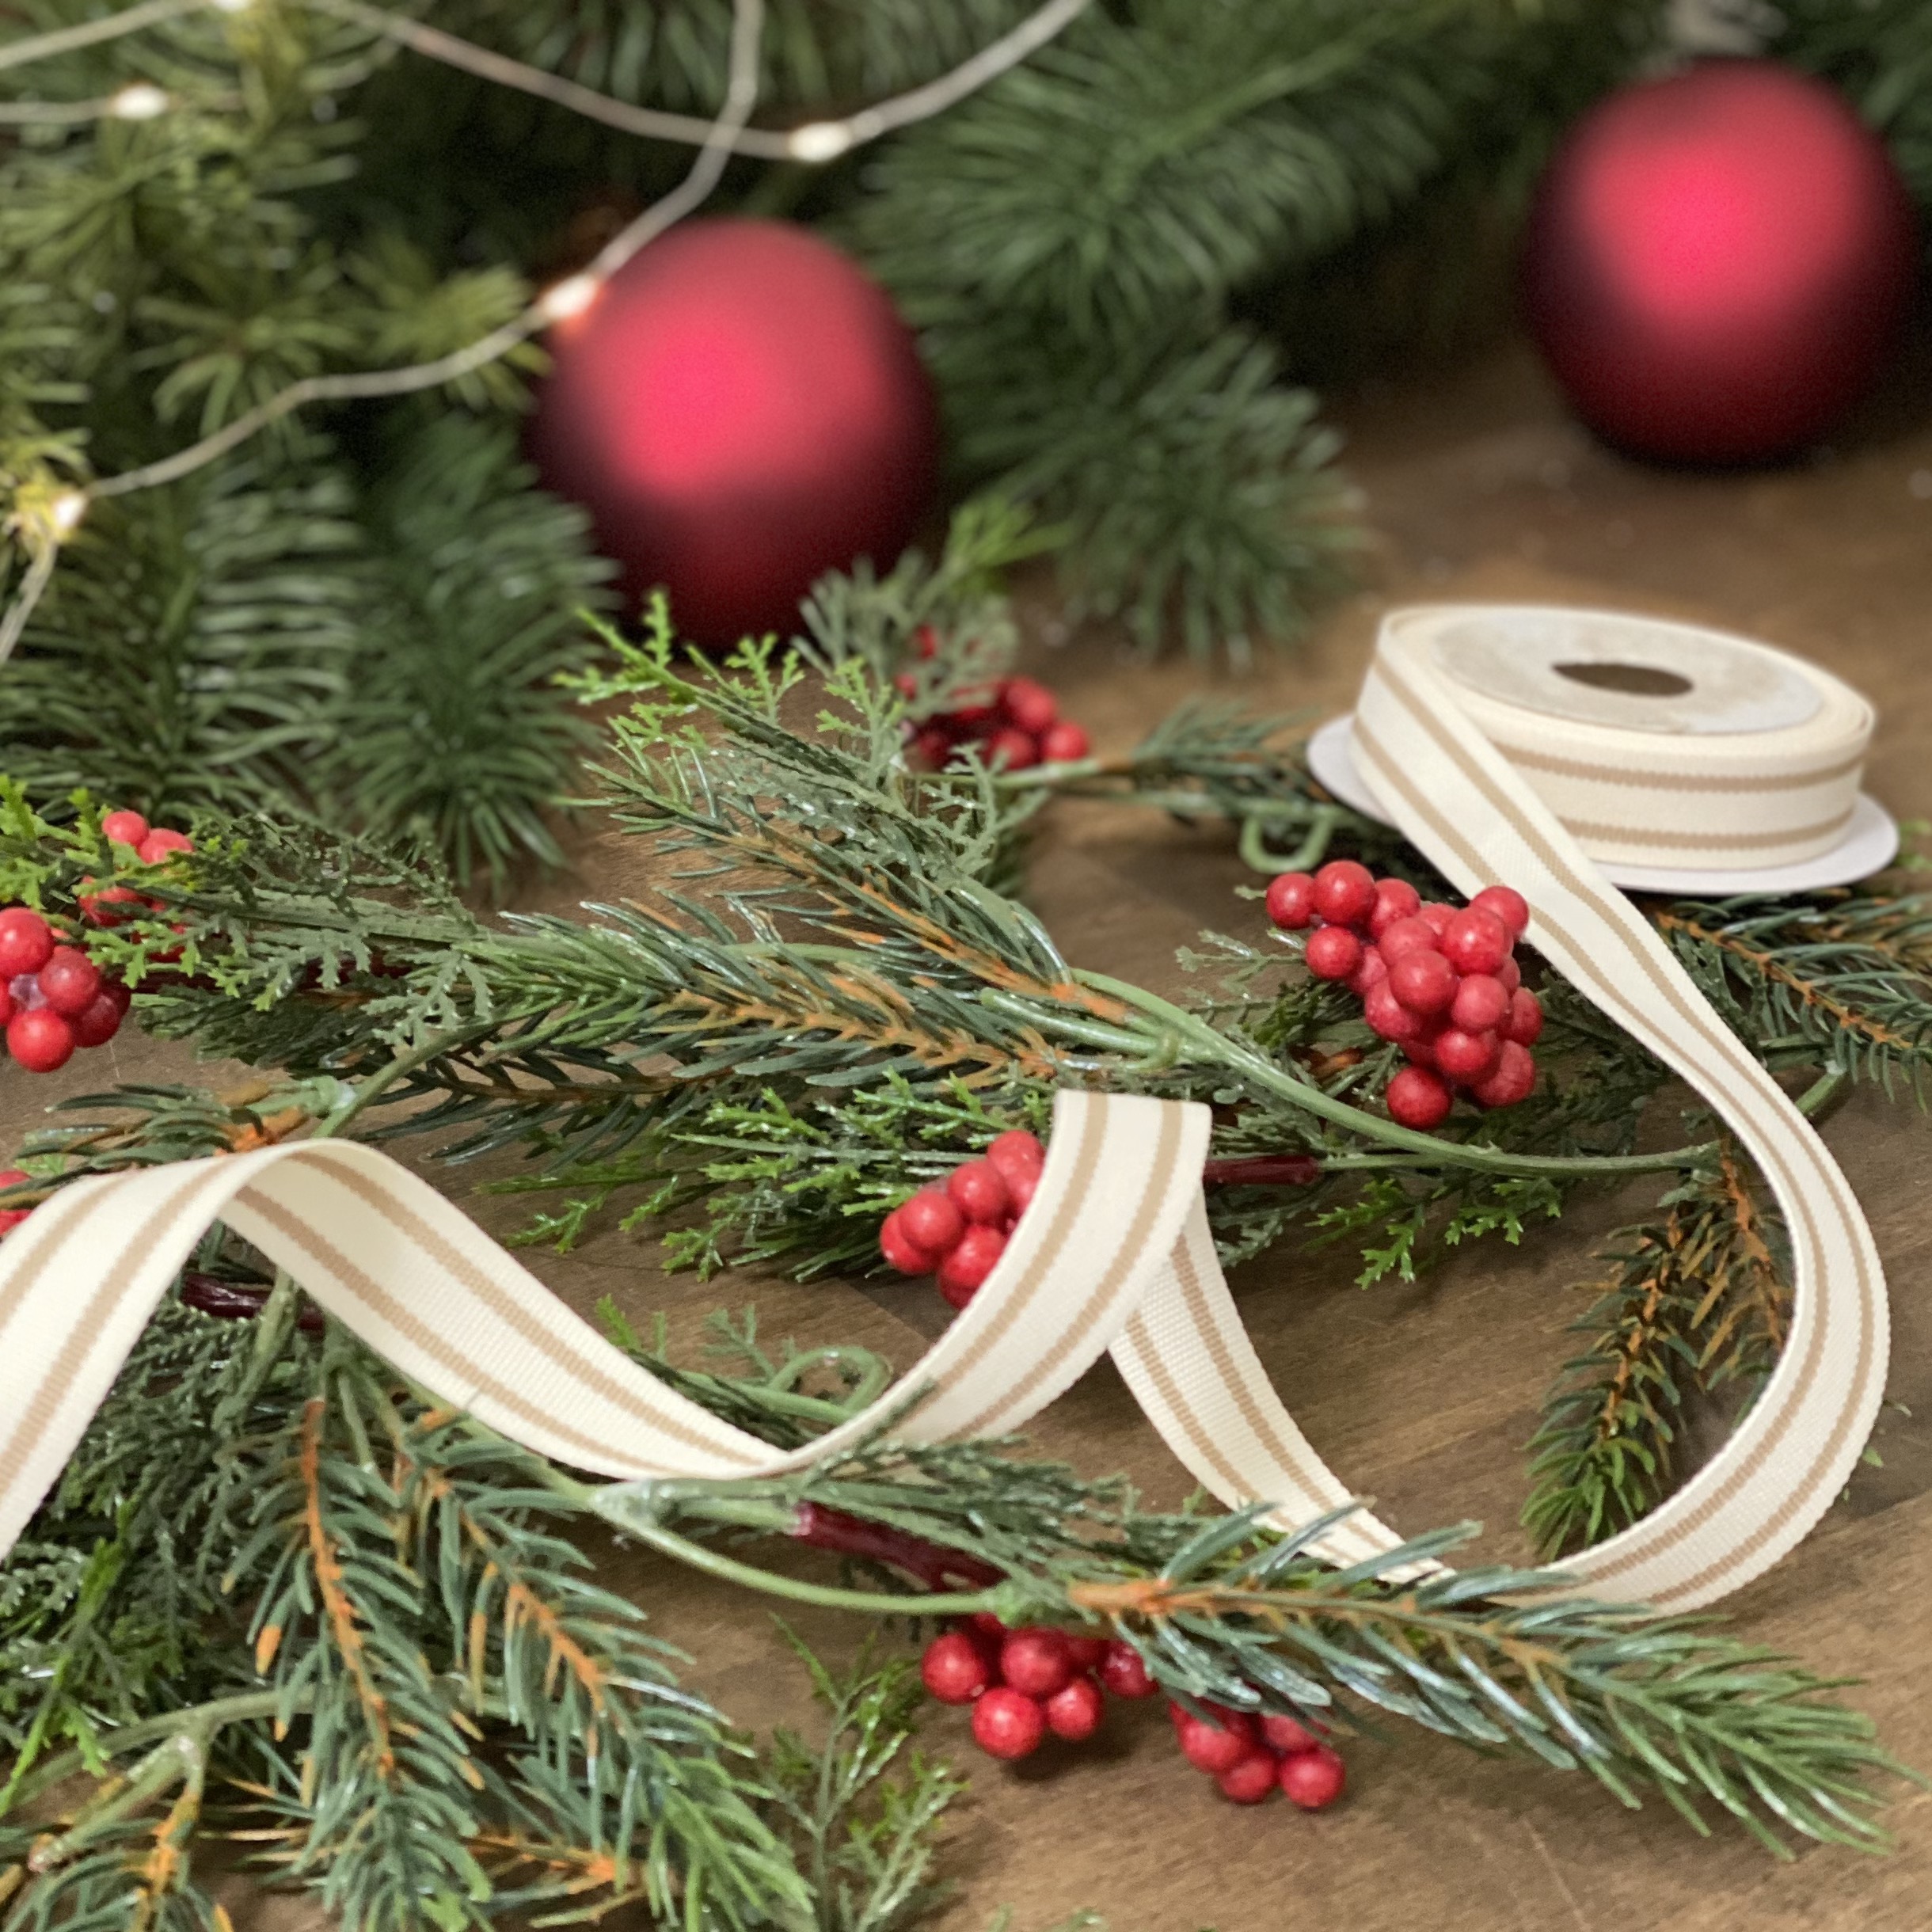
Three-eighth inch ribbon is usually perfect to go around the rim of the jars. Or, wrap twine around the rim several times and then tie it in a bow to secure it. I used a very inexpensive faux evergreen garland with red berries on it to decorate my jars. It also happened to be 50% off which made it perfect for this project! To secure the greens and berries I used a dot of hot glue, but you may be able to tie it right in with the ribbon or twine.
Snowy Ornaments
With the leftover snow from the snowy jar candle holders, you can also make snowy ornaments for the Christmas tree. I found very inexpensive clear plastic ball ornaments at the local craft store.
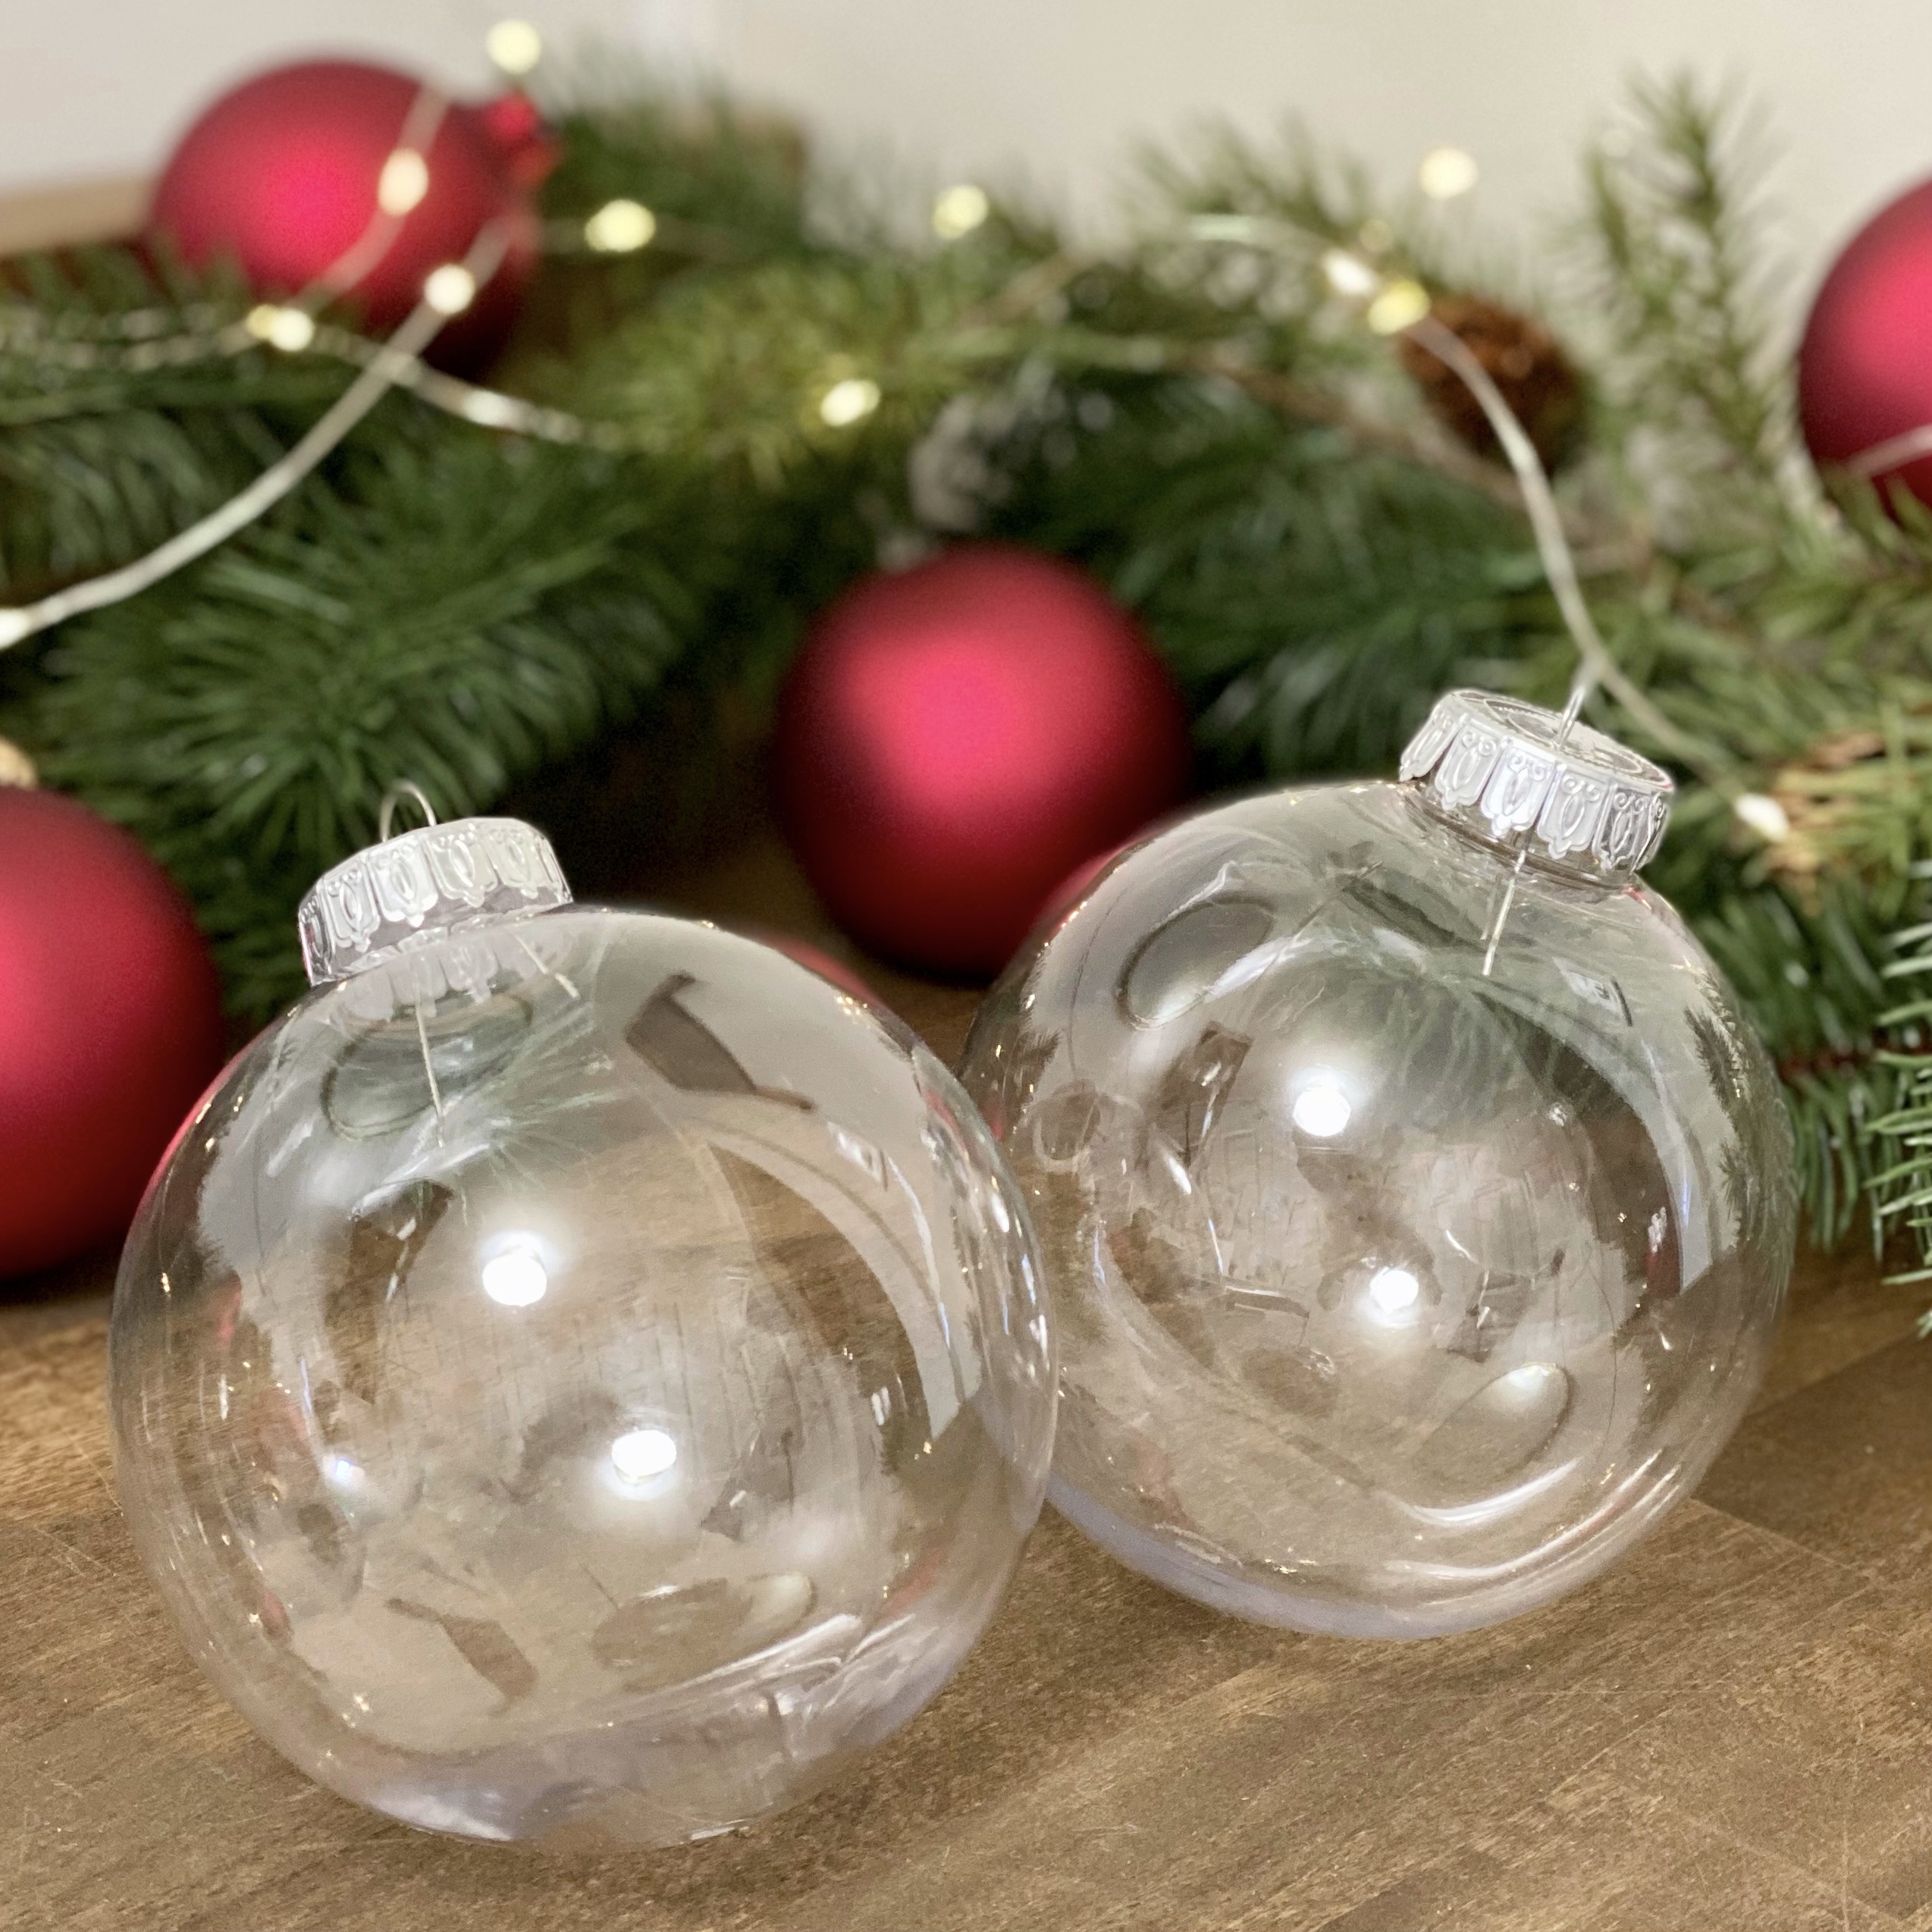
Using the same method for the snowy jar candle holders I made ornaments for our Christmas tree. I added a bow made with ribbon at the top of each ornament to match the theme of our tree.
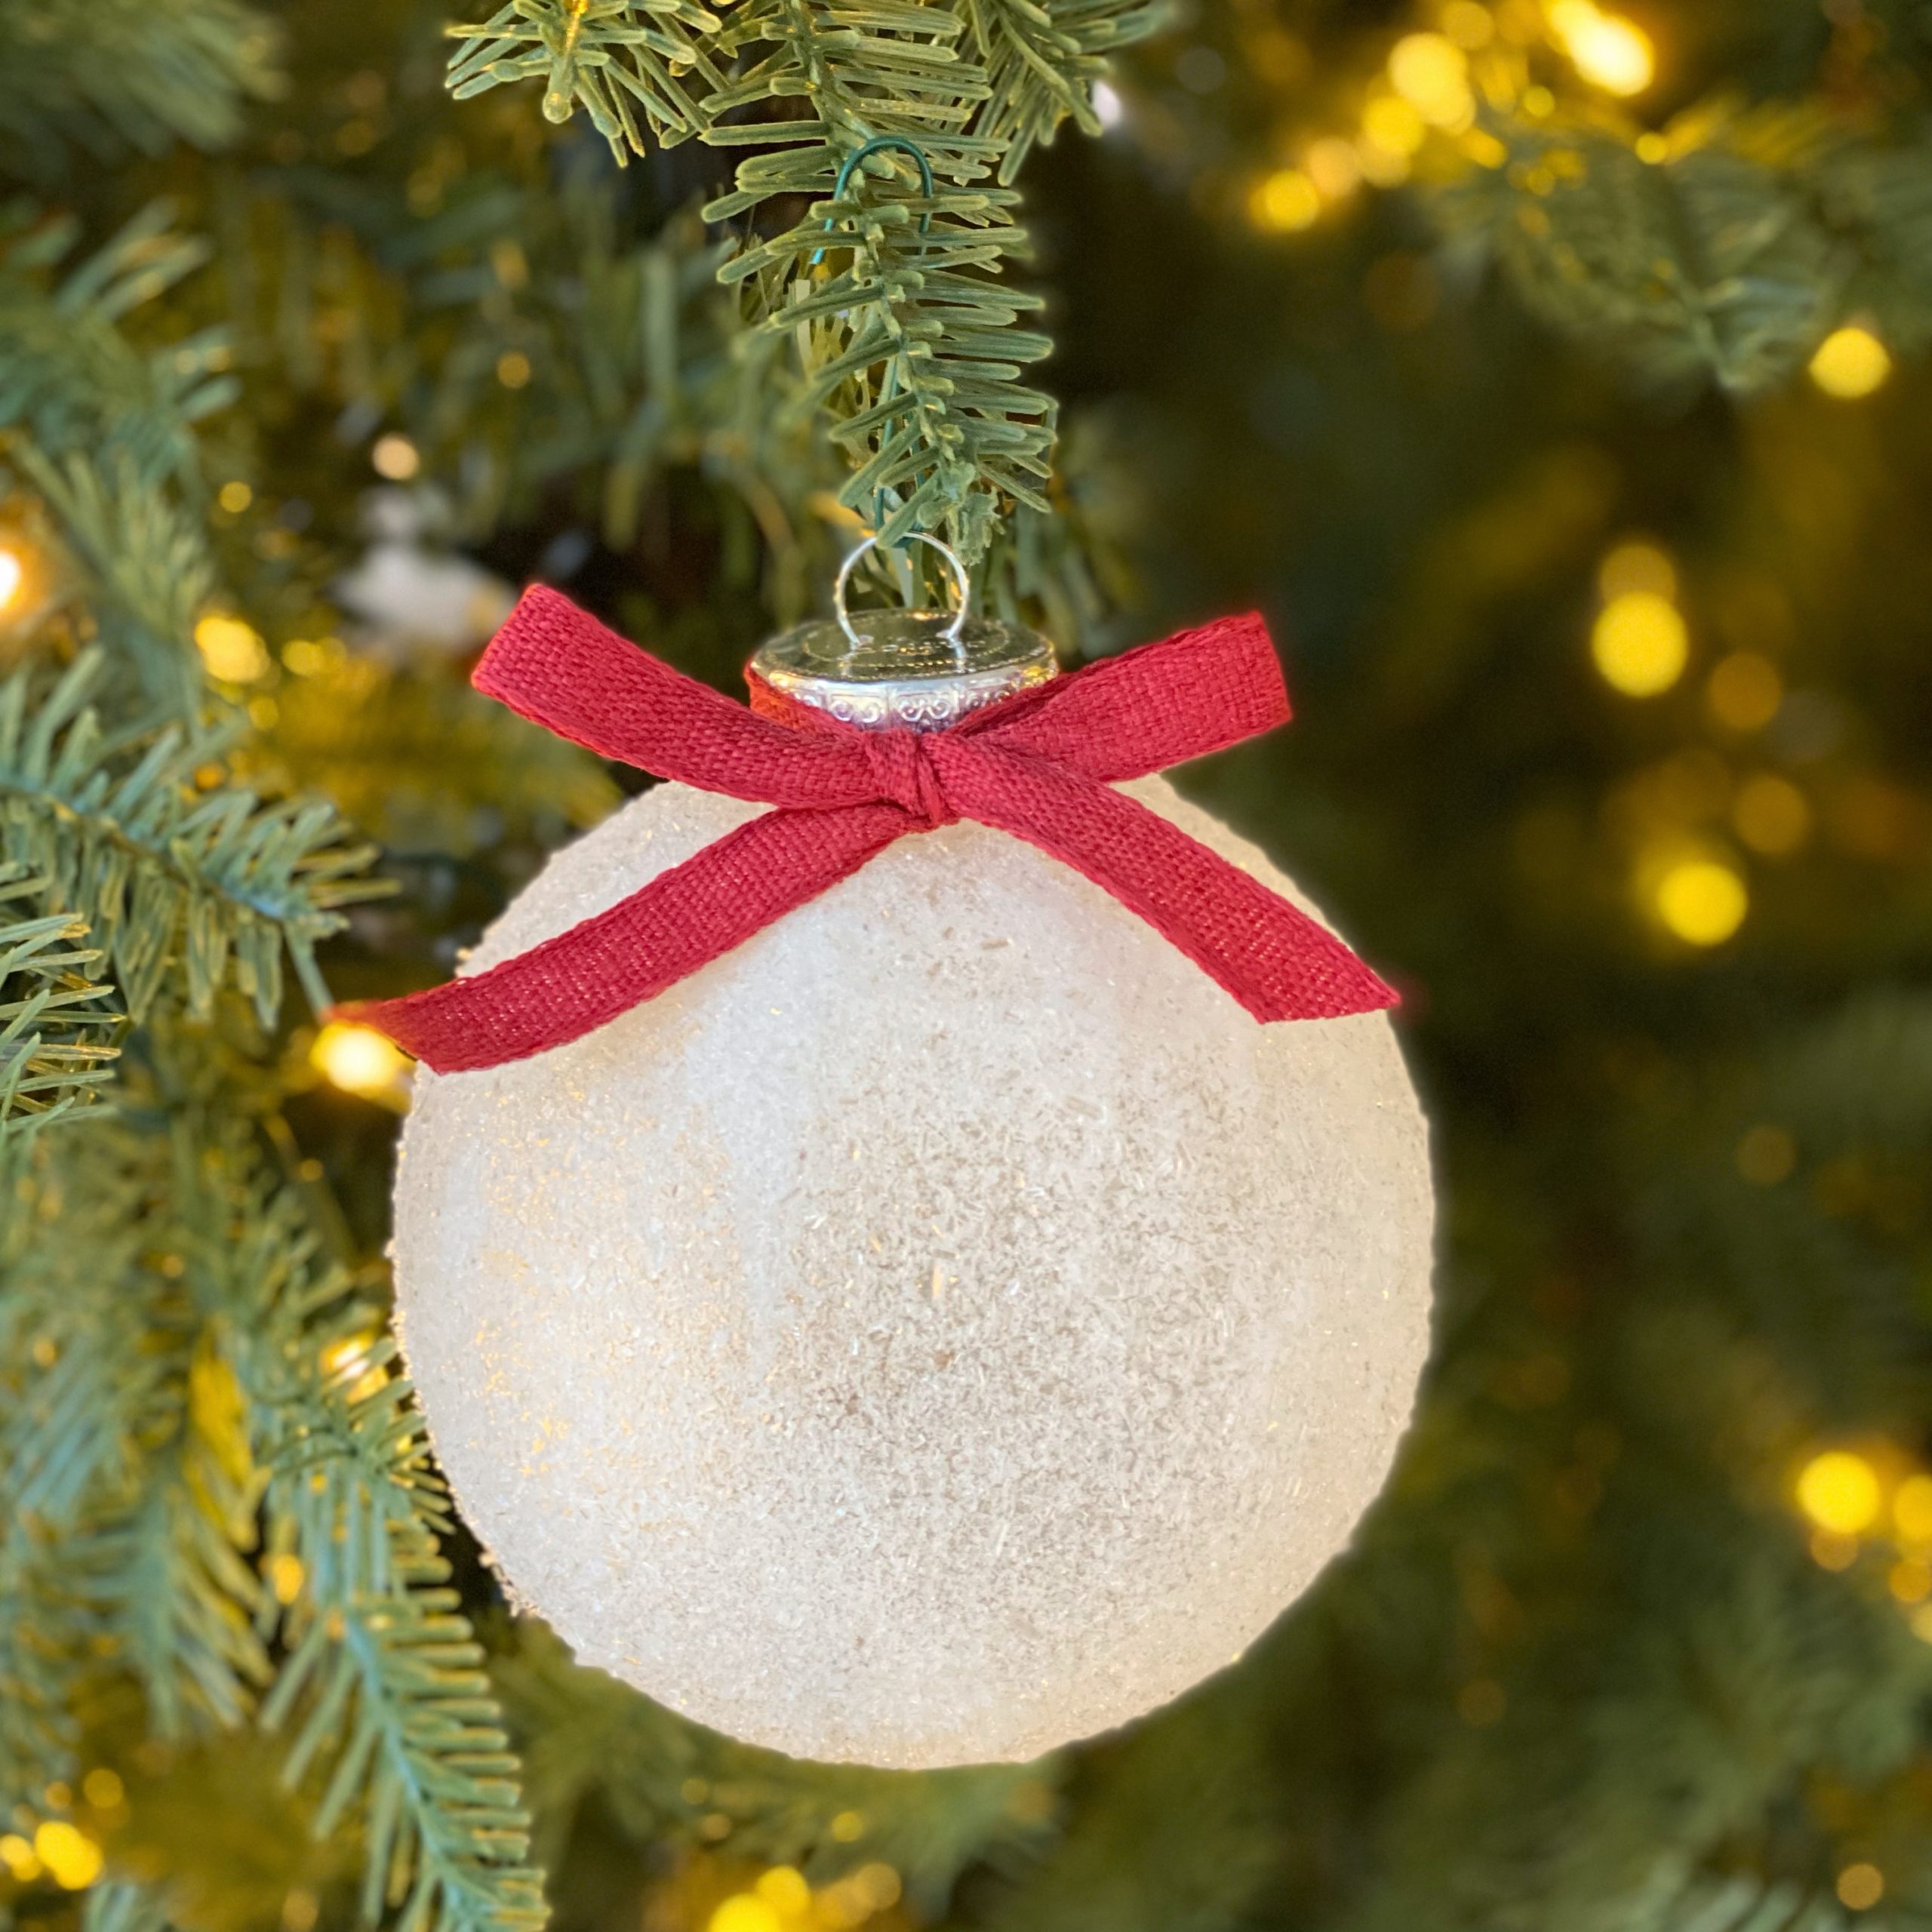
Snowy ornaments can also be beautifully displayed in a bowl on an entry or coffee table. They look like snowballs!
I hope you enjoy both of these snowy projects. They were so fun to share with you. Enjoy making your own creations and be sure to share them with me on Instagram! Don’t forget to Pin this project to refer to when you’re ready. I hope you’re having a wonderful holiday season.


You always have great diy projects and this one is no exception. I have a “collection” of jars as well so I think it would be fun to try. Instead of faux greenery and a candle, I think I might try using the jars to hold a small potted ivy or succulent as cute little “Winter” plant decorations, and how cute would they be on a tablescape . Thanks again for a great project.
Thank you so much, Jan. What a wonderful compliment! I’m so happy you like this idea. I love your idea of making some for little succulents or “winter” plants. They would look great on a tablescape! It was my pleasure to share this project with you. Thank you for joining me here and leaving me your thoughts.
[…] year (so far), I’ve made snowball ornaments. I love how they look on the Christmas tree! Without the lights on, the snowball ornaments look […]
I knew I was saving all those Oui jars for a reason😄 And I live in the woods and can use fresh greens. Thanks🎄
My pleasure to share, Holly! I’m so happy you like the idea and that you can finally use those Oui jars you’ve been saving. 😉 Merry Christmas!
[…] Snowy Jar Candle Holders […]
I I love your snowy jars. I have made these with Epson salt, but I will make some jars and Christmas
tree ornaments. Great job!
Thank you, Lollie!
If you have a newsletter, I’d like to be on it…thanks!
Hi Kris! I’ve added you to my newsletter recipient list. Thank you for your request!
Ciao mi piacerebbe essere sulla tua newsletter, sarebbe possibile?
Fai cose veramente molto belle!
Grazie Paola
Ciao, Paola! I will be happy to add you to my newsletter. Thank you for the request and for joining me here. I look forward to sharing more with you!
I can’t wait to make the snowy jars!!!
I would like to be on the newsletter list also
I’m so happy you like the idea, Diane! Have fun making some of your own. I will gladly to add you to the newsletter list. Consider it done! Thank you for joining me here!!
I have a question, do you spray the jars, after they are done with the Eason salts, with a clear adhesive to make it stay better on the jars.
Hi Susan,
Good question! I have not sprayed my jars before. It’s worth trying it on one. My only fear would be that the clear adhesive could change the look of the Epsom salt and faux snow from a “snowy” look to a shinier or clearer look on the jars.
Wondering if anyone has tried the spray adhesive, and if so did it change the look?
Good question, Pam! Hopefully someone who has tried spray adhesive will let us know.
[…] GET TUTORIAL HERE […]
[…] GET TUTORIAL HERE […]
Please add me to your newsletter as well!
Love this idea of the frosted little jars!
Hope to use the idea to make table favors for my club!
Thank you for the idea, helpful hints and directions.
Hi Loretta! You are on the newsletter list. I appreciate your request. I’m so happy you love the Snowy Jar Candle Holders. They will make the perfect table favors at your club! It is my pleasure to share the idea, helpful hints, and the directions. Thank you for your comment!
[…] GET TUTORIAL HERE […]
[…] GET TUTORIAL HERE […]
Just found you today, yay!! I can’t wait to make both the jars and ornaments. Im a flocked Christmas tree kinda girl 🤷♀️, so this is perfect. Oh, welcome to NC!! 🤗
Hi Jenny! I’m so happy you found me, welcome! Your excitement for the jars and the ornaments makes me smile. I hope you enjoy making some of your own. Thank you for your warm welcome. We love NC!
Lover ur ideas. Very crafty.
Thank you so much, Lucy!
[…] en madera o hasta foami. Foto: westcoastgardens en Pinterest Macetas súper navideñas. Foto: caligirlinasouthernworld en […]
[…] for DIYs too! Here are just a few projects I have used upcycled glass vases and candle holders, Snowy Jar Candle Holders, DIY Mercury Glass Candle Holders, and Frosted Glass Heart Candle […]
[…] Cali Girl in a Southern World […]
Maybe I have missed something, but what is the epsom salt for if you use fake snow? I really want to make these this year!
The Epsom salt adds a little shimmer due to it’s crystallization. I hope you enjoy making some for your home this holiday season!
[…] GET INSTRUCTIONS HERE […]
Such a cute idea! I live somewhere where faux snow is not available. Could these be done only with epsom salt?
Thank you, Heids! Yes, if you have trouble finding a retailer near you that sells faux snow, these snowy jar candle holders can be made with only Epsom salt. They will still be beautiful!
Hello,
I just found these awesome snowy jars and have made a couple following your directions but I find even after they have fried over night the
faux snow falls off easily. I was wondering if
there any type of sealant that could be used
Thank you
Glenda
Hi Glenda,
I’m glad you like the snowy jars. Although I didn’t have any trouble with the snow falling off, I might suggest trying a spray adhesive. It can be found at most craft stores and at some hardware stores where they sell spray paint. I hope this helps. Happy holidays!