
Wait until you see how fun and easy these DIY concrete pumpkins are to make! I’ve decided that 2020 is the year of concrete crafts at the farm. Therefore, what better way to celebrate the arrival of Fall than with these adorable DIY concrete pumpkins? I can’t get enough of them, y’all! With a few inexpensive and easy-to-find supplies, you can make these beautiful pumpkins for your home too!
This post contains some affiliate links for your convenience. Click here to read my full disclosure policy. As always, thank you for supporting my blog.
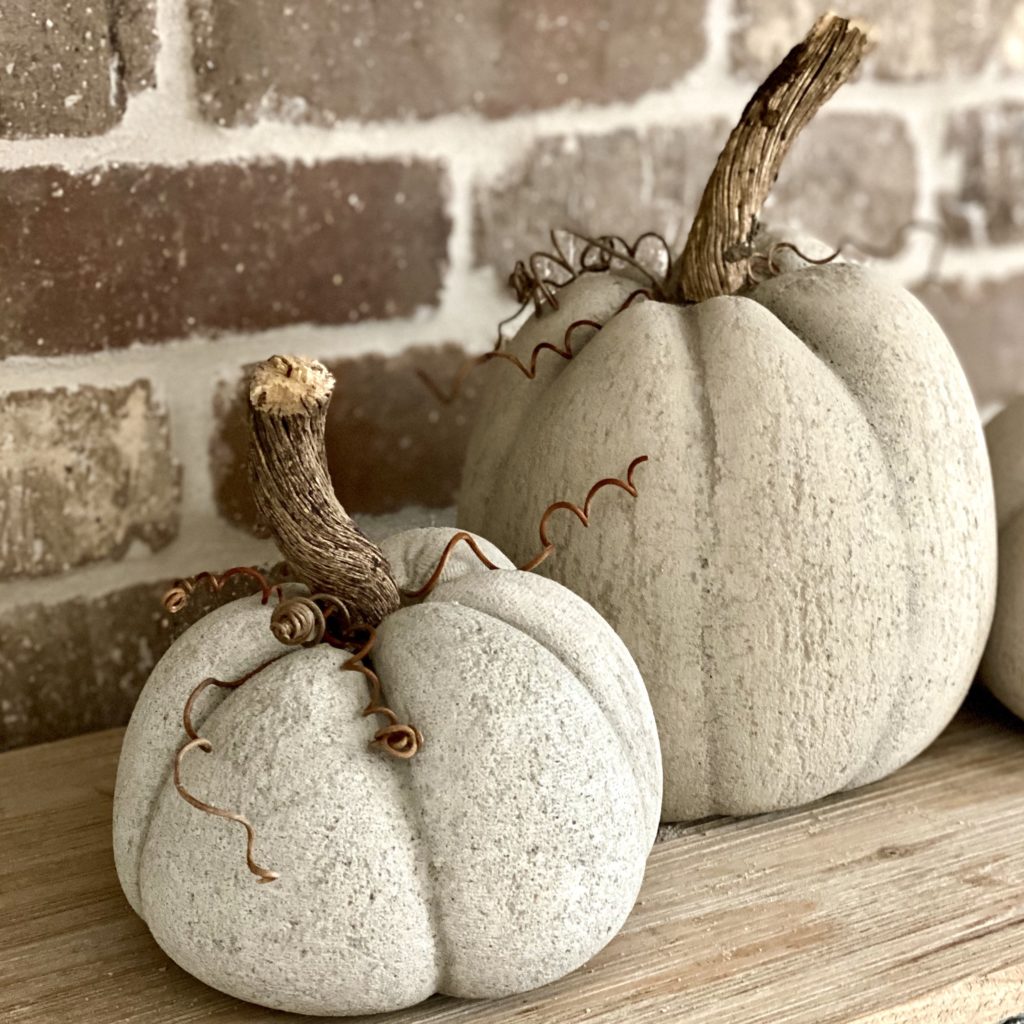
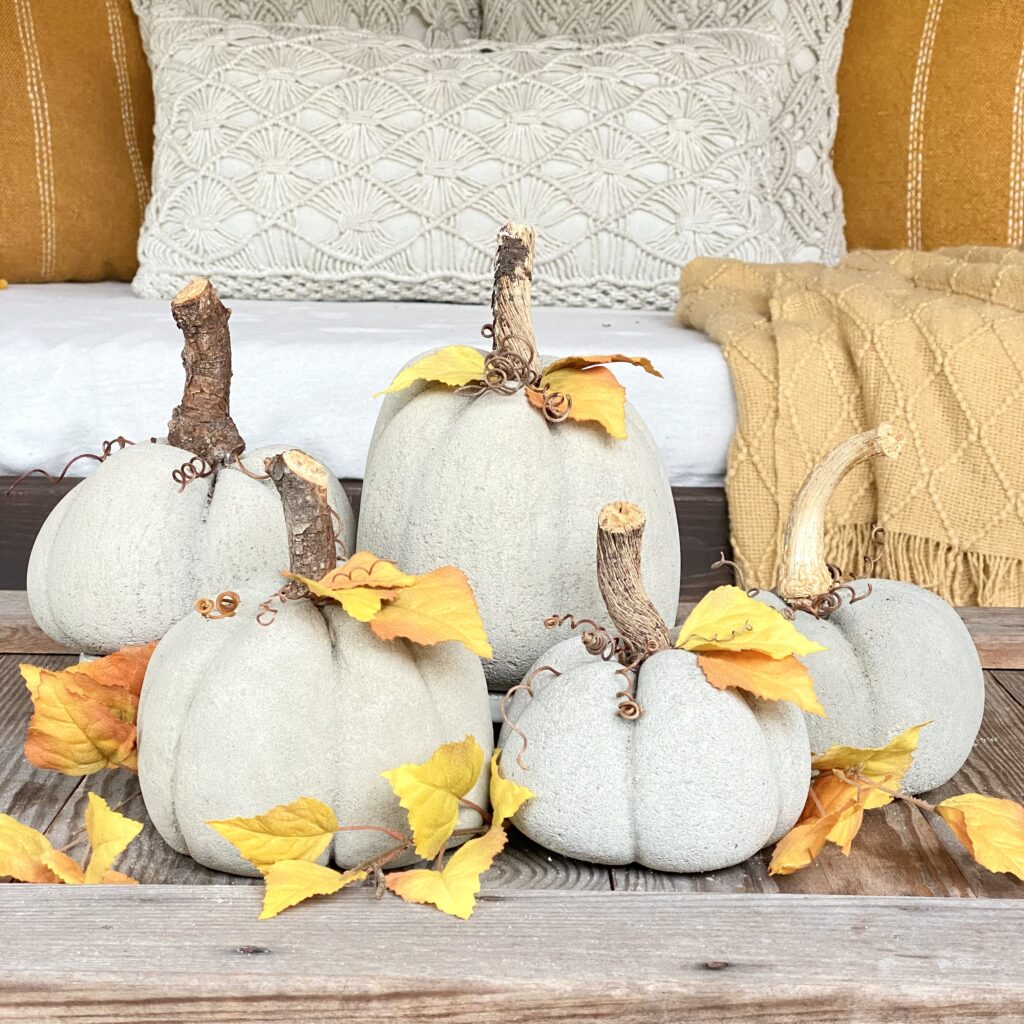
There are so many ways to create a personal touch to these fall DIY concrete pumpkins including but not limited to adding real pumpkin stems, dried vines, faux flowers or berries, and even small pinecones or acorns. The sky’s the limit!

Obsessed with Concrete
Although concrete can be a little messy at times, it’s quite easy to work with. It’s also a very inexpensive material when it comes to DIYs. It’s a wonderful medium for making home decor to use inside or outside the home. Talk about durability!
This Fall I’m obsessed with making concrete pumpkins, much like I was obsessed this past Summer when I discovered how to make concrete bowls. If you’ve never tried to make concrete bowls, you’ll want to check out my post for them here. Fair warning: once you start, it’s hard to stop! Dare I say… These concrete pumpkins may even be more fun to make than the bowls!?
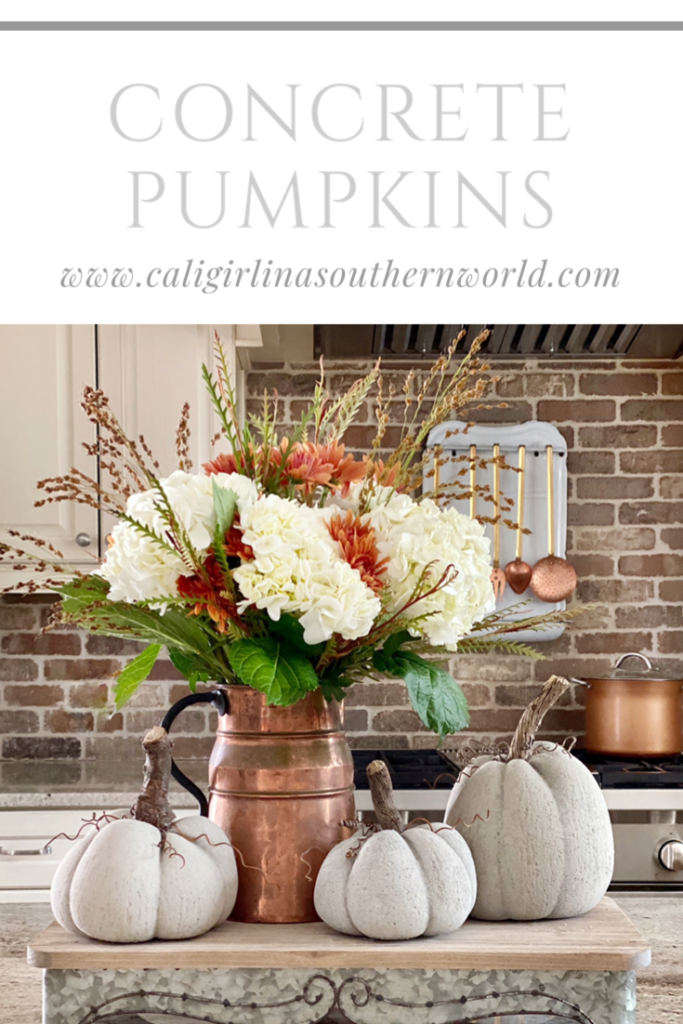
DIY Concrete Pumpkins: The Perfect Way to Celebrate Fall
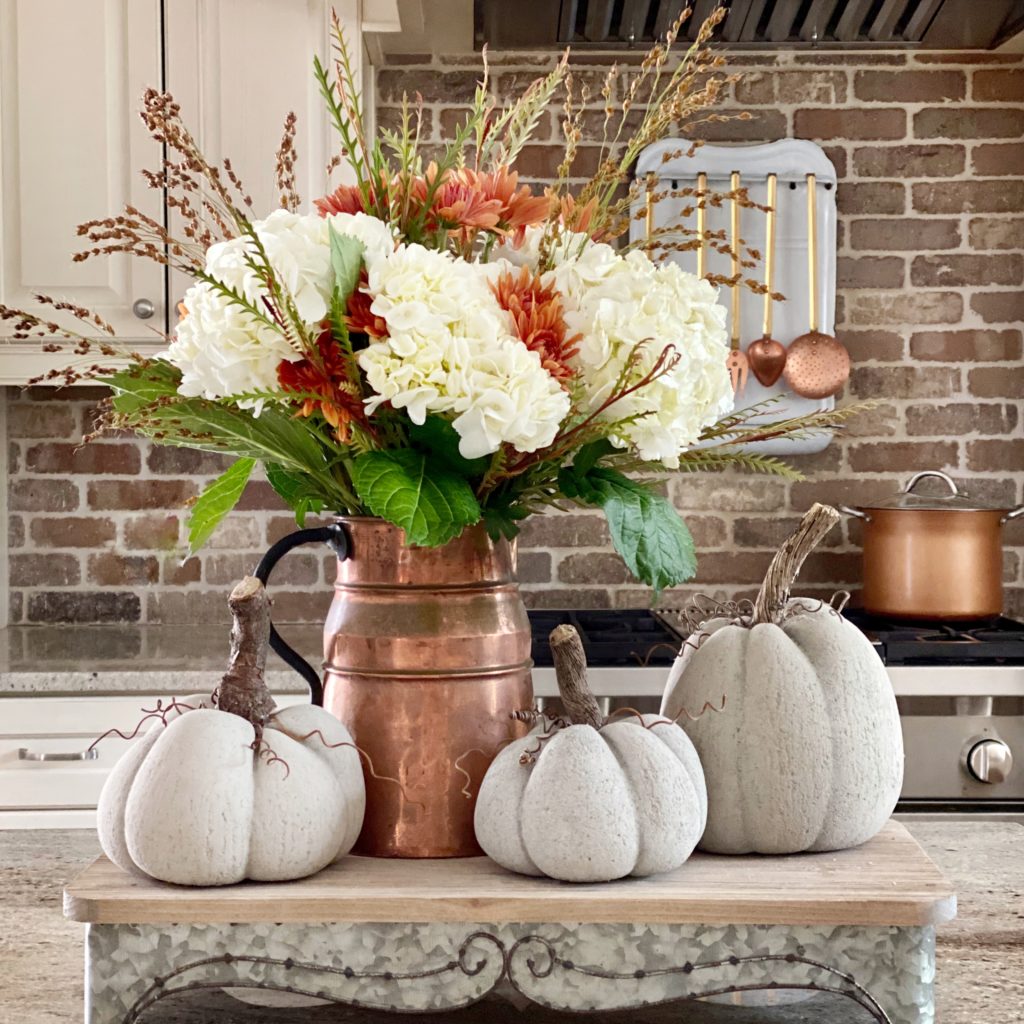
Along with leaves changing colors and cool crisp air, pumpkins are another telltale sign that Fall has arrived. At the farmhouse, I love to decorate for Fall with pumpkins. Whether they are real pumpkins or faux pumpkins, I say the more the merrier to celebrate the season. This year, I felt like adding something special to my pumpkin collection.
I wanted to add more texture to my fall decor and I needed some smaller pumpkins to use in vignettes. Since I still had concrete leftover from the Summer bowls, it didn’t take long before I decided I would try my hand at making some concrete pumpkins for fall.
Materials Needed To Make Concrete Pumpkins
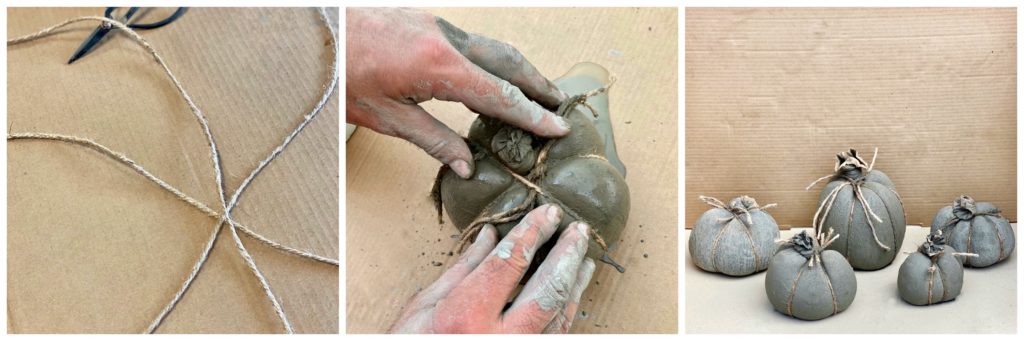
Concrete pumpkins are easy, inexpensive, and fun to make! You can really let your creativity run wild. All you need to make these adorable concrete pumpkins for your home are a wide-mouth container, Quick-dry concrete, quality pantyhose (or trouser stockings), scissors, and some twine.
The beauty of this tutorial is that I am providing you with the exact materials that I found worked best for making the perfect DIY concrete pumpkins. Through trial and error here at the farm, I’ve taken the guesswork out of it for you.
Nylons
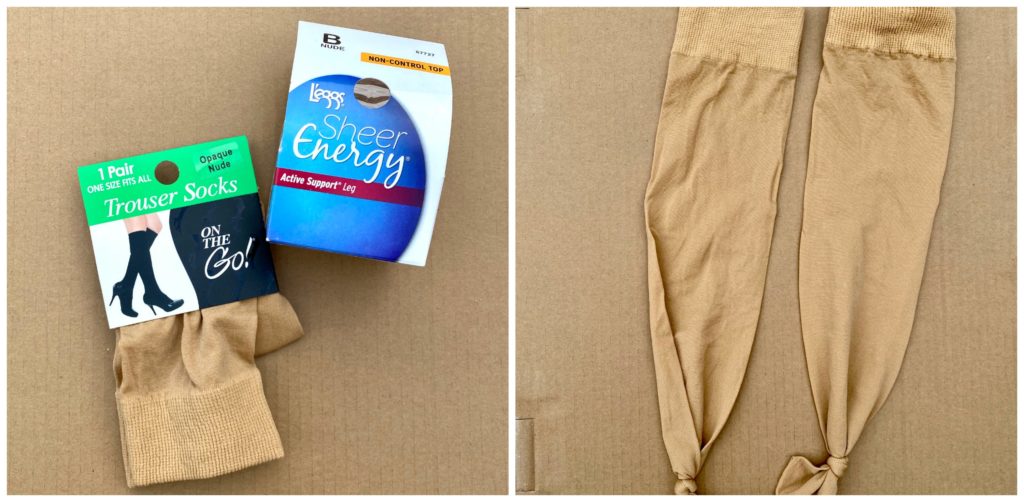
Quality nylons are key. “Active” pantyhose and trouser socks make the best pumpkins. Although they are slightly more expensive, trousers socks work the best. In the end, the ease of using quality nylons outweighed the cost. (Note: The cheaper the nylon, the harder it is to peel off your pumpkin. Believe me, they make a fuzzy mess… I learned the hard way!)
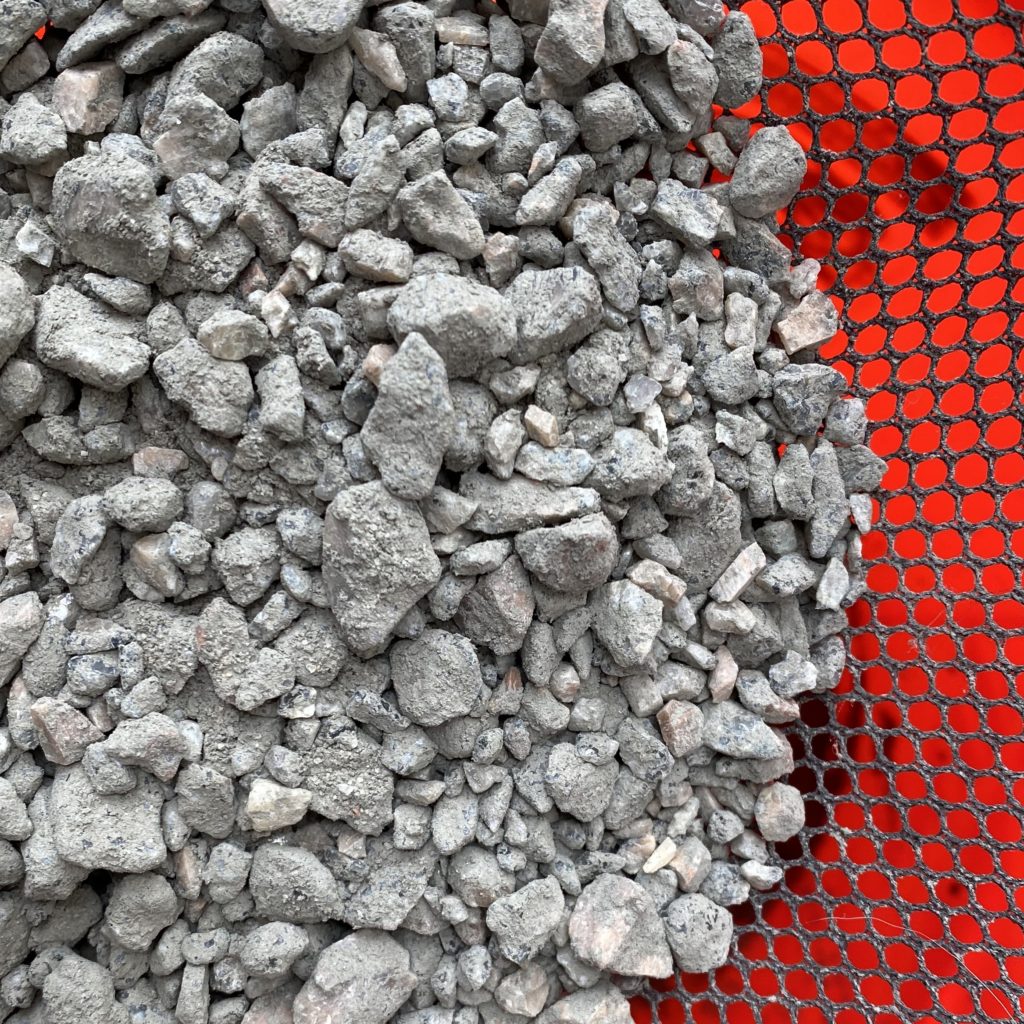
Concrete
Sifting out the small rocks from the quick-drying concrete is key. After making concrete bowls, I realized that there is a tremendous amount of rocks in concrete. Although I loved the texture the rocks added to the bowls, I didn’t think they would be a good look for the pumpkins. Knowing that the concrete pumpkins were not going to be large a smooth look is ideal. In this case, the concrete should be as rock-free as possible.
Using an old net I found in the garage, I sifted out the rocks. An old window screen, wire mesh, or a plastic colander also works well. I highly recommend using gloves for this project because wet concrete has a very high alkalinity (high pH). Gloves will help prevent the possibility of chemical burns.
Container or crock
The container used to hold the nylons open is also important. It needs to be wide enough that you can get a good amount of concrete in it. At the same time, the mouth of the container cannot be too wide, otherwise, your nylon will not fit around it. It took some trial and error to find the perfect container around the farmhouse to use. I ended up using an old crock to hold my nylons. It worked beautifully! You can also use an old ice cream container or a small sand pail.

Twine
Easily found at home improvement or craft stores, simple household jute twine works perfectly to make these concrete pumpkins. When tying it around the pumpkins, add as many or as few creases in the pumpkins as you like. Below I have added a few tips and tricks that might be useful when tying the twine around the pumpkins you make.
DIY Concrete Pumpkins: Tips and Tricks
Tight, but not too tight
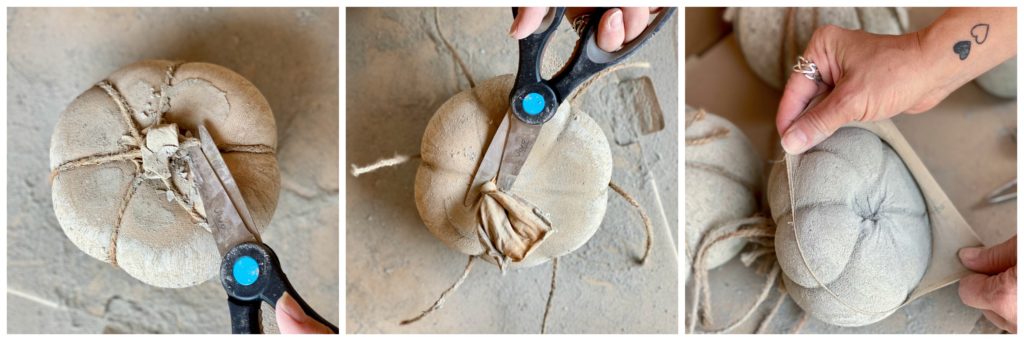
When tying up your concrete-filled nylons with twine to make the creases for the pumpkins, be sure that the twine strings are not tied too tight. If the twine disappears into the nylon and the concrete to the point it can’t be seen, the concrete will dry around it. The twine strings will end up being buried in the dry concrete and it will be very difficult to cut and pull them out.
Not too close to the Knot
Also, be careful not to tie the twine too close to the top knot in the nylon or over the top knot. This will also cause you trouble once your pumpkins are dry and you are ready to cut off the nylon and twine.
Bottom is best
Finally, take caution when cutting off the twine and nylon once the pumpkins are dry (after 24-48 hours). I started at the bottom. I cut the twine off first and removed it. Then, I cut the knot in the nylon off and slowly peeled it upward.
Smooth it out
If you notice a texture to the concrete from the nylon that you’re not happy with, sponge off your pumpkins with some water and use 220 grit sandpaper to smooth it out.
Let Your Creativity Run Wild
The best part of making these pumpkins is experimenting with their sizes and shapes. I was challenged by trying to make a taller pumpkin and some smaller ones.
Once all the DIY concrete pumpkins were dry and free from the twine and nylons, it was time for the fun part. It was time to decorate them. Walking around the farm, I searched for branches and other things in nature to make stems and curly vines to decorate my pumpkins. I also found some dried pumpkin stems from past pumpkins that I saved. They were perfect for decorating the pumpkins.
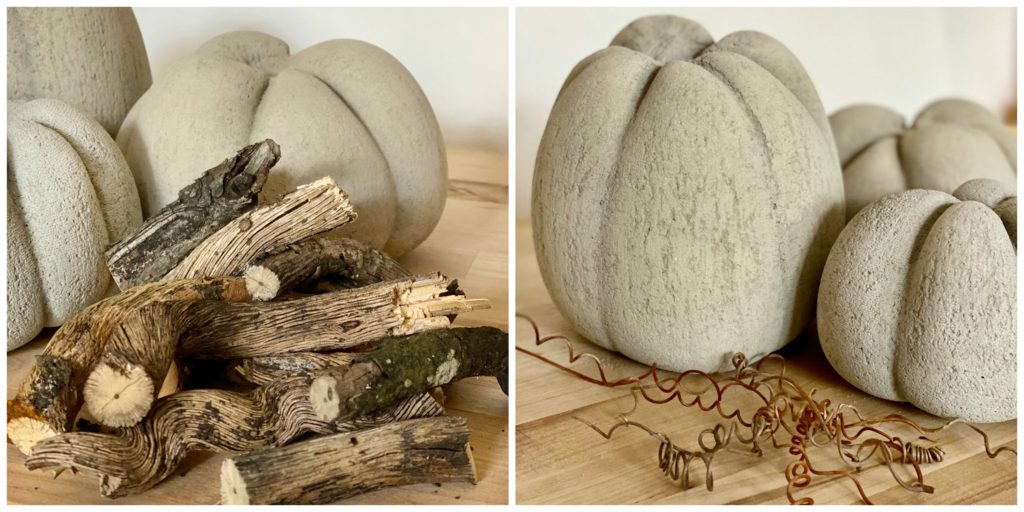
The fun of this DIY is making the concrete pumpkins as ornate or as simple as you choose. Enjoy decorating them. Adding faux flowers, berries, and leaves to these pumpkins is a beautiful idea too! Make them a reflection of you and your beautiful home.
DIY concrete pumpkins are a wonderful way to celebrate the arrival of Fall. They are a fun, easy, and inexpensive DIY that is great for all ages. Use concrete pumpkins inside and outside your home to celebrate and decorate for the season. Be careful though, once you start- you may find it hard to stop. Enjoy! Wet cement has a very high alkaline (high ph), so gloves are recommended to prevent the possibility of chemical burns.
DIY Concrete Pumpkins
Materials
Tools
Instructions
Notes


Can you tell me where you got that tray? It’s so pretty!
I’m always happy to share sources, Michelle. The tray is from Decor Steals. I’m so happy you like it!
I love how these pumpkins turned out!
Thank you so much Mercedes!
[…] may remember how much I loved making DIY concrete bowls in the summertime. Then, last Fall I was a DIY concrete pumpkin making machine. So, when images of concrete jack o’lanterns kept popping up on my Pinterest […]
[…] Concrete Pumpkins […]
[…] started a couple of summers ago when I made my first concrete bowls. After that summer, I made concrete pumpkins for Fall, followed by concrete Jack O’lanterns for Halloween. Just when you’d think I […]
[…] didn’t include pumpkins in my decorating… I most certainly did. They are in the subtle form of DIY concrete pumpkins. They aren’t orange, but they are the perfect way to start introducing fall feels on the […]
Can’t wait to get started on these pumpkins
Have fun, Pat!
love your stuff
Thank you, Coreen!