
DIY concrete eggs are so fun and easy to make. They are the perfect addition to your spring home decor. Use them to decorate inside or outside your home. Style these concrete eggs in a faux nest, use them for filler in a spring bowl or basket, or sprinkle them around a tray styled for spring.

This post contains some affiliate links for your convenience. Click here to read my full disclosure policy. As always, thank you for supporting my blog.
DIY Concrete Creations
It’s no secret that I love playing with concrete. My love affair with concrete projects started a couple of summers ago when I made my first concrete bowls. After that summer, I made concrete pumpkins for Fall, followed by concrete Jack O’lanterns for Halloween. Just when you’d think I had exhausted all concrete project ideas, in the new year, I made concrete heart planters for Valentine’s Day. It was then that I thought for sure I had exhausted all my concrete project ideas… Boy, I was wrong! As spring approached I realized I still had an idea left ruminating around my head. Concrete eggs!
As I always do when I think of an idea, I went straight to Pinterest. It’s my favorite place to confirm whether an idea is a good one or not. Pinterest is such a creative community! Sure enough, there were plenty of people who had tried making concrete eggs. Most of them used plastic Easter eggs as their mold. Makes sense. However, what I noticed was that most of the concrete eggs that I was seeing had seams where the egg halves come together. I wasn’t crazy about the look. If I was going to make concrete eggs, I wanted them to be seamless. The question was, how do I achieve that?

That’s when it hit me. Use real eggshells! I know what you’re thinking- “Meeghan, how are you going to make DIY concrete eggs with real eggs?!” Thank you for asking… By taking out the egg yolk and egg white from the eggshells and making them hollow. I promise it’s easier than you may think.
What you need to make DIY Concrete Eggs
- Eggs
- Egg carton
- Straight pin
- Bamboo skewer
- Bowl
- Fast-setting concrete mix
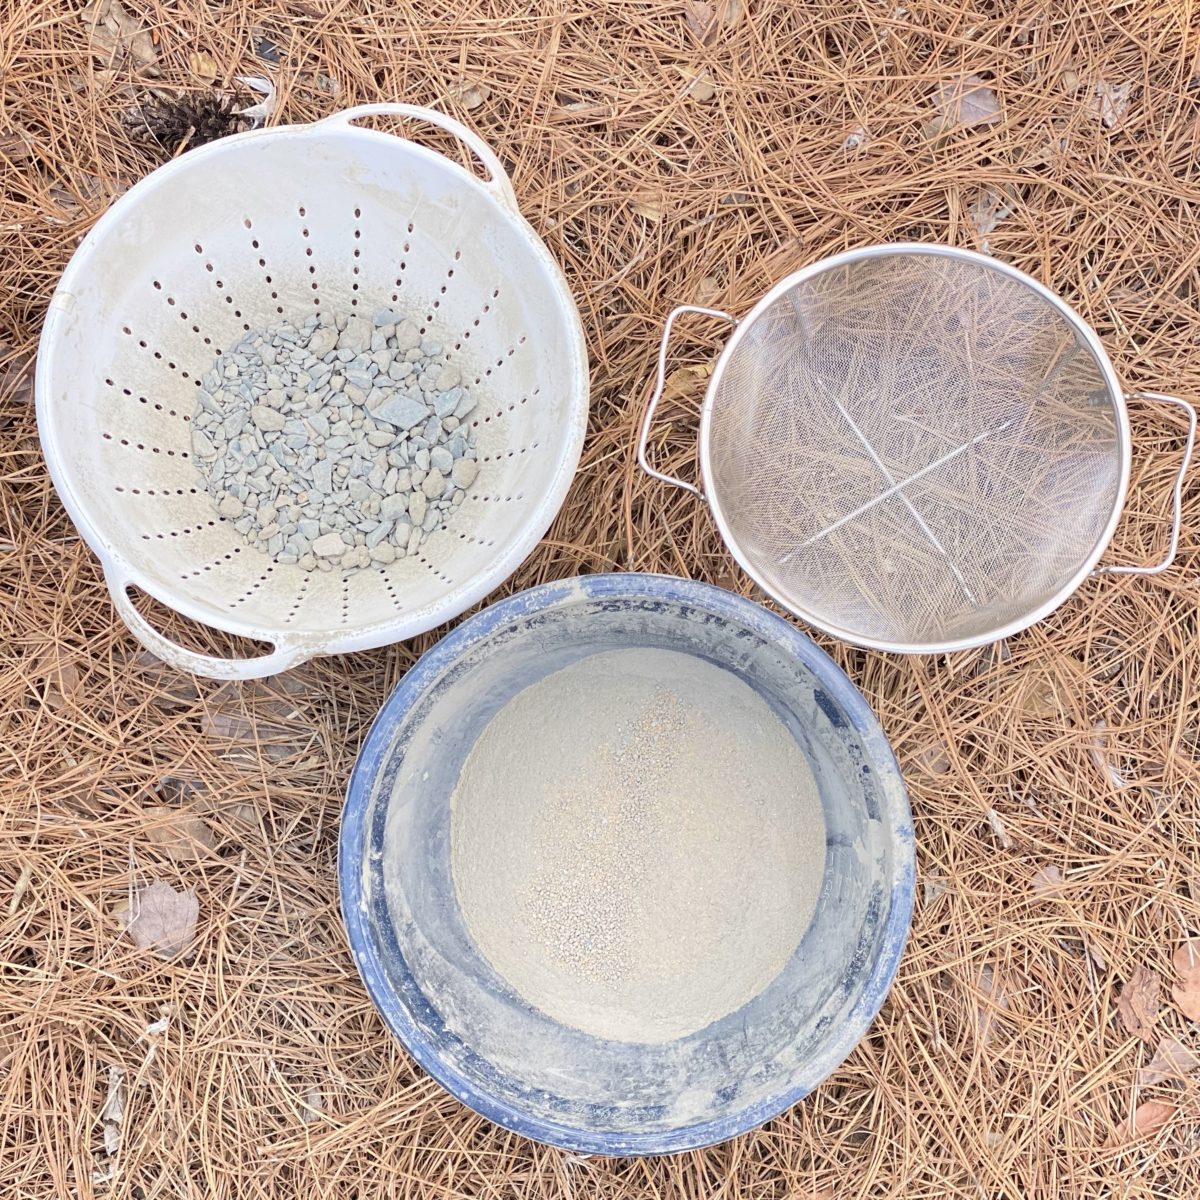
- Sifters (Helpful to remove large pieces of gravel in the concrete. First, I used a plastic colander I found at Walmart for under $1, and then I used a finer mesh sifter to get out more of the smaller rocks that the colander didn’t catch.)
- Water
- Plastic gloves (Recommended as wet cement has a very high alkaline (high ph), so gloves are recommended to prevent the possibility of chemical burns.)
- Mask for nose and mouth (Recommended)
- Spoon
- Small funnel
- Tweezer (optional)
How to Make DIY Concrete Eggs
Prepare the Eggs
Create a Hole
Using a straight pin, gently poke holes in one end of the egg creating a circle made with pinholes.
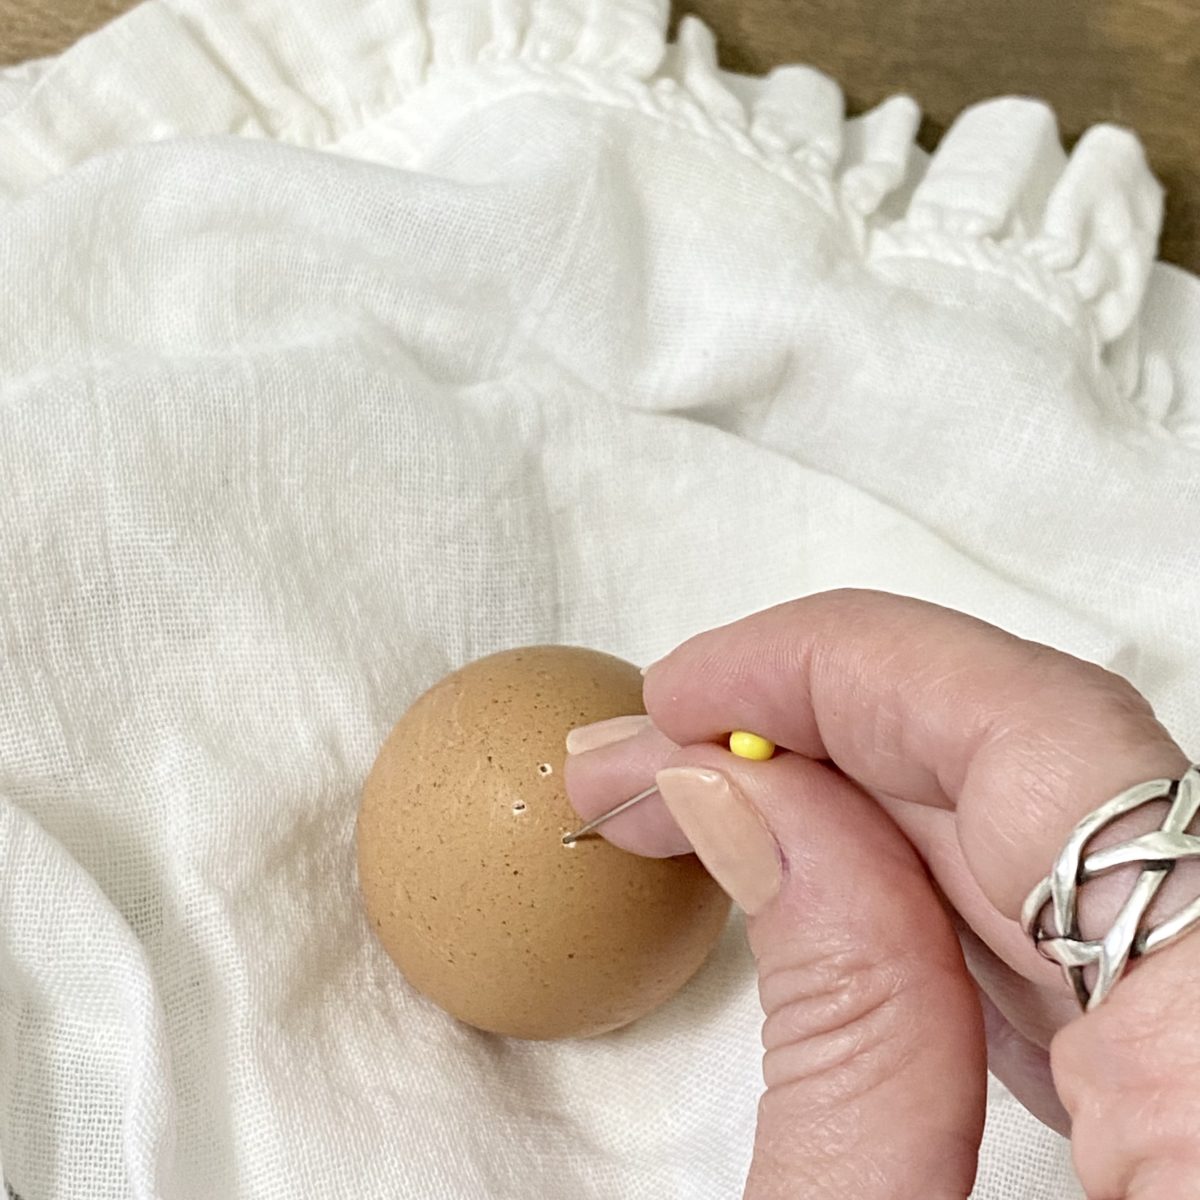
Carefully, continue to poke pin-sized holes in the shape of a circle until a small hole is made in the egg. Peel back the circular piece of the eggshell.
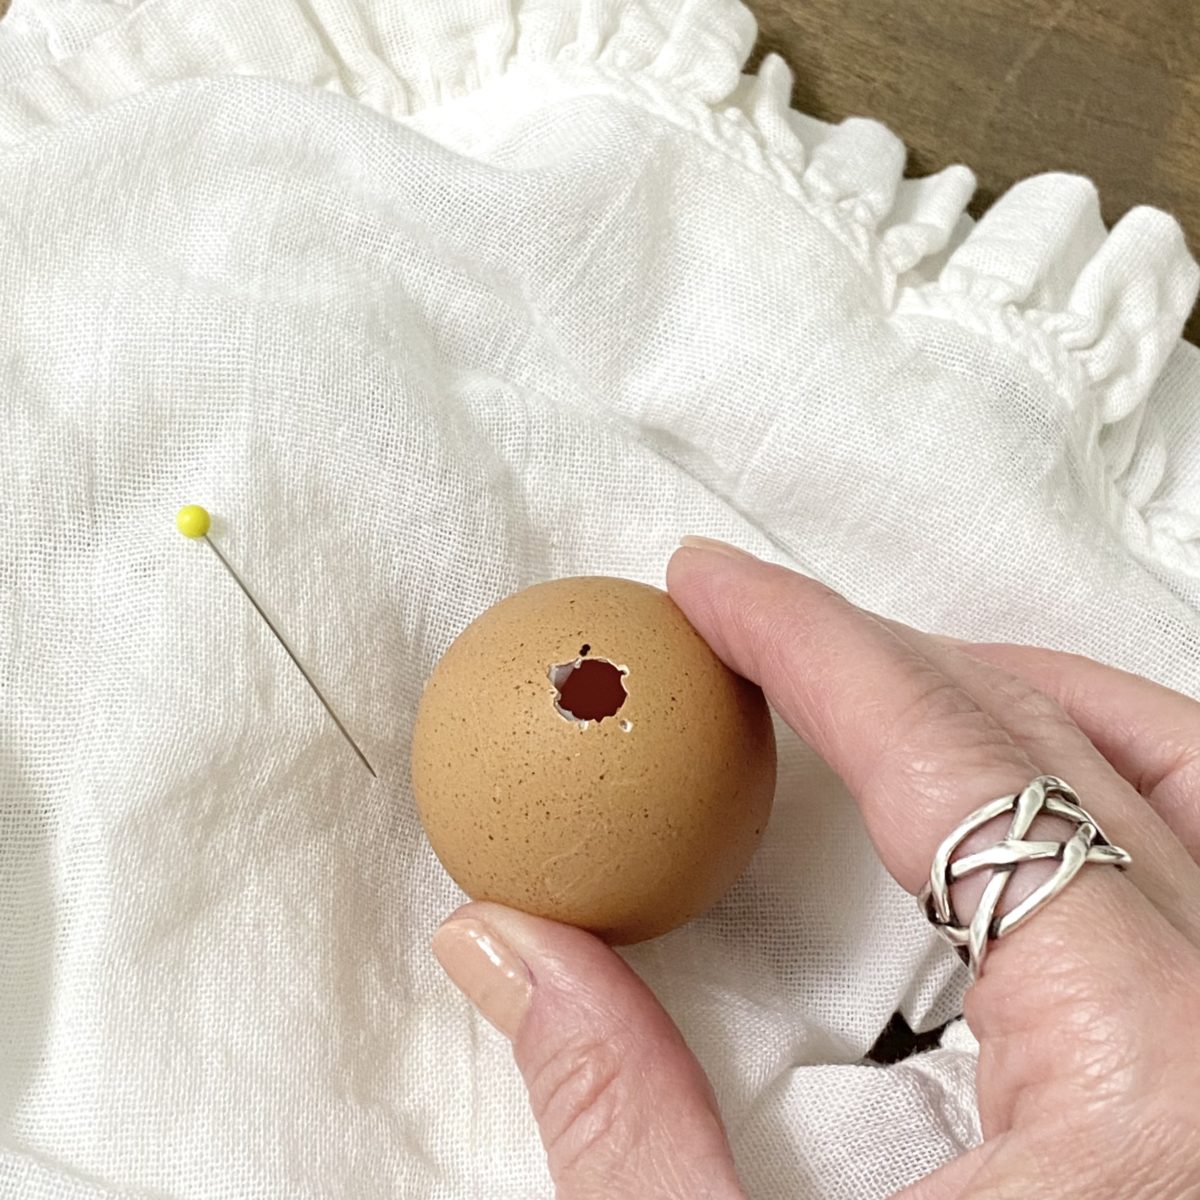
Be sure that the hole in the eggshell is big enough for the tip of the small funnel to fit into.
Hollow out the Egg
Once the hole is large enough for the funnel to fit, use the bamboo skewer to help coax the egg white and yolk from inside the egg out into a bowl. It helps to carefully insert the pointy end of the skewer into the egg to break the yolk by swirling it around inside the egg. After the yolk is broken, gently poke the skewer in and out of the egg. At this time, you will see egg white and yolk draining out of the egg, down the skewer, and into the bowl below it. (Consider this a very drawn-out way to scramble your eggs for the morning!)

Once all the egg yolk and white are out of the eggshell, carefully filled it up with water from the kitchen sink using a stream of water that fits into the hole. Then, pour the water out of the eggshell.
After each egg was hollowed and cleaned out, place the eggshells hole-side down in a bowl lined with paper towels to allow them to continue to drain and dry out. Mine sat in the bowl overnight.
Mix the Concrete
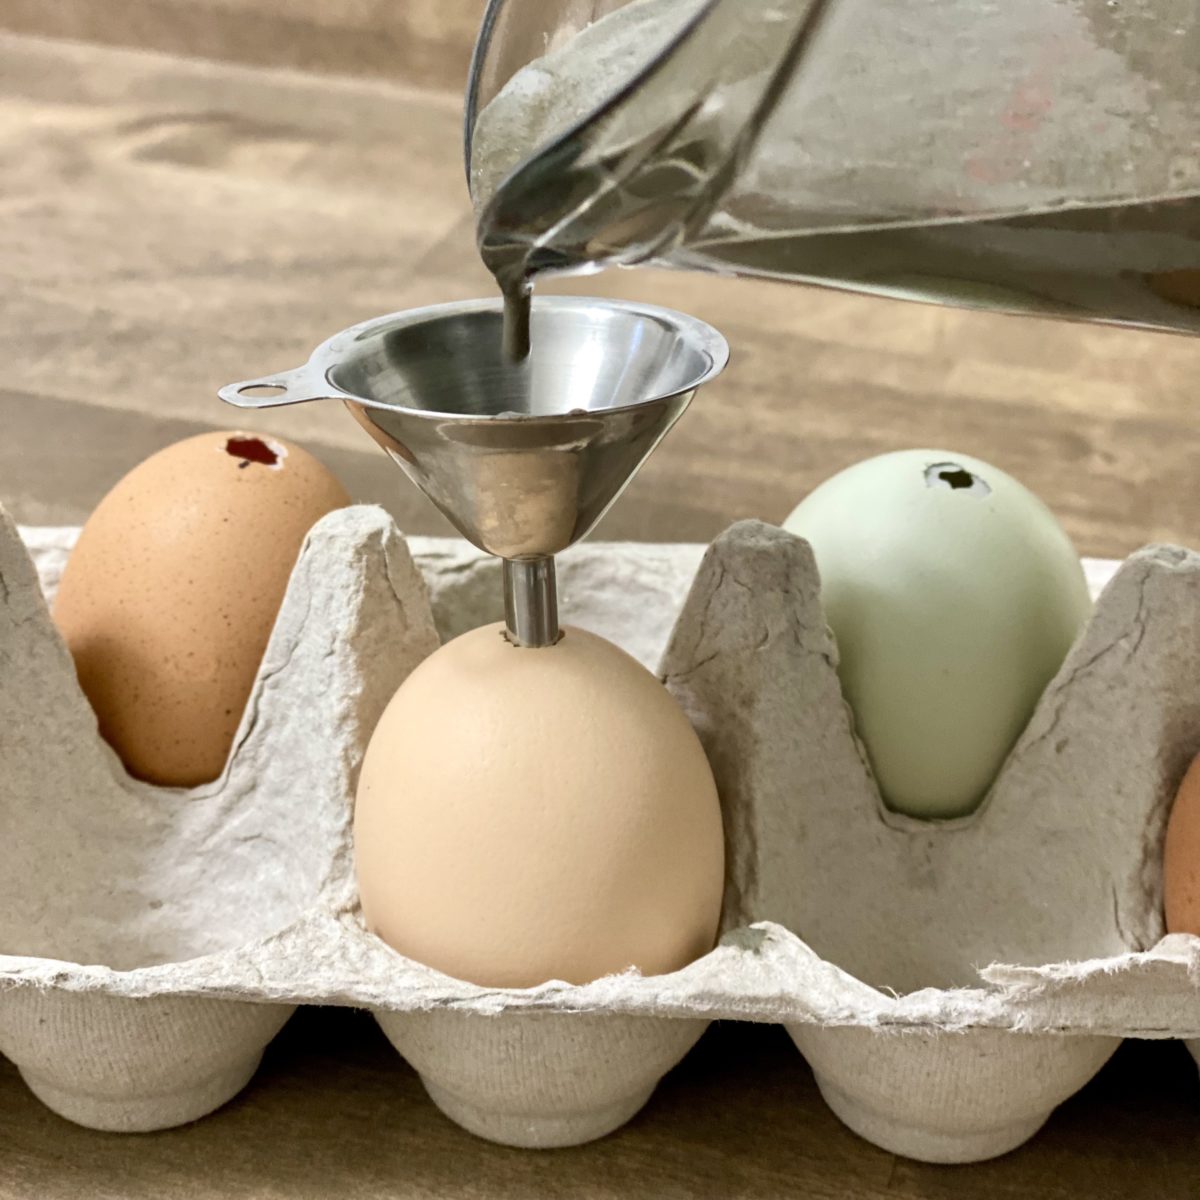
Once you are ready to mix the concrete, be sure you have all your supplies ready. Gather your plastic gloves and mask. Place the hollowed-out eggshells in the egg carton, hole-side up. Once the concrete is inside the eggshells, the egg carton is handy to hold the eggs still while it sets and dries in them. Have the small funnel ready too.
Sifting
First, as in past concrete projects, sifting the concrete is highly recommended. For the eggs, I actually sifted the concrete twice. Once I sifted it using my tried and true plastic colander from Walmart. The colander eliminated the larger rocks in the concrete. However, because the eggs are small, I wanted to make sure the concrete was as fine as possible. Therefore, after the colander sifting, I sifted the concrete a second time using a finer wire mesh strainer. This double sifting method made the concrete for the eggs very fine and the result was great in the end.
Mixing
Now that the concrete is sifted, it’s time to mix up the concrete. Unlike past concrete projects when a bucket has been used to mix the concrete, for the DIY concrete eggs using a small bowl is better. I used an old 2-cup Pyrex glass liquid measuring cup. The built-in spout was very helpful for this project.
Make the concrete in small batches. Again, remember the eggs are small and the concrete dries rather quickly. I used about a cup of concrete at a time which filled about two eggs. When adding the water to the concrete, you want the consistency to be similar to pudding or slightly less thick. It needs to be able to run through the funnel, at the same time, you don’t want the concrete to be too watery, or else it will take forever to set and dry.
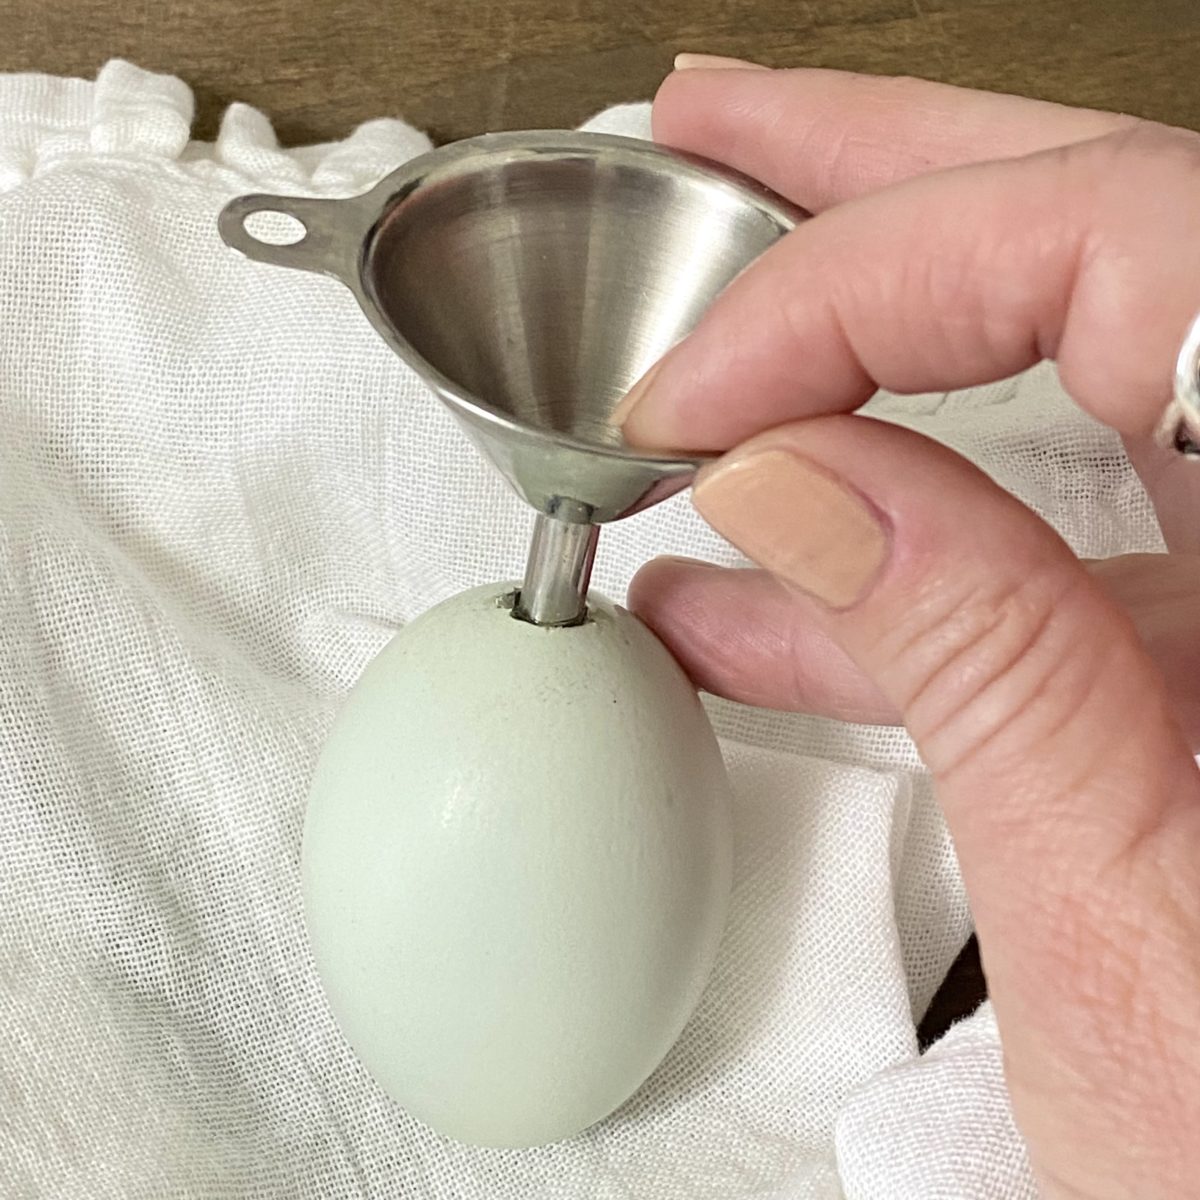
Pour the Concrete into the Eggshells
Gently place the funnel in the hole of the eggshell and slowly begin pouring the concrete into it. Allow the concrete to run through the funnel and into the eggshell before adding more. sometimes I needed to help it along with my finger. Continue to pour the concrete in until it comes up to the hole. Carefully tap the egg to release any air bubbles trapped inside. Then, place the eggshell with the concrete in it in the egg carton while the concrete sets and dries.
Continue using the same method for each eggshell. Once the concrete has been poured into each eggshell, check to make sure it comes as close to reaching the top of the egg hole as possible. If you don’t see concrete through the hole, add more. The concrete tends to settle as it sits allowing for more room for concrete. Filling the eggshells completely will make for more realistic-looking concrete eggs.
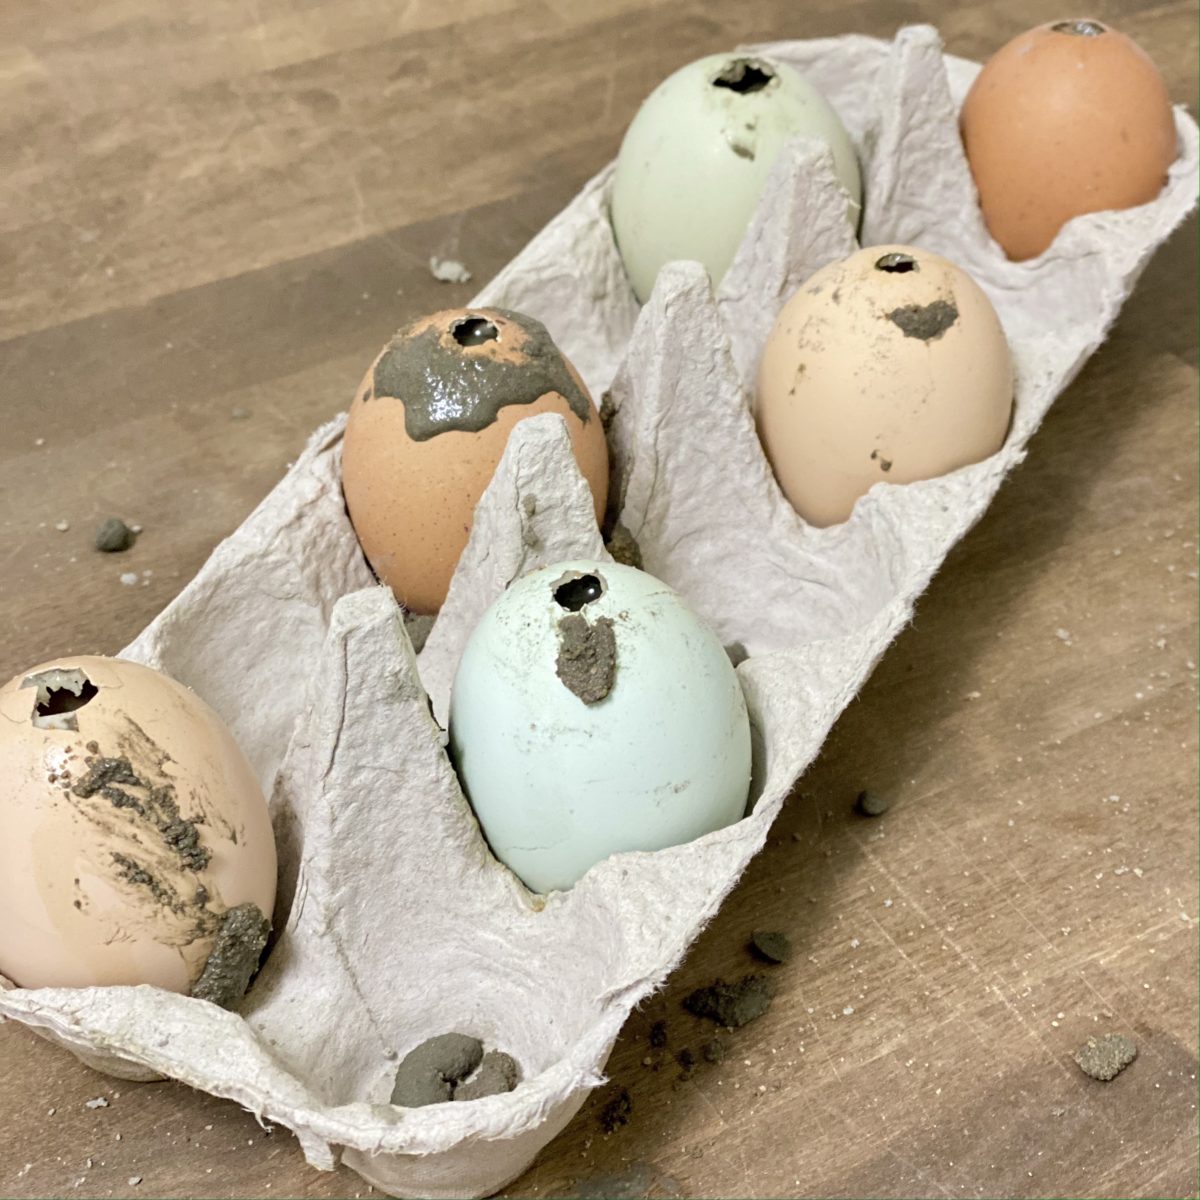
Set, Dry, and Peel
Finally, allow the concrete eggs to set and dry in the eggshells completely. I placed mine on a sunny windowsill and let them cure for about 24 hours in the carton.
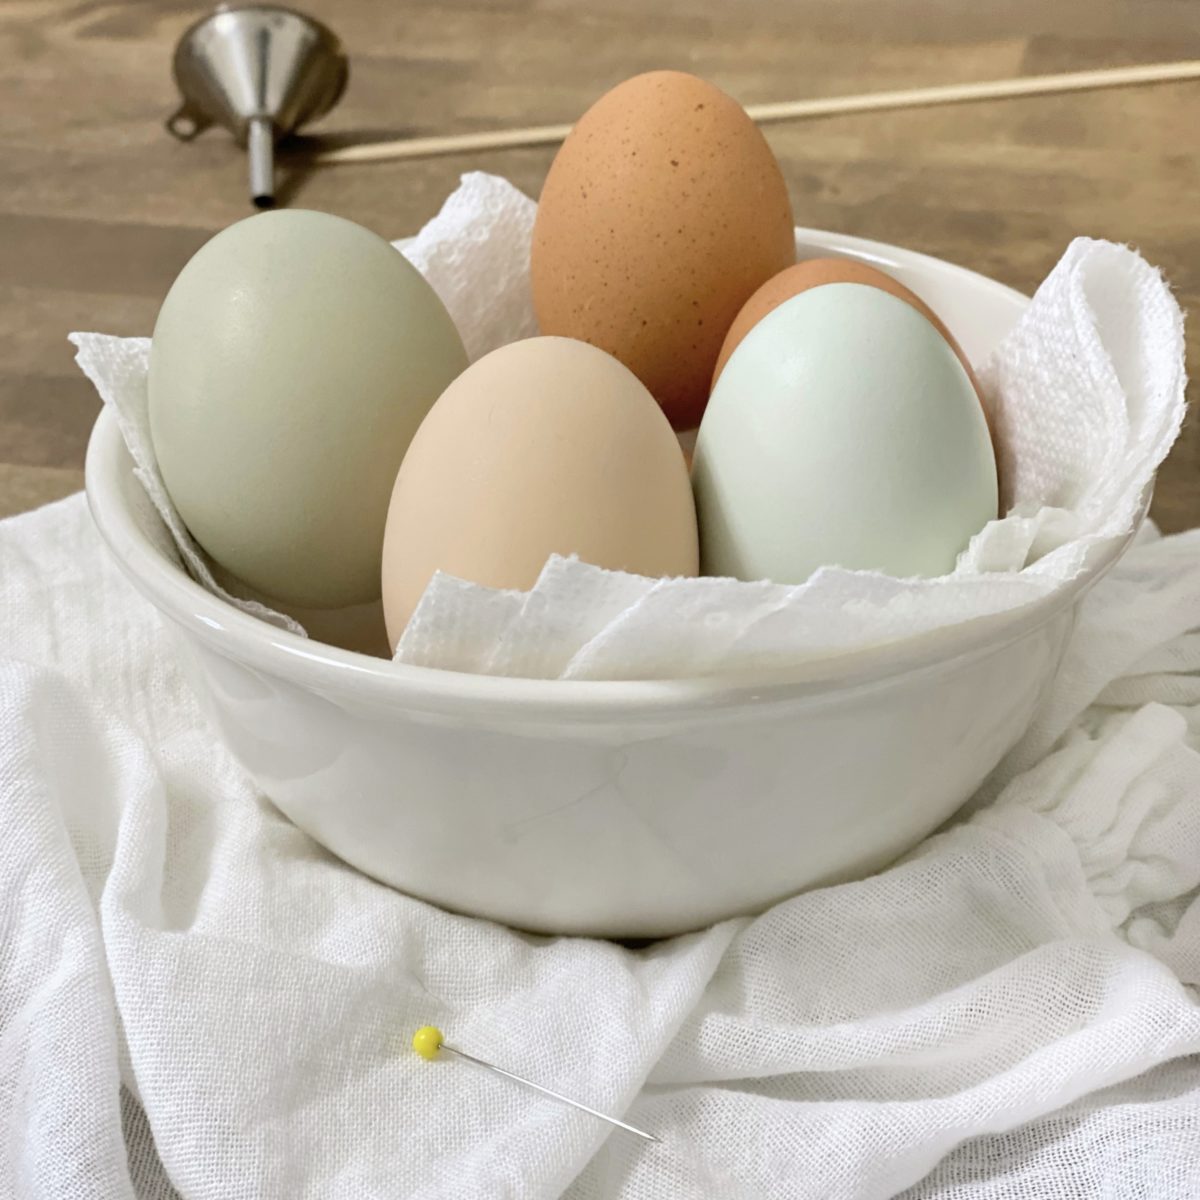
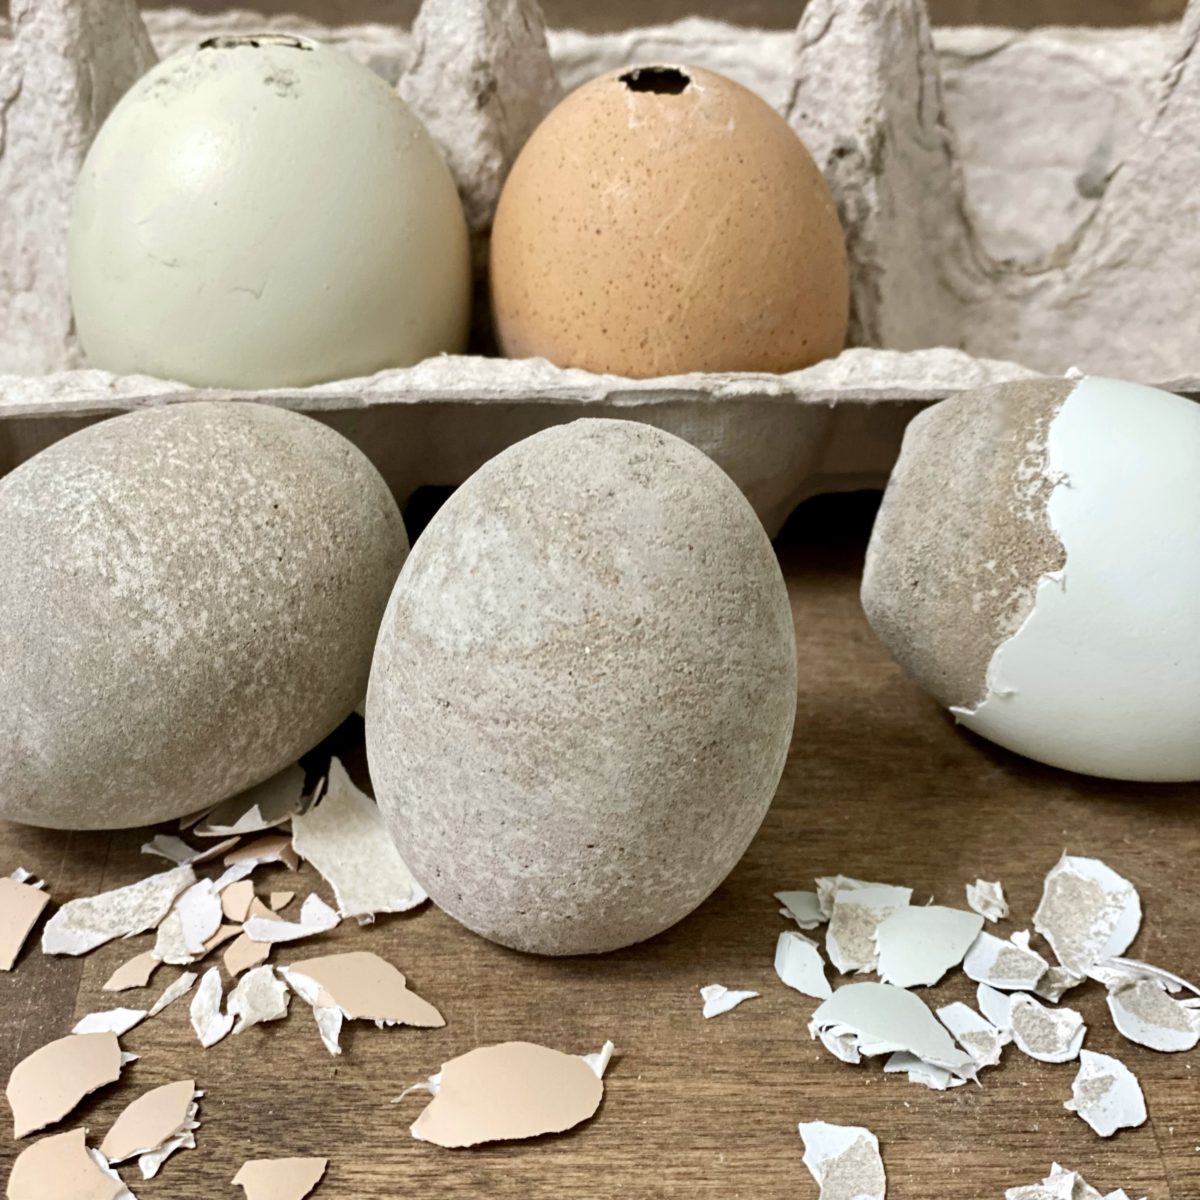
Once the eggs are fully set and dry, peel off the eggshell. A tweezer can be handy for this (it will also help save your fingernails).
Styling DIY Concrete Eggs
Voila! Your seamless DIY concrete eggs are now ready to style. I styled a few of mine in a vintage-inspired glass candy dish that I filled with moss and grapevines to make a nest for the concrete eggs to sit in. It became part of the centerpiece for a simple spring tablescape outside by the pond. Everyone loved it!

I also styled a few in a basket that I used on a tray in the living room. Guess what else? The concrete eggs look great stlyed in one of the smaller concrete bowls I made when I tried my very first concrete project. I’m loving sprinkling these adorable eggs inside and outside the farmhouse!
No matter how you style your concrete eggs this spring, I hope you have as much fun making them as I did. As always, thanks for joining me.
Pin this idea for later!


